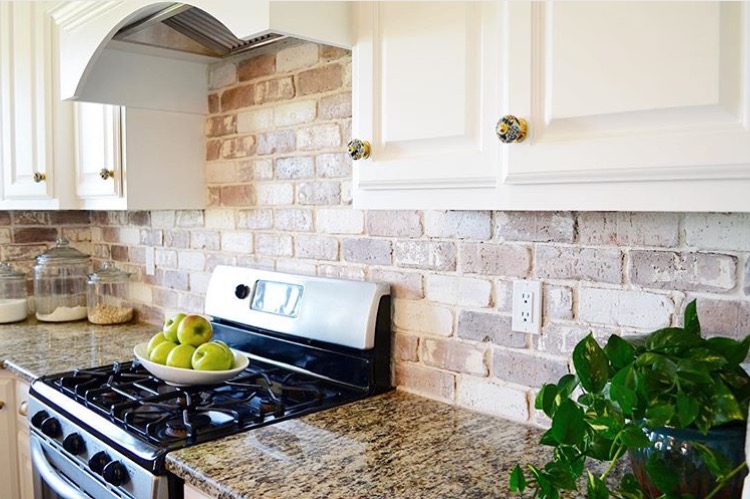
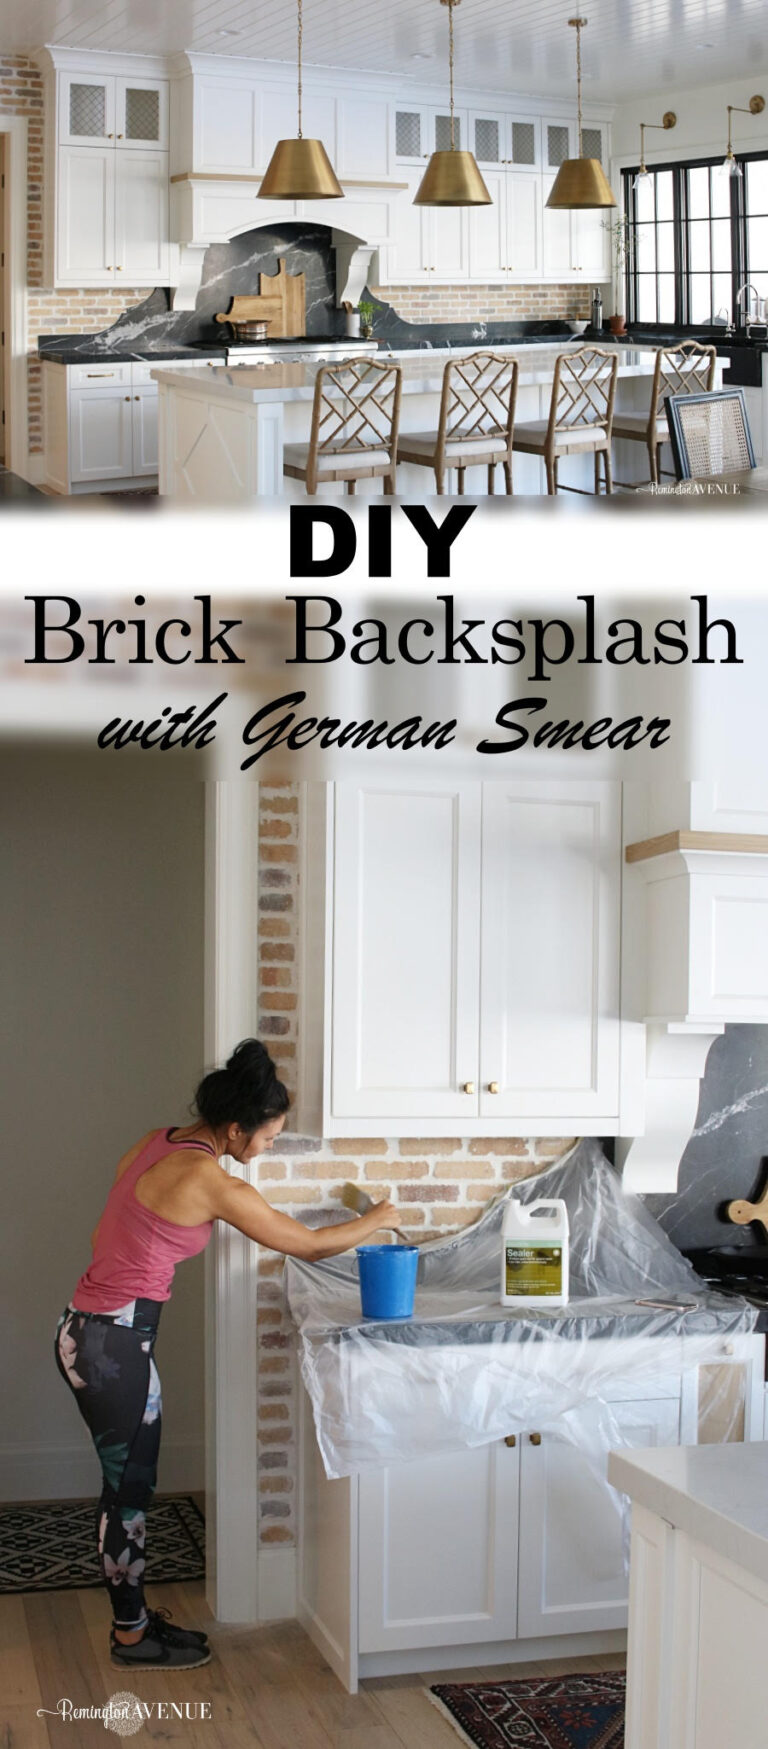
I’ve always loved old brick. It’s so charming with its chippy white history. When it came time to do my kitchen backsplash I knew I had to have that look. Only problem was there wasn’t an ounce of brick on my house or hiding behind some drywall. So I came up with a solution. Introducing the Do It Yourself Brick Veneer Backsplash!
Starting from the beginning, I special ordered the veneers through Home Depot. The actual bricks are made by Rocky Mountain Stone and the color option you see here is Alamitos. Total cost for 50 sft was $216. In addition to the cost of the veneers I spent approx. $100 on Premixed grout, adhesive, and other supplies.
Shop the Look
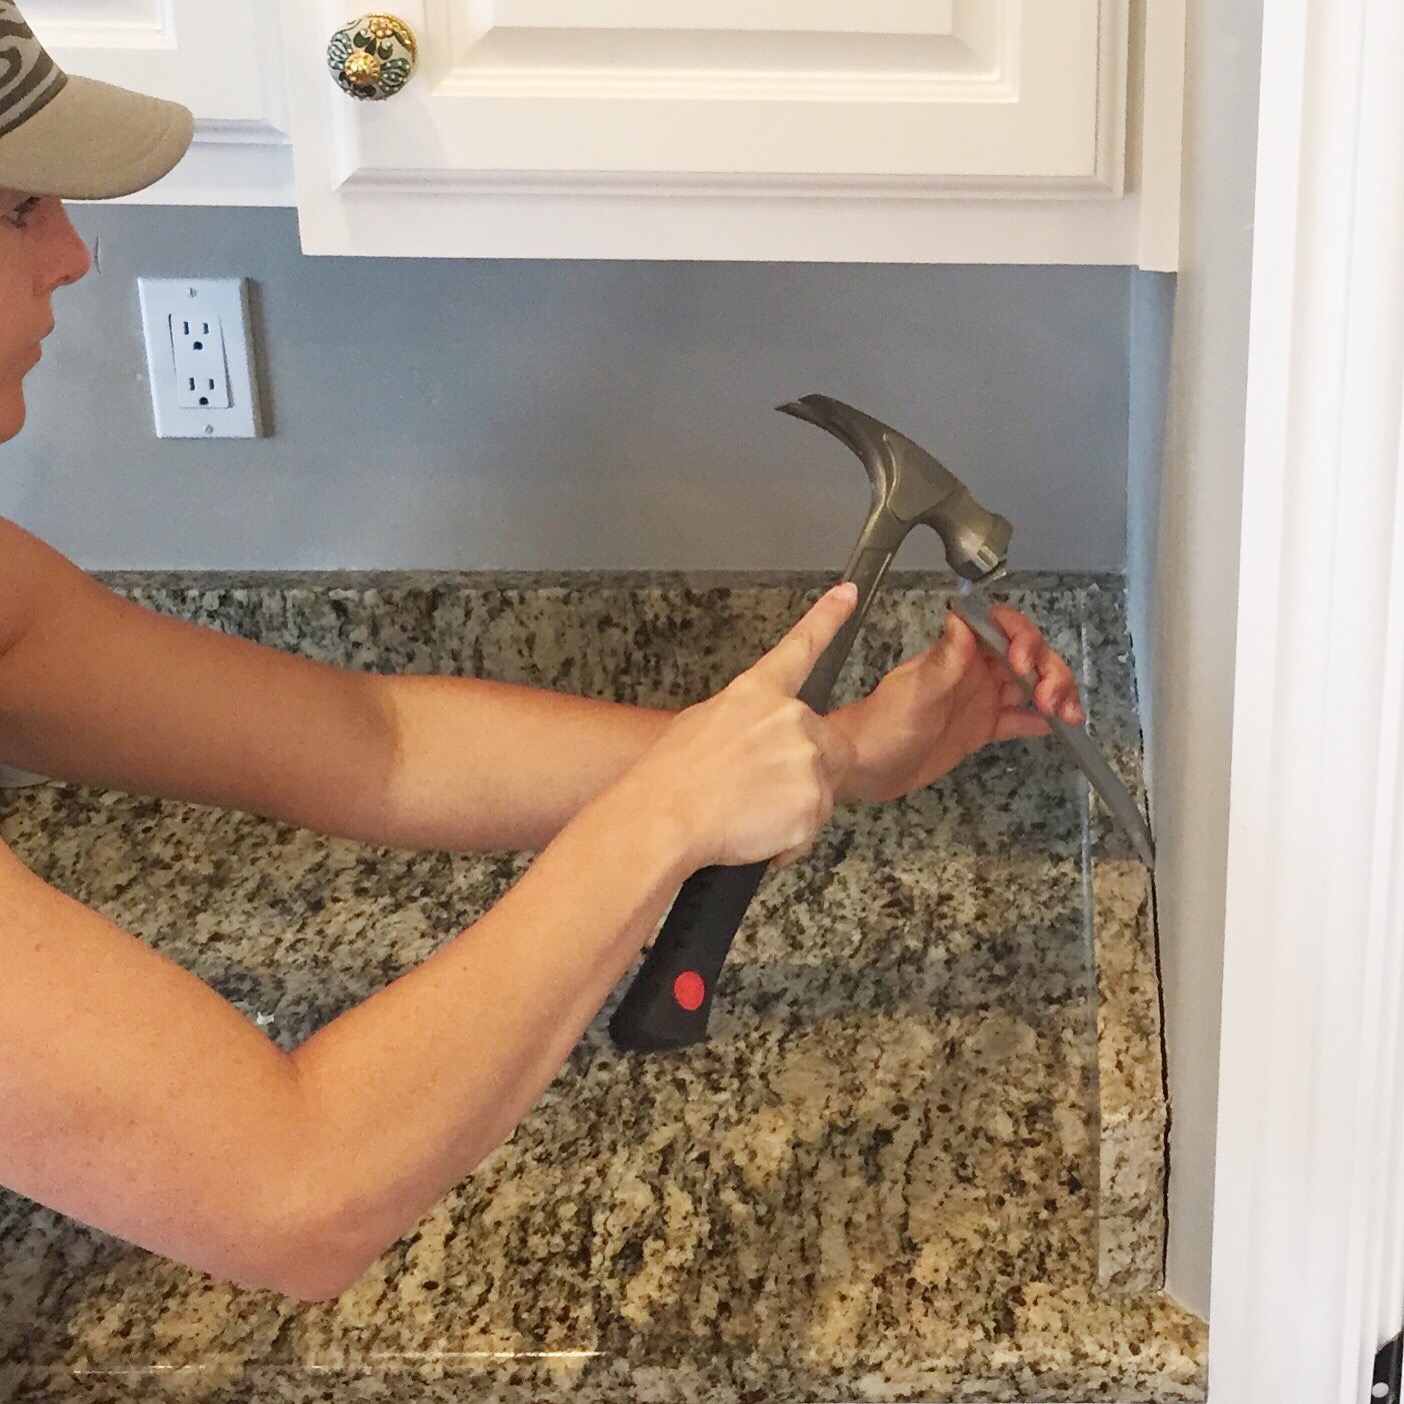
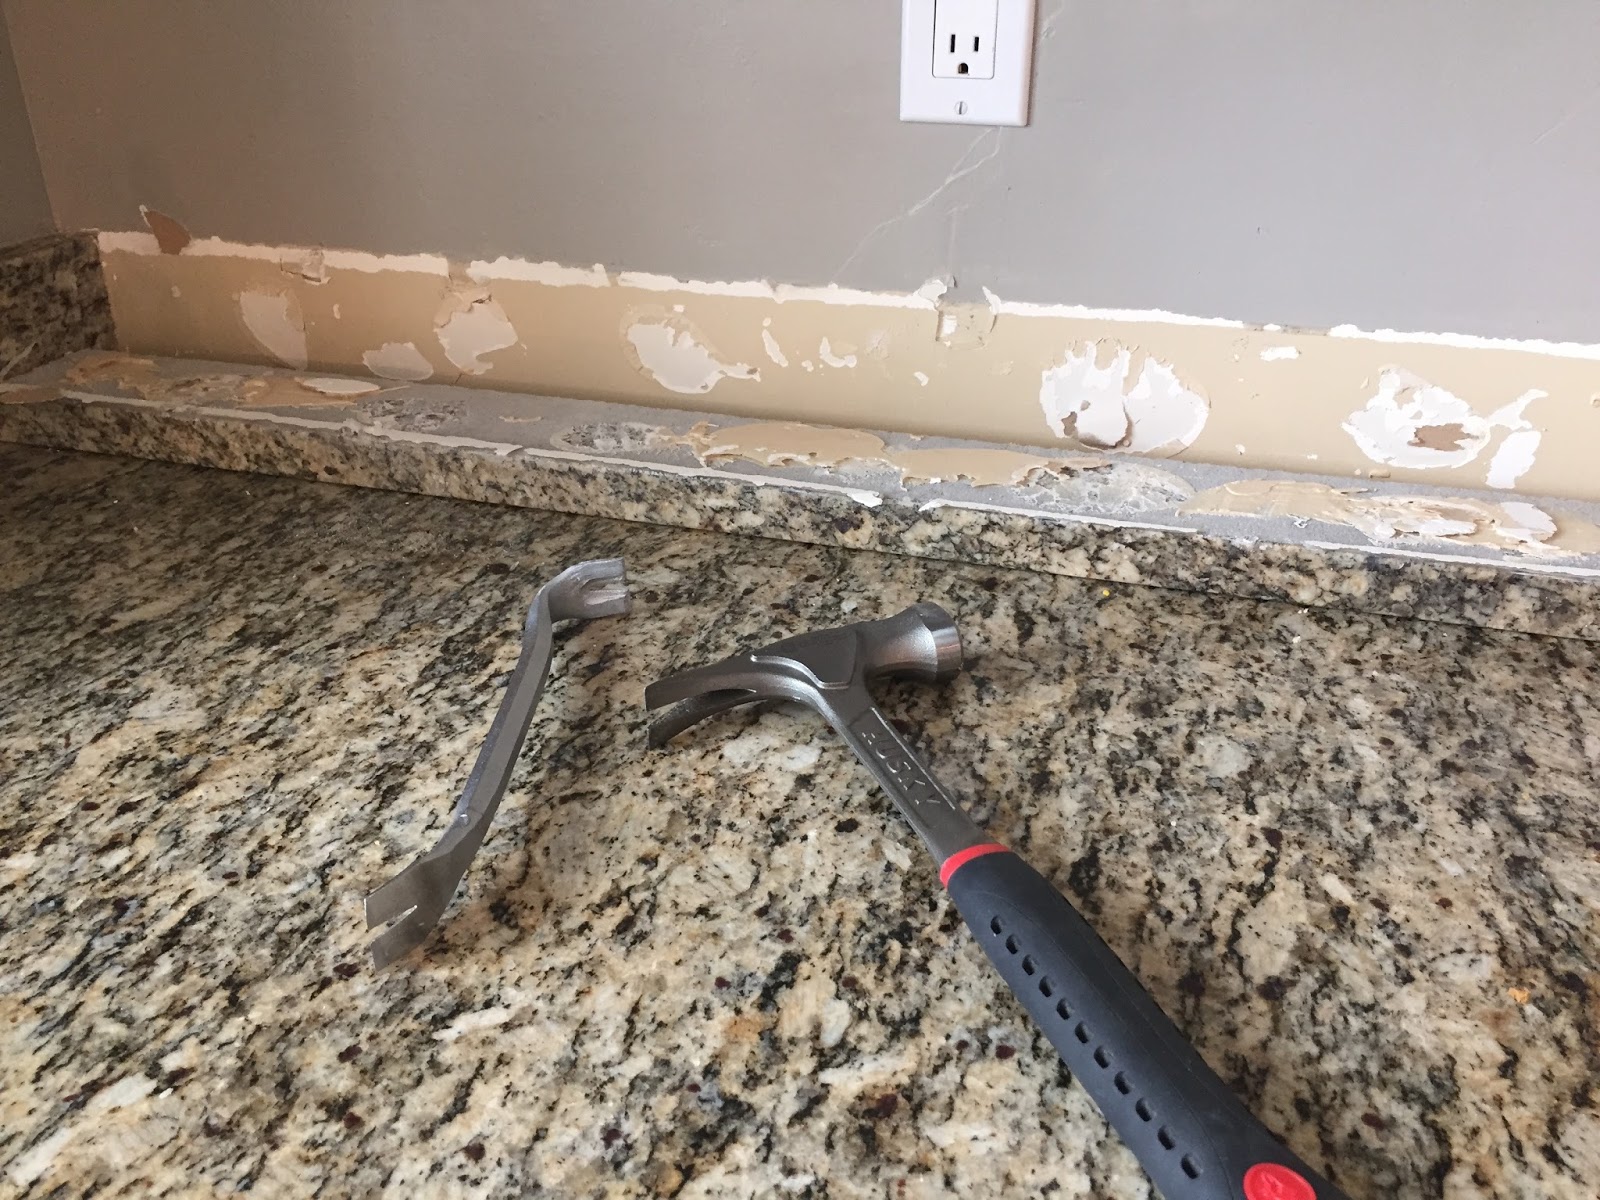
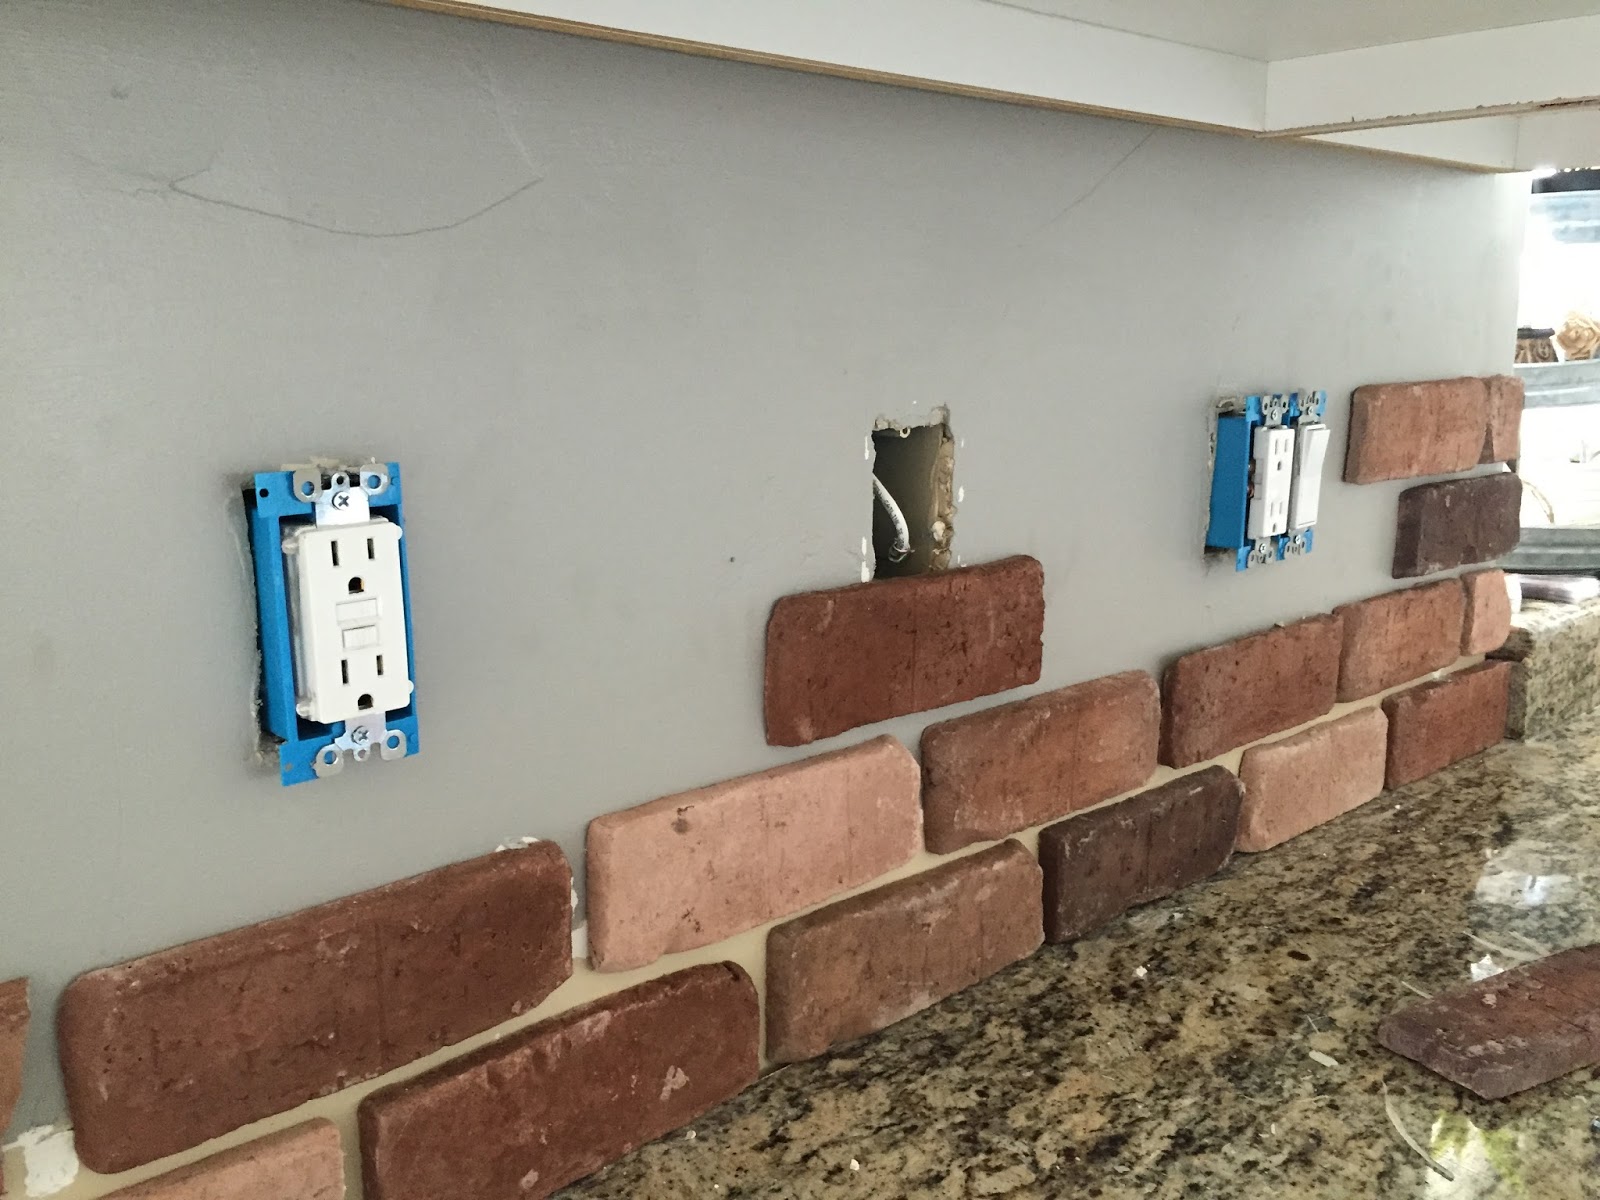
First step for me was removing the granite backsplash throughout the kitchen. There is no hard fast rule that says you need to do this, but I personally think it looks better. It was also the easiest step so no harm no foul right! Using a hammer and mini crowbar I managed to remove the granite with no real damage to the wall. Even if you make a few holes along the way its no big deal because its going to get covered right up anyway!
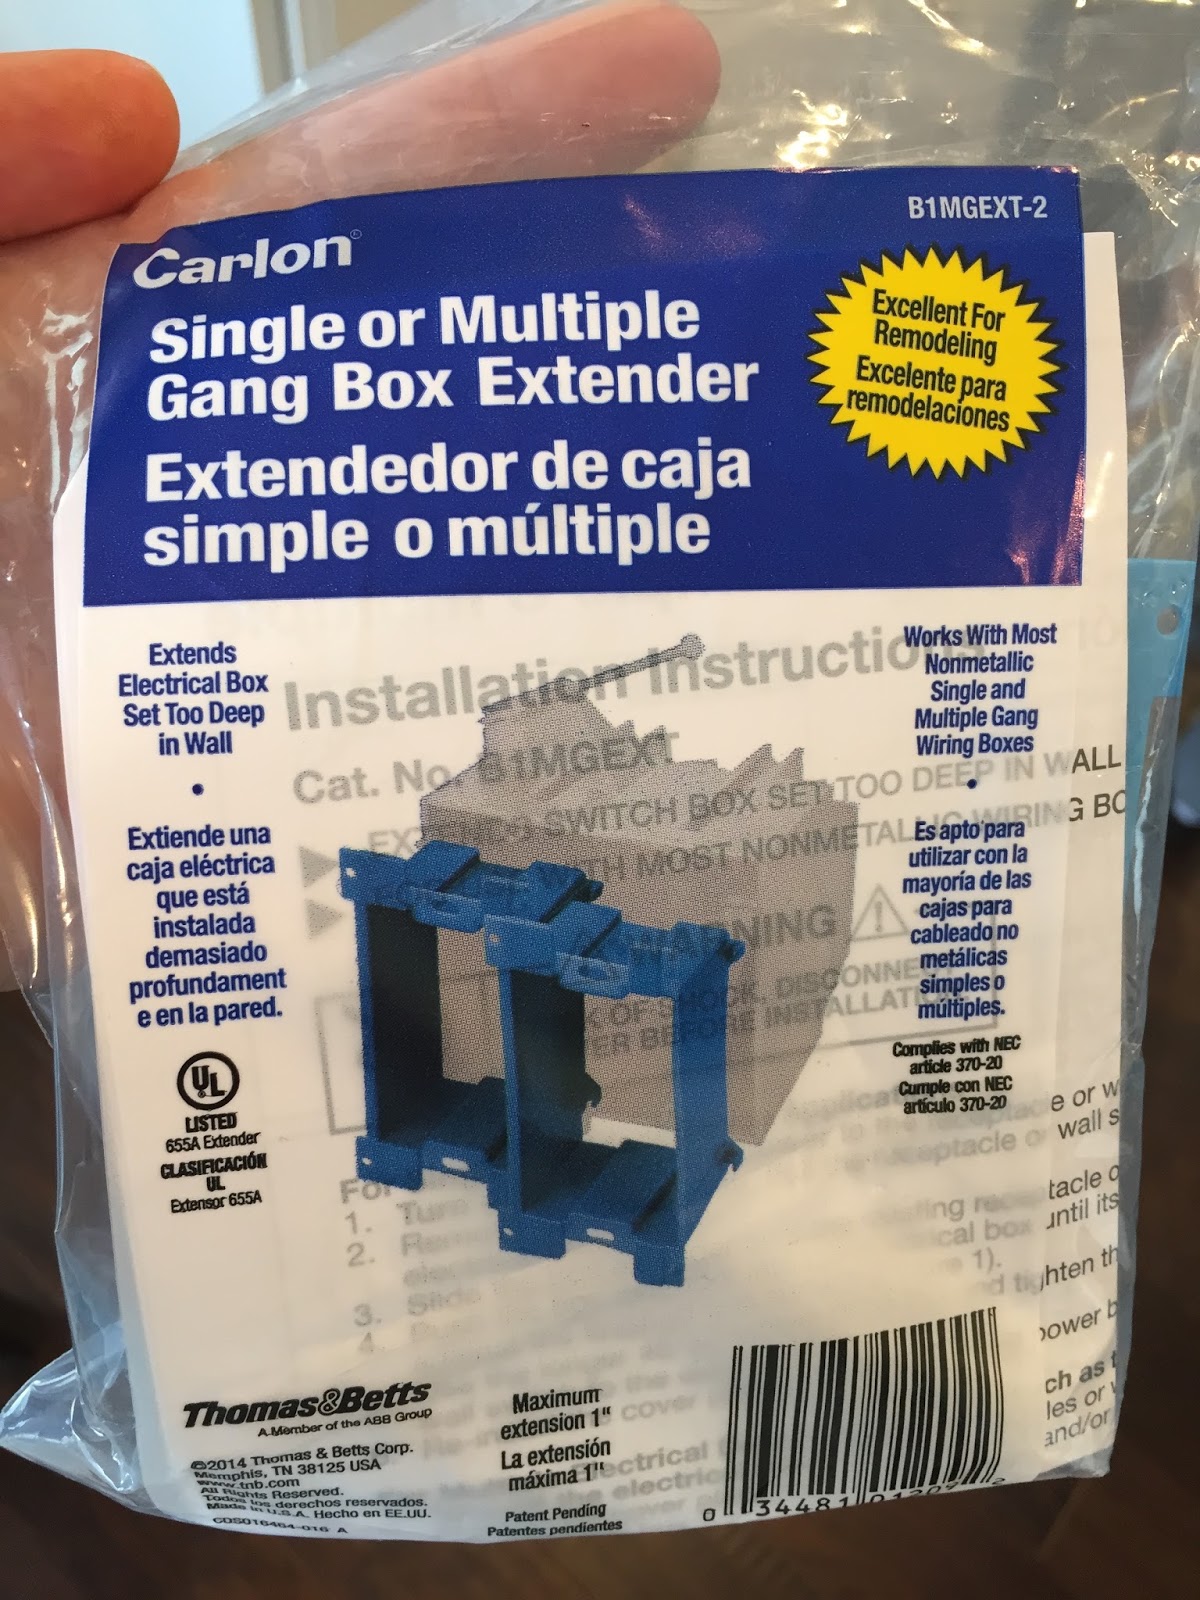
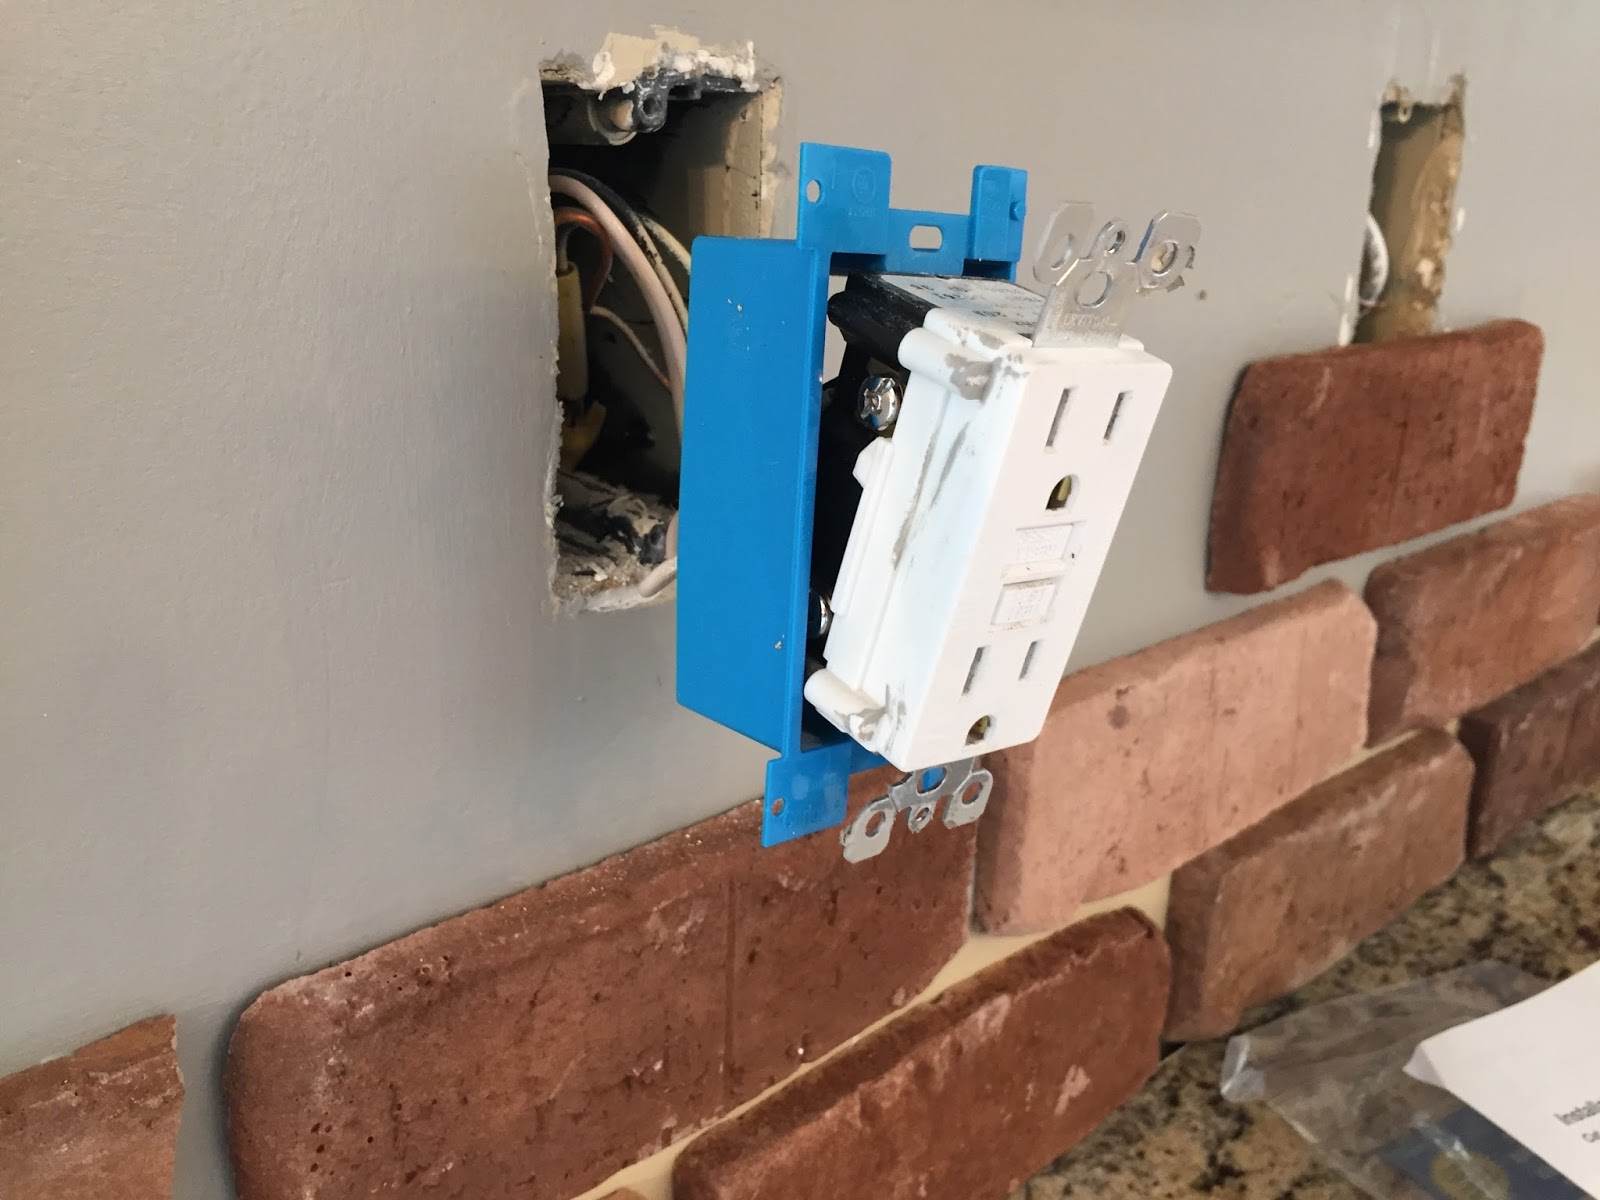
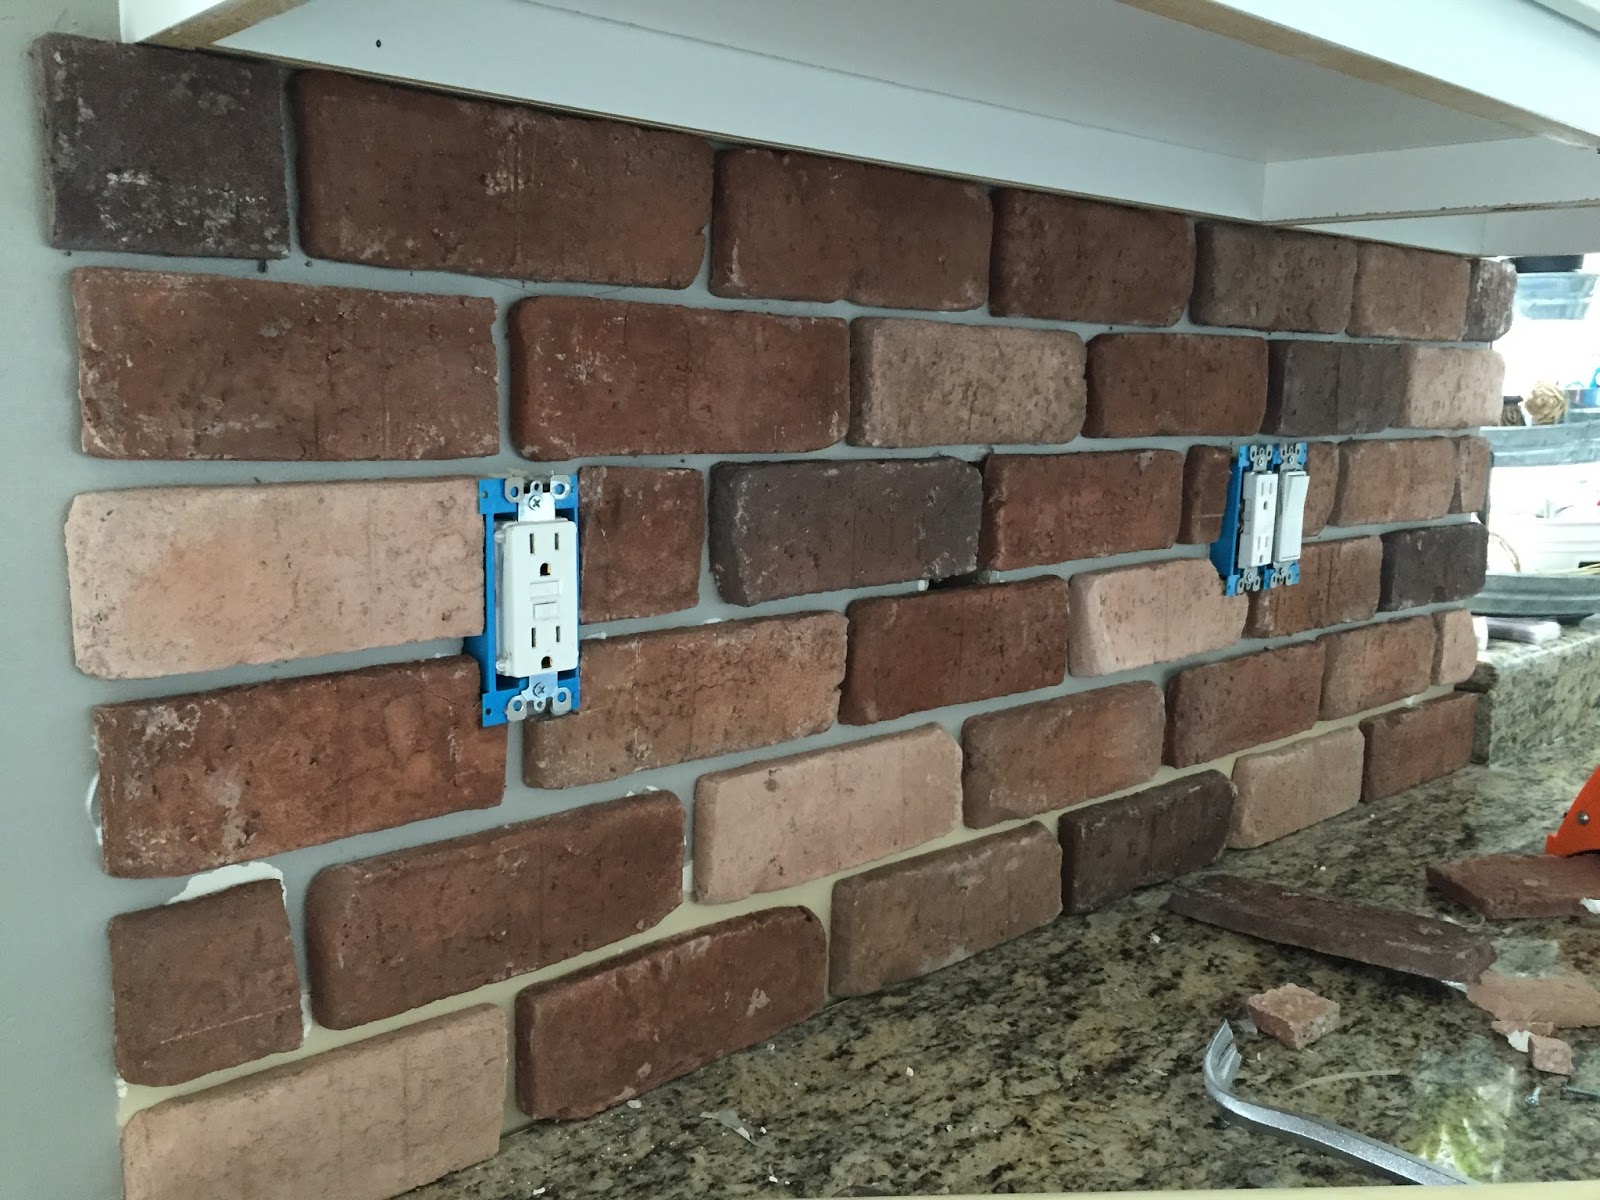
Next, I removed all the electrical plates and put them aside. Because the veneers are about 1/4 – 1/2 inch thick I had to add extenders to the outlets. You can buy them Here. Just follow the instructions on the back of packaging. Anytime I do anything with electrical wires I get a bit nervous, but this was pretty simple. Make sure to switch the breaker off for all the outlets! I did get a good shock on the first one because I forgot…ouch!
Shop The Supplies
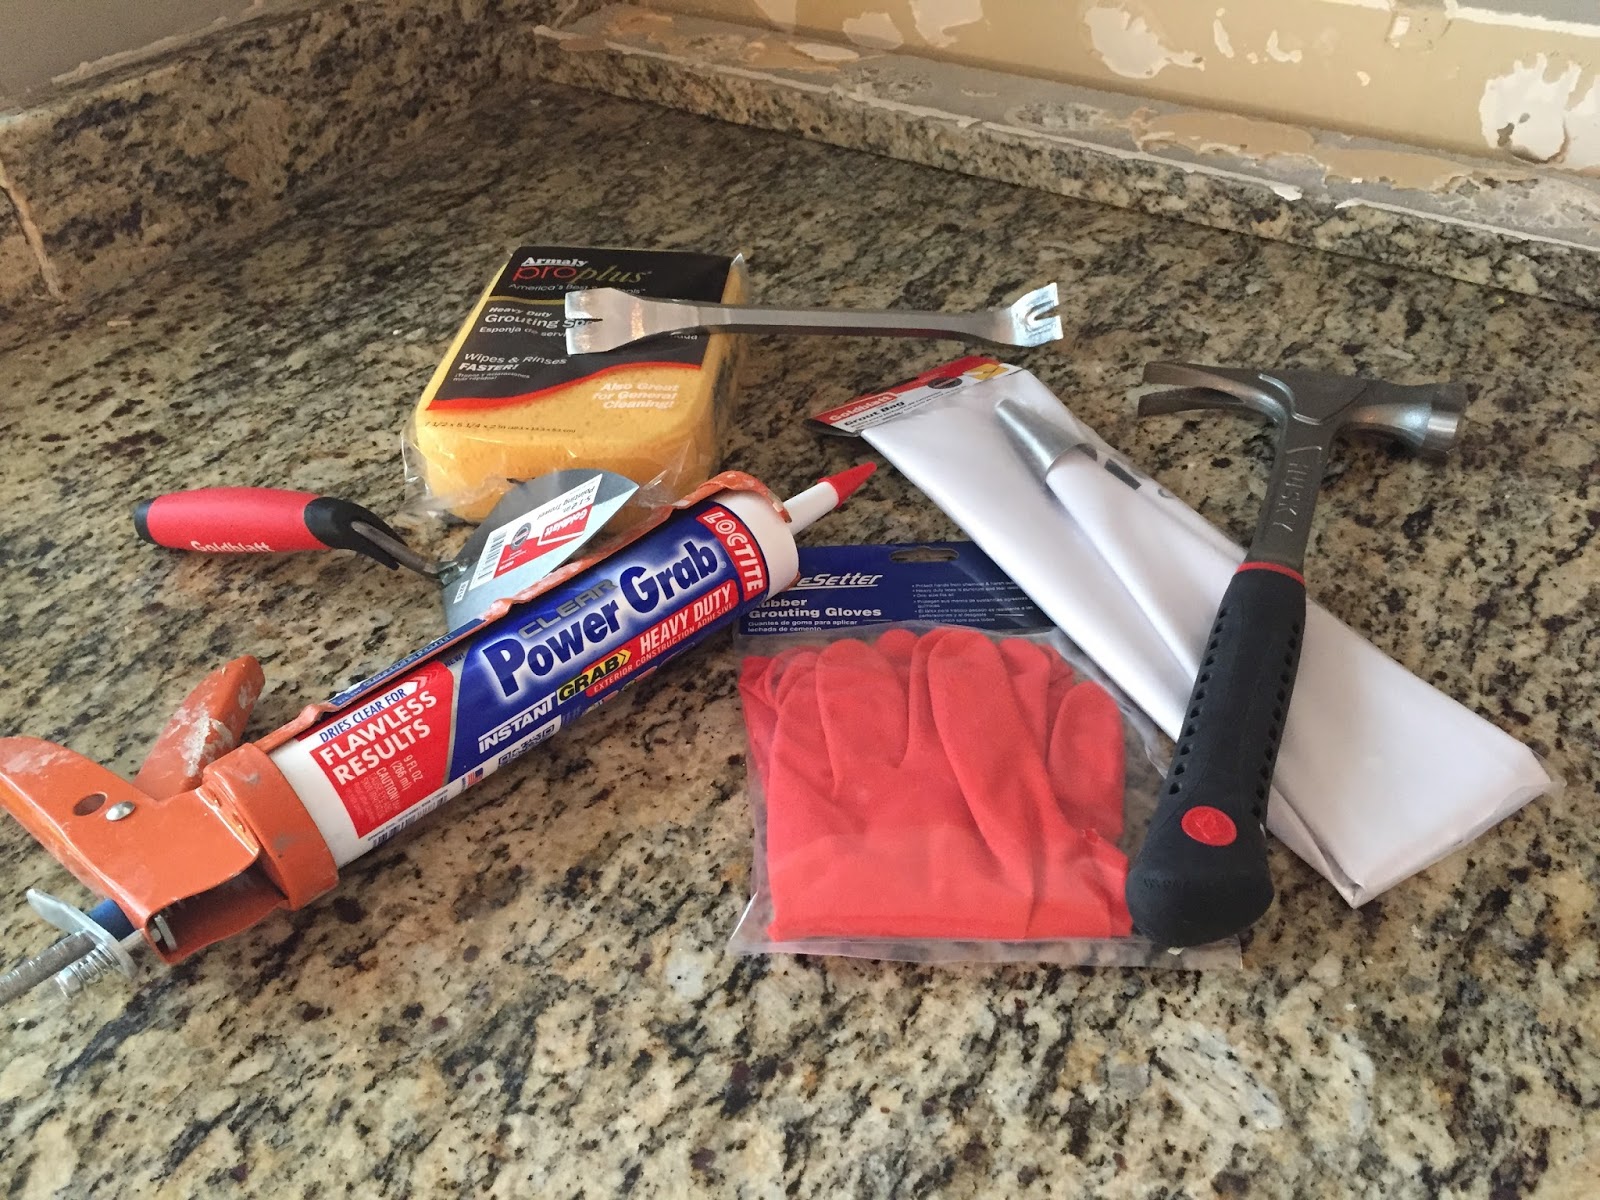
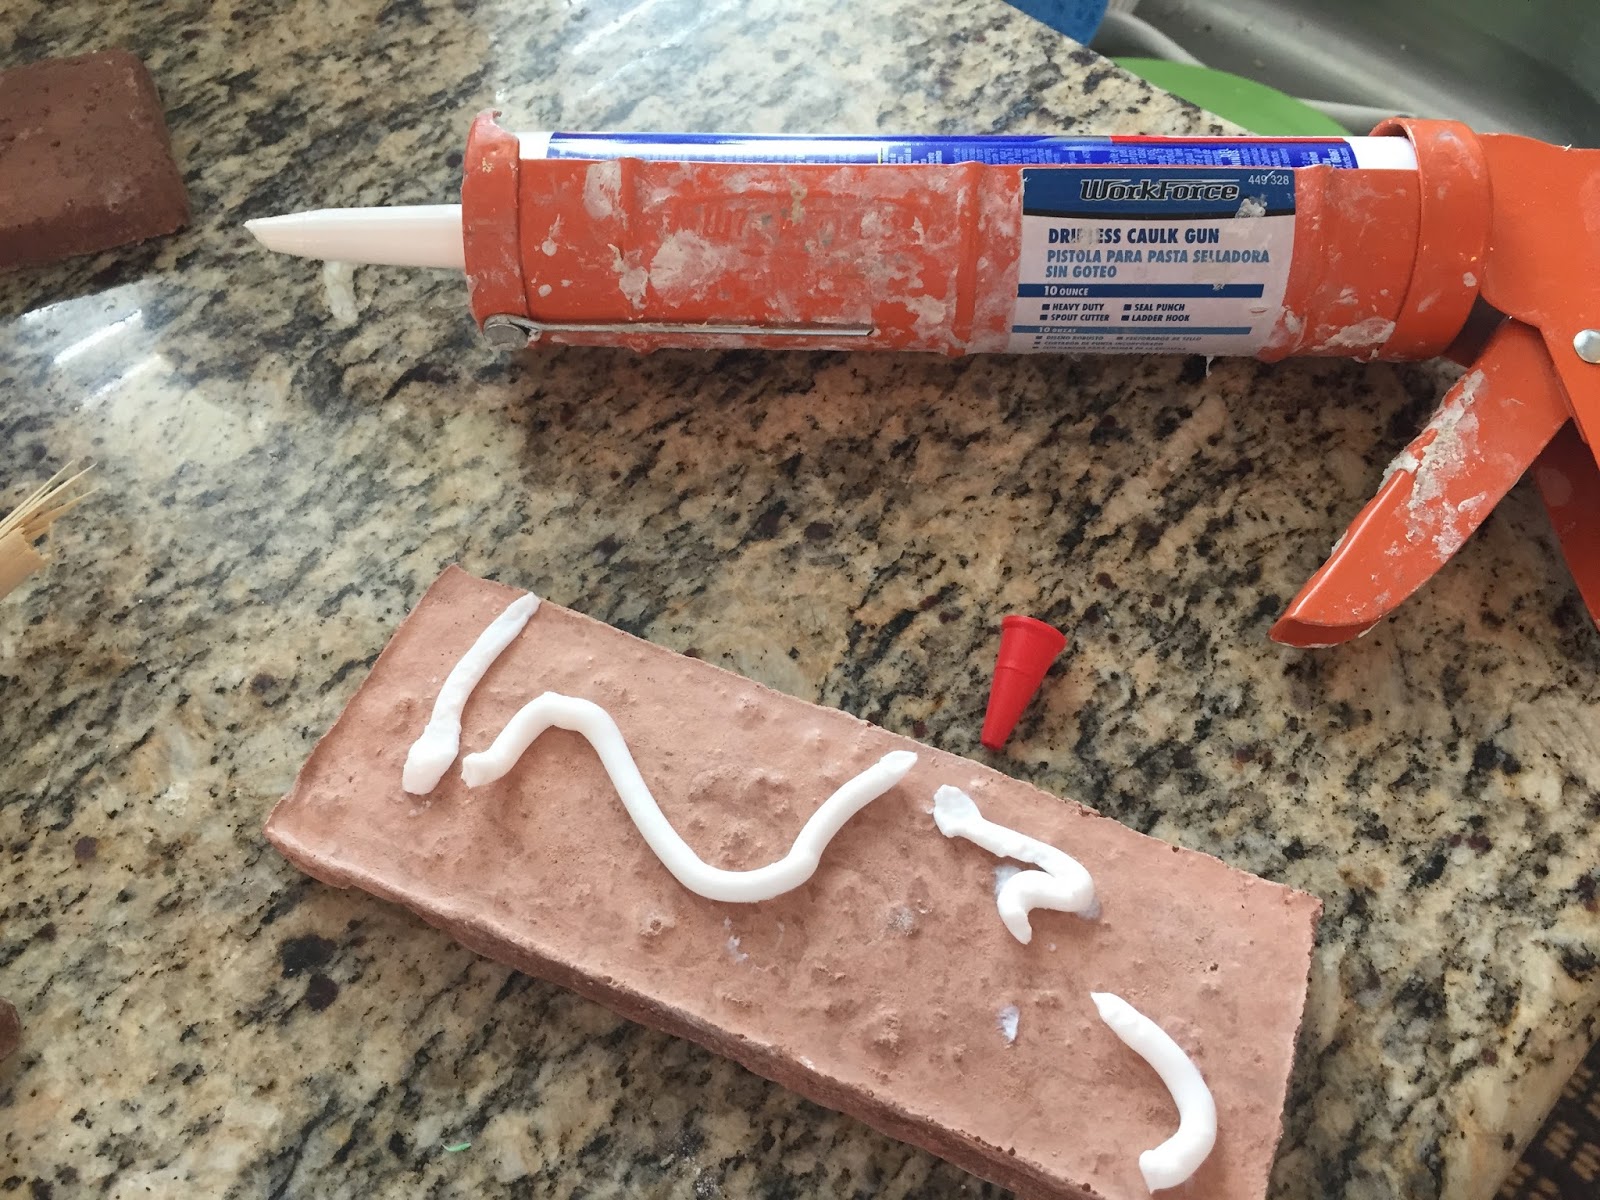
You can see I already started adhering the brick veneers before I realized I would need the extenders. Thats whats great about blog tutorials, someone else works out all the kinks for you right! So using my Locktite Power Grab adhesive, I simply glued the back of the veneers to the wall. Starting at the bottom, leaving no space between the granite and first row of veneers, I adhered them about a 1/2 inch apart on sides and top. The veneers are not perfect, so your spacing doest have to be exact either. The imperfections only add the rustic nature of brick wall. also, make sure to stagger the bricks lining them up so the center of the brick is just above the gap in the row lower. I am not sponsored by Locktite so believe me when I say, Use this brand!Specifically the Power Grab! Its the only one that bonds as soon as you place it on the wall. It will save you so much time. Otherwise you will be standing there for 5 min per brick holding it while it adheres. It takes about 30 min to totally dry so there is still time to make adjustments while they are on the wall. I used all the tools you see here except the trowel (more on that later).
Shop The Supplies
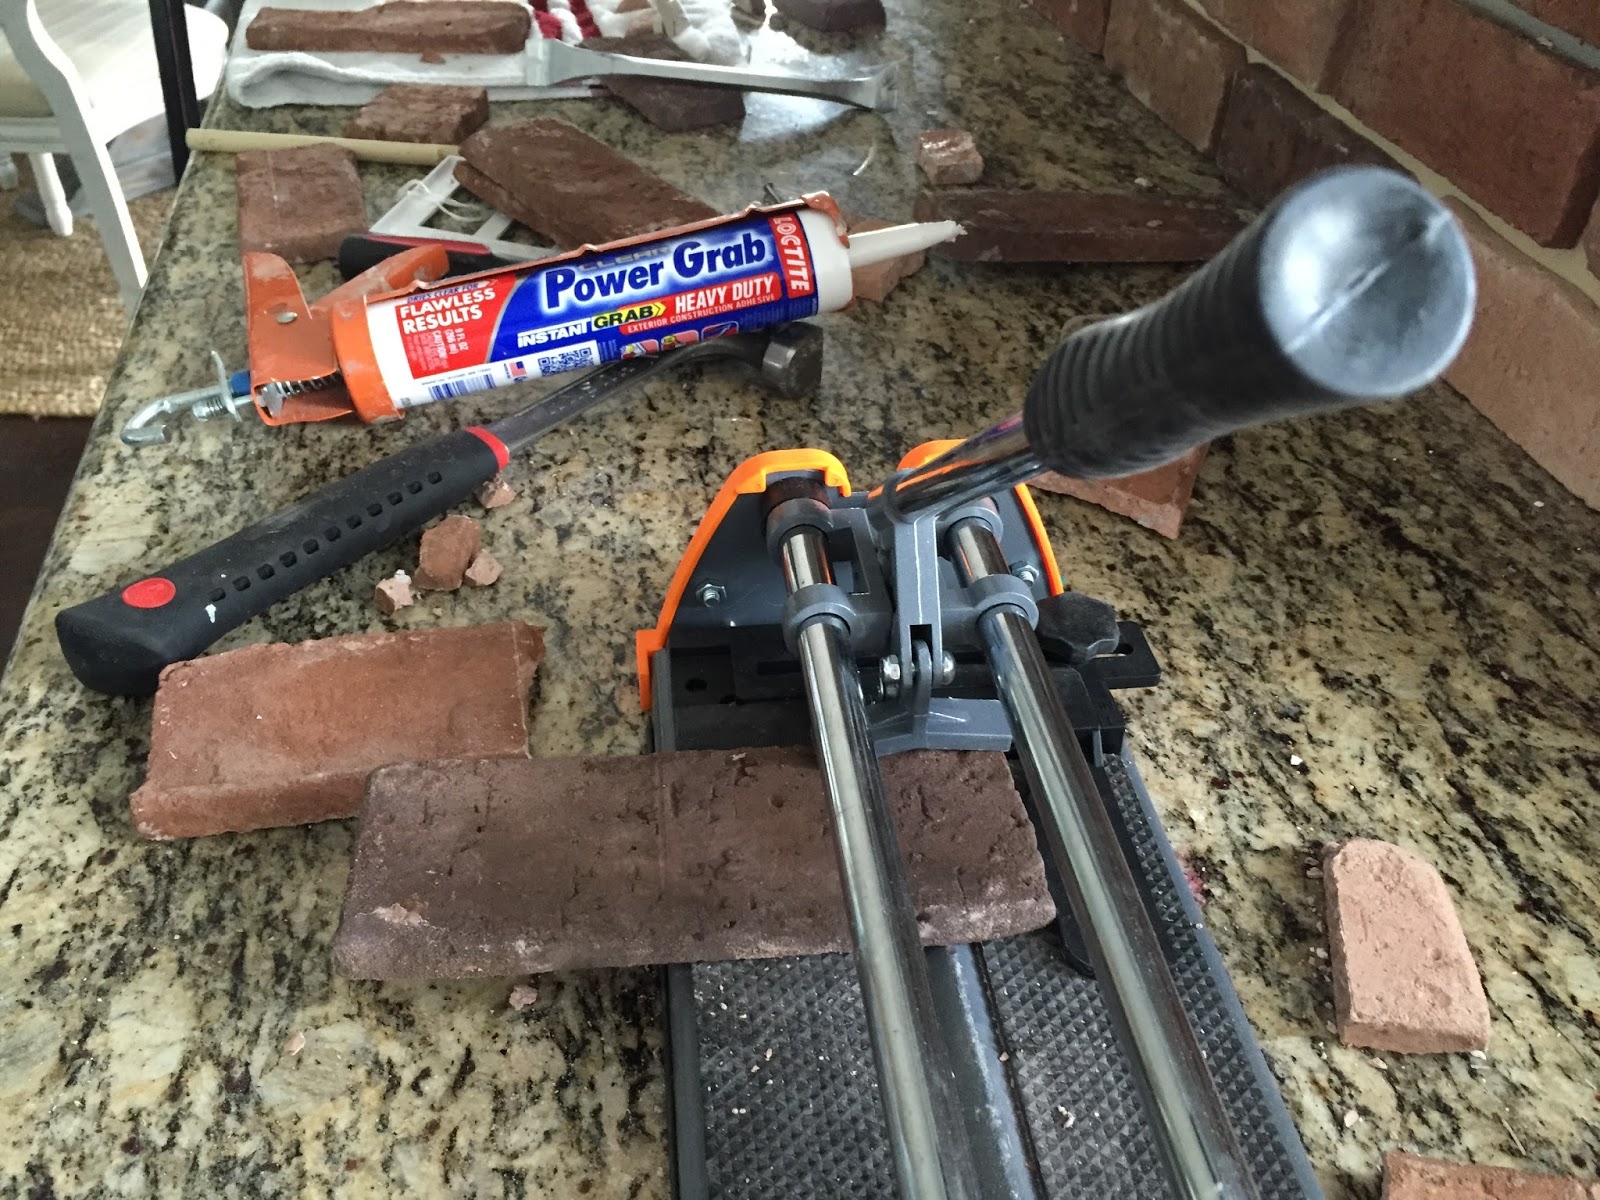
When you get to the ends of each section of backsplash there may not be enough room for a full brick. I used this Tile Cutter to score the brick to the size I wanted and pressed down to break the brick in that exact spot. It took me a couple practice rounds, but then I got the hang of it. Follow the instructions on the box. Its easy.
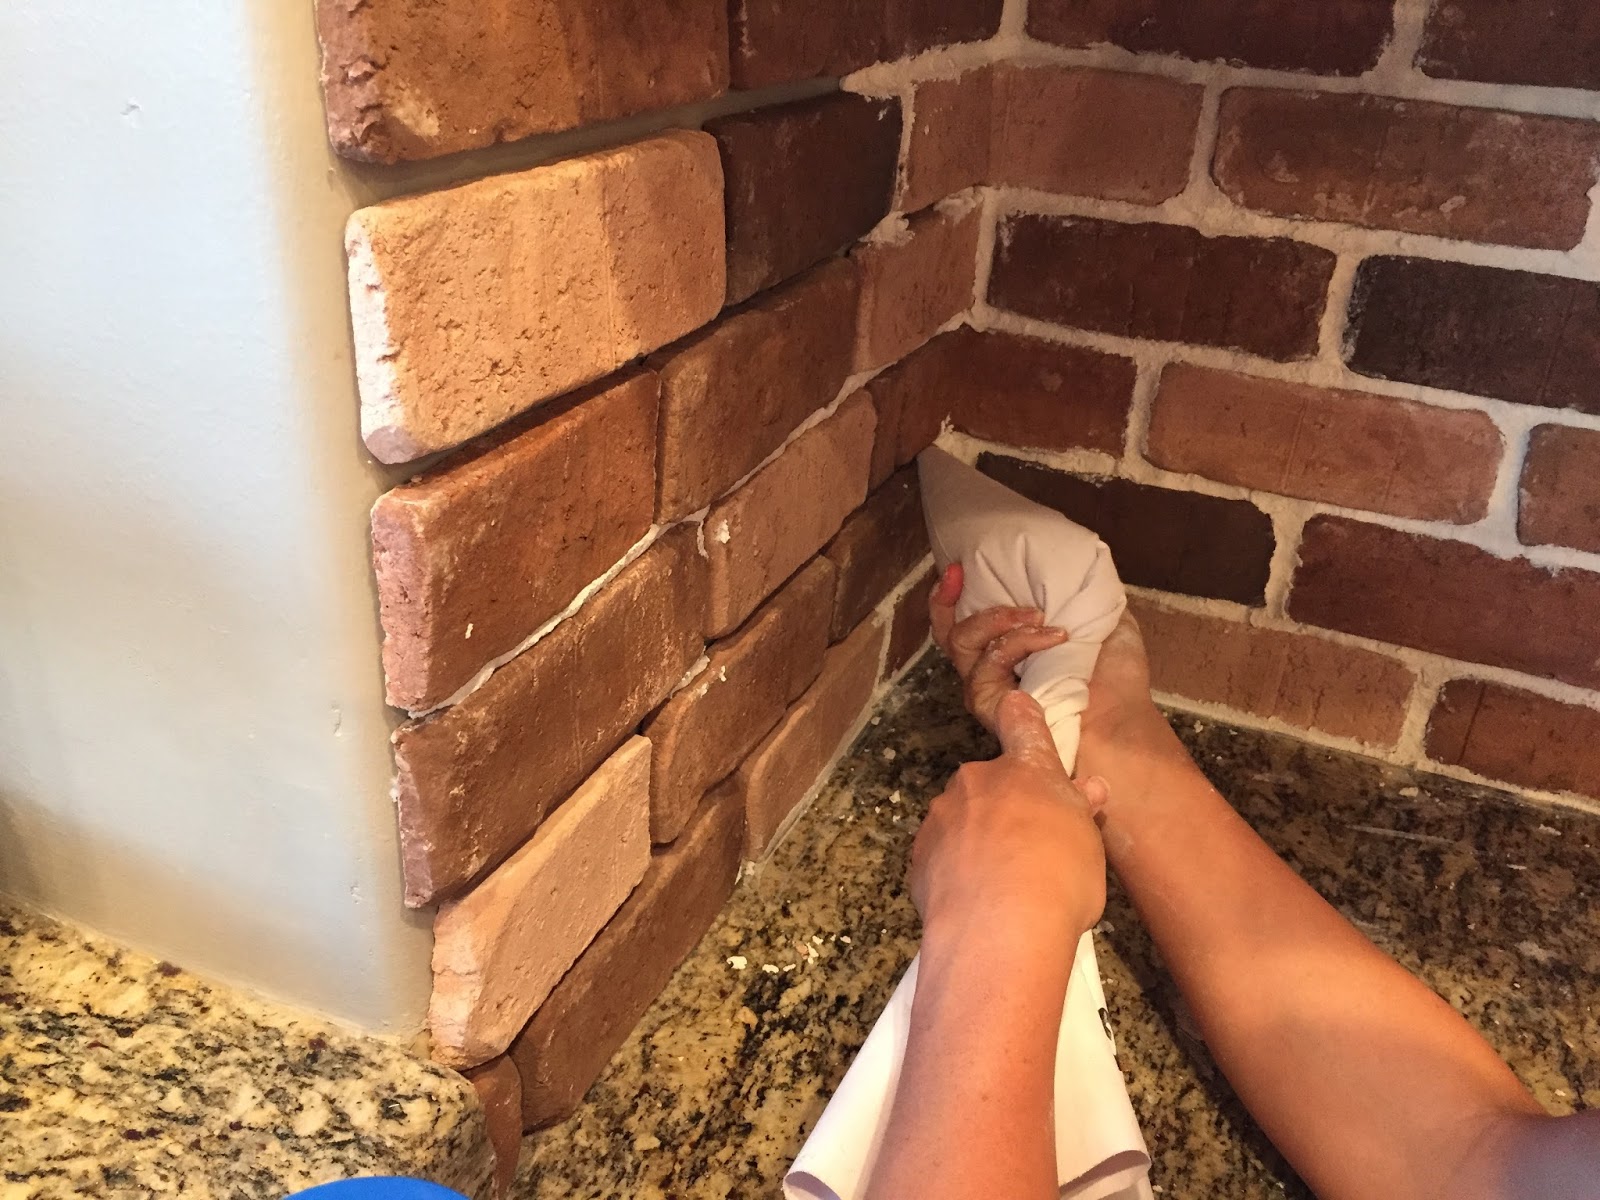
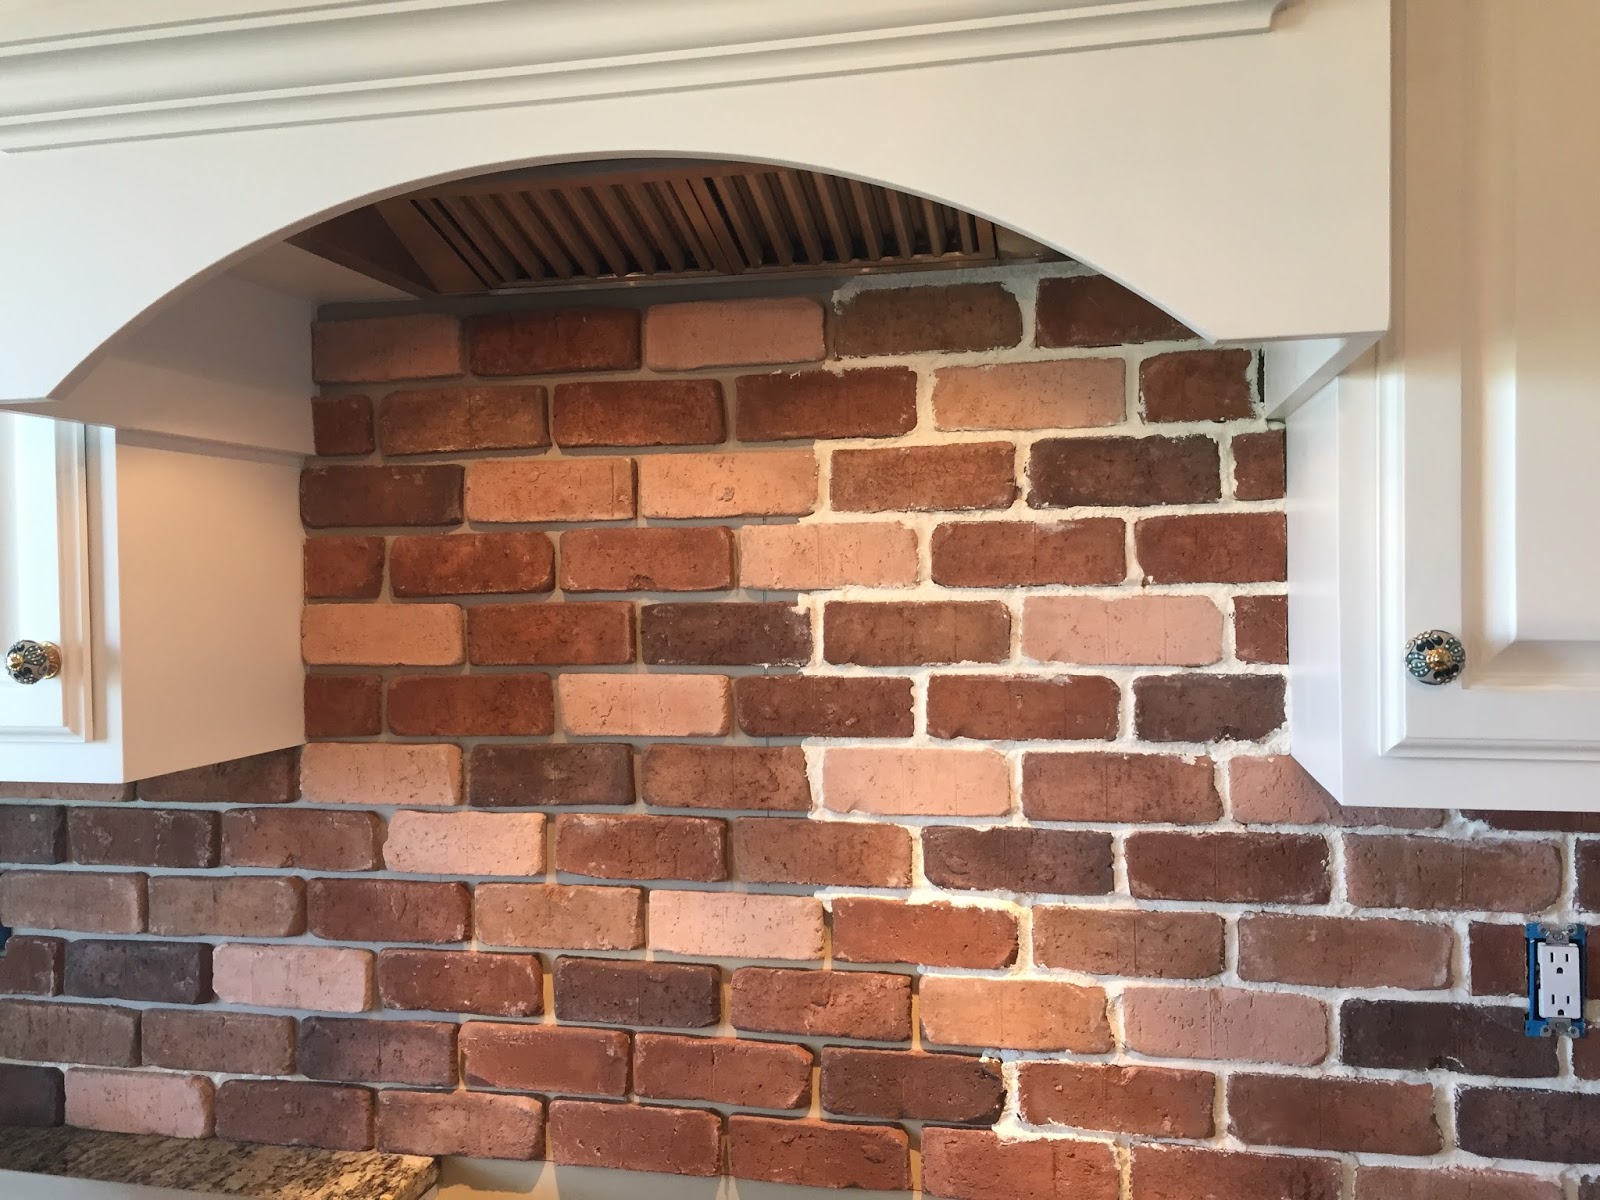
Continue this same repeated pattern until all your bricks are evenly spaced on the wall. Make adjustments along the way by sliding the bricks up and down or side to side. Once the adhesive is set, your stuck with it. I only had 2 corners to to work around so I did not order corner pieces. Instead I just used my tile cutter to cut 2 veneers and place them on the corners to look like 1 brick.
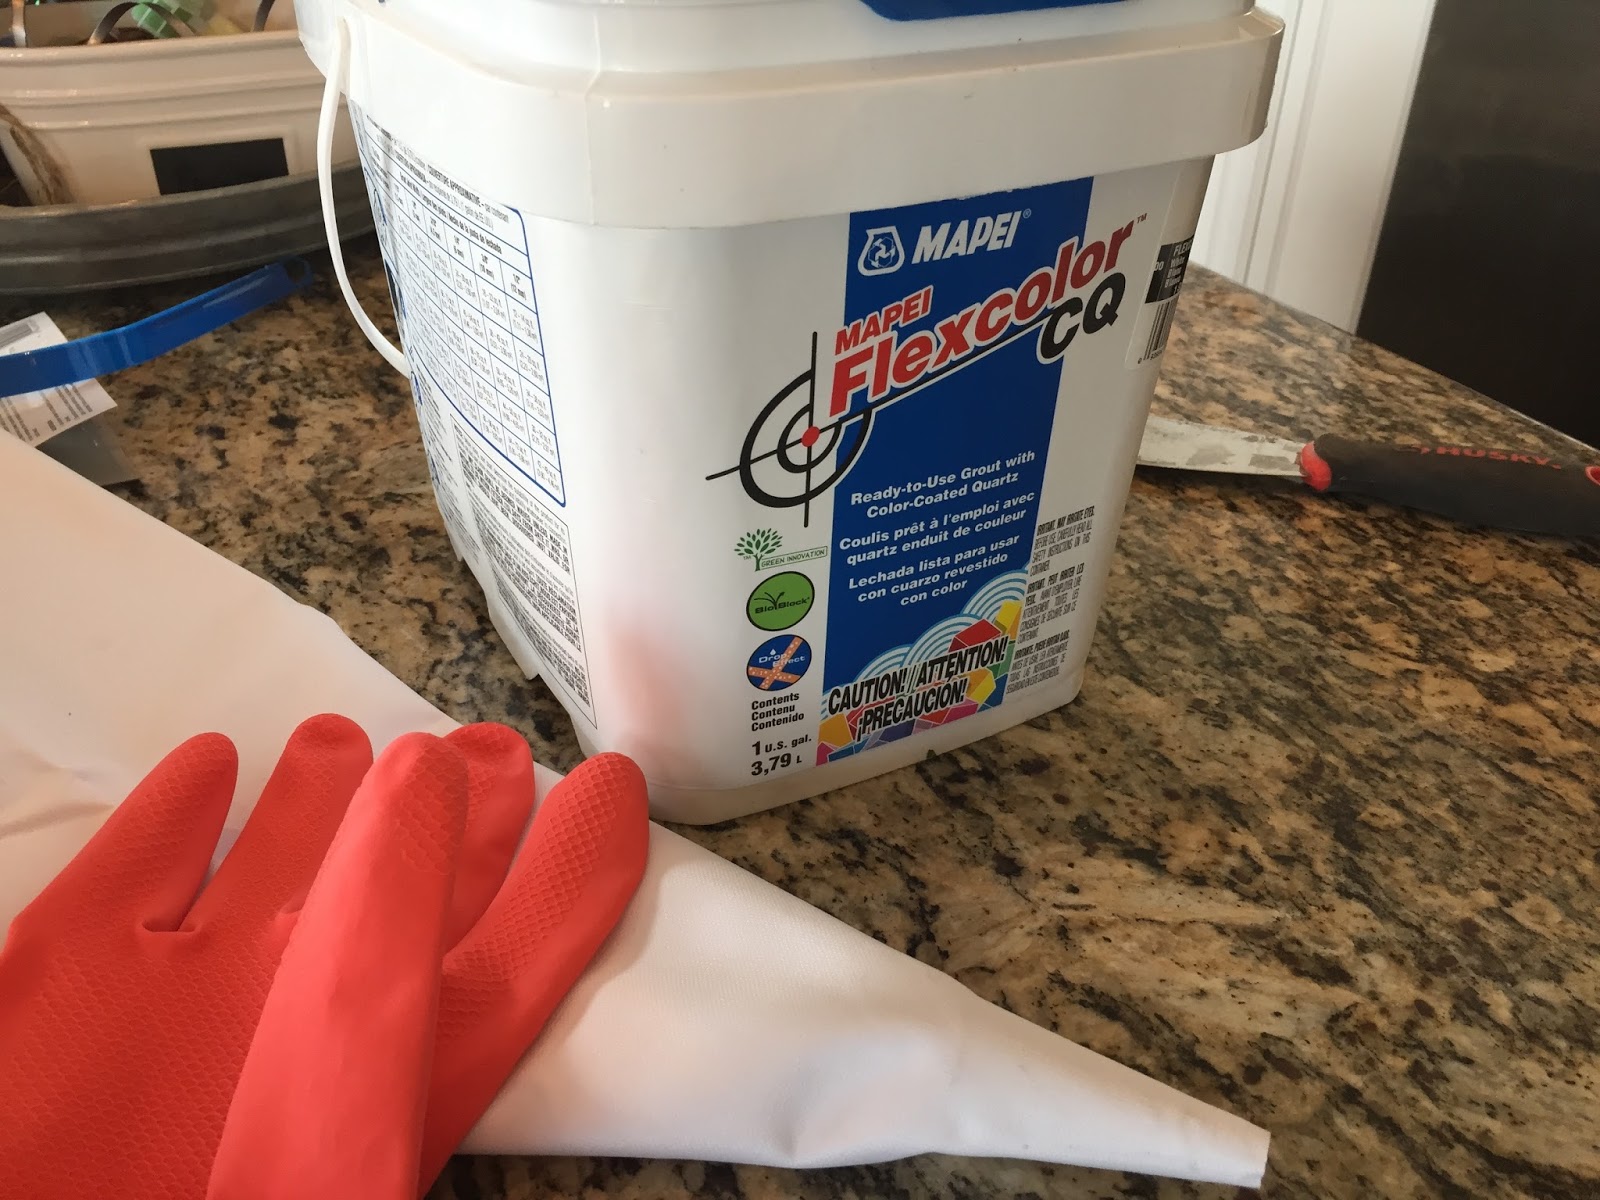
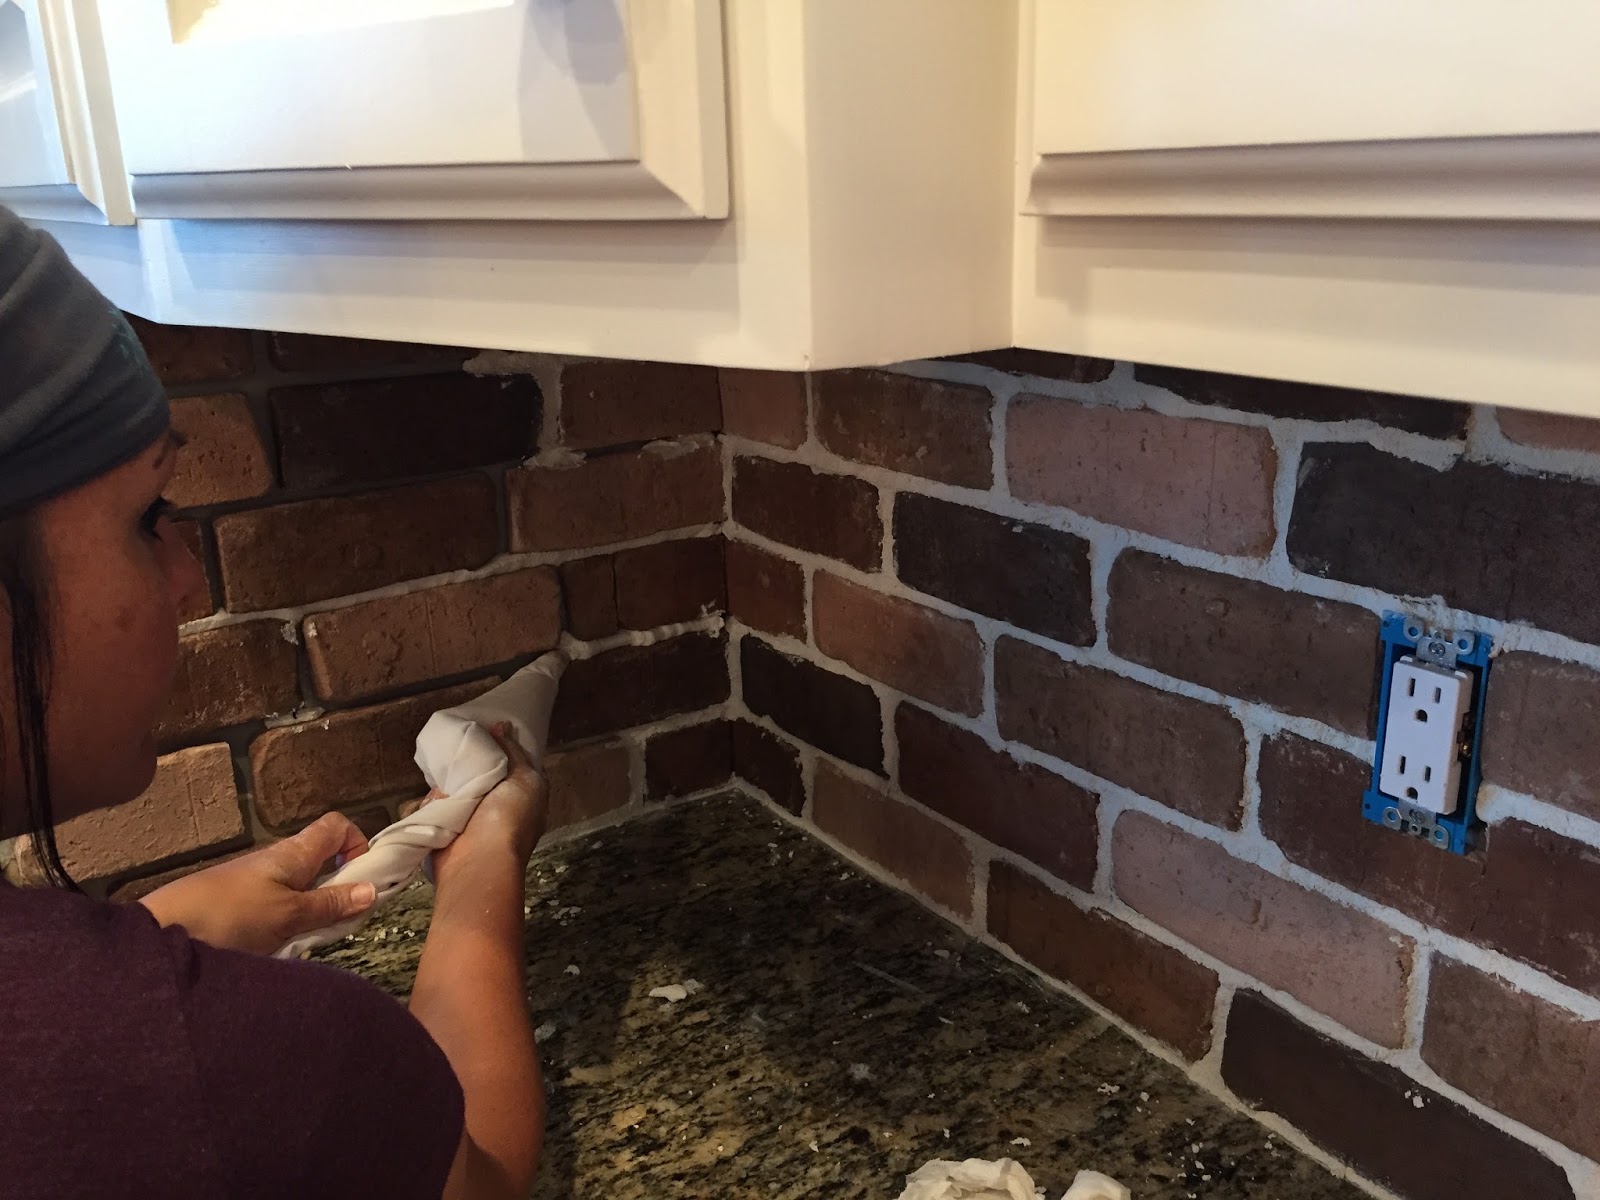
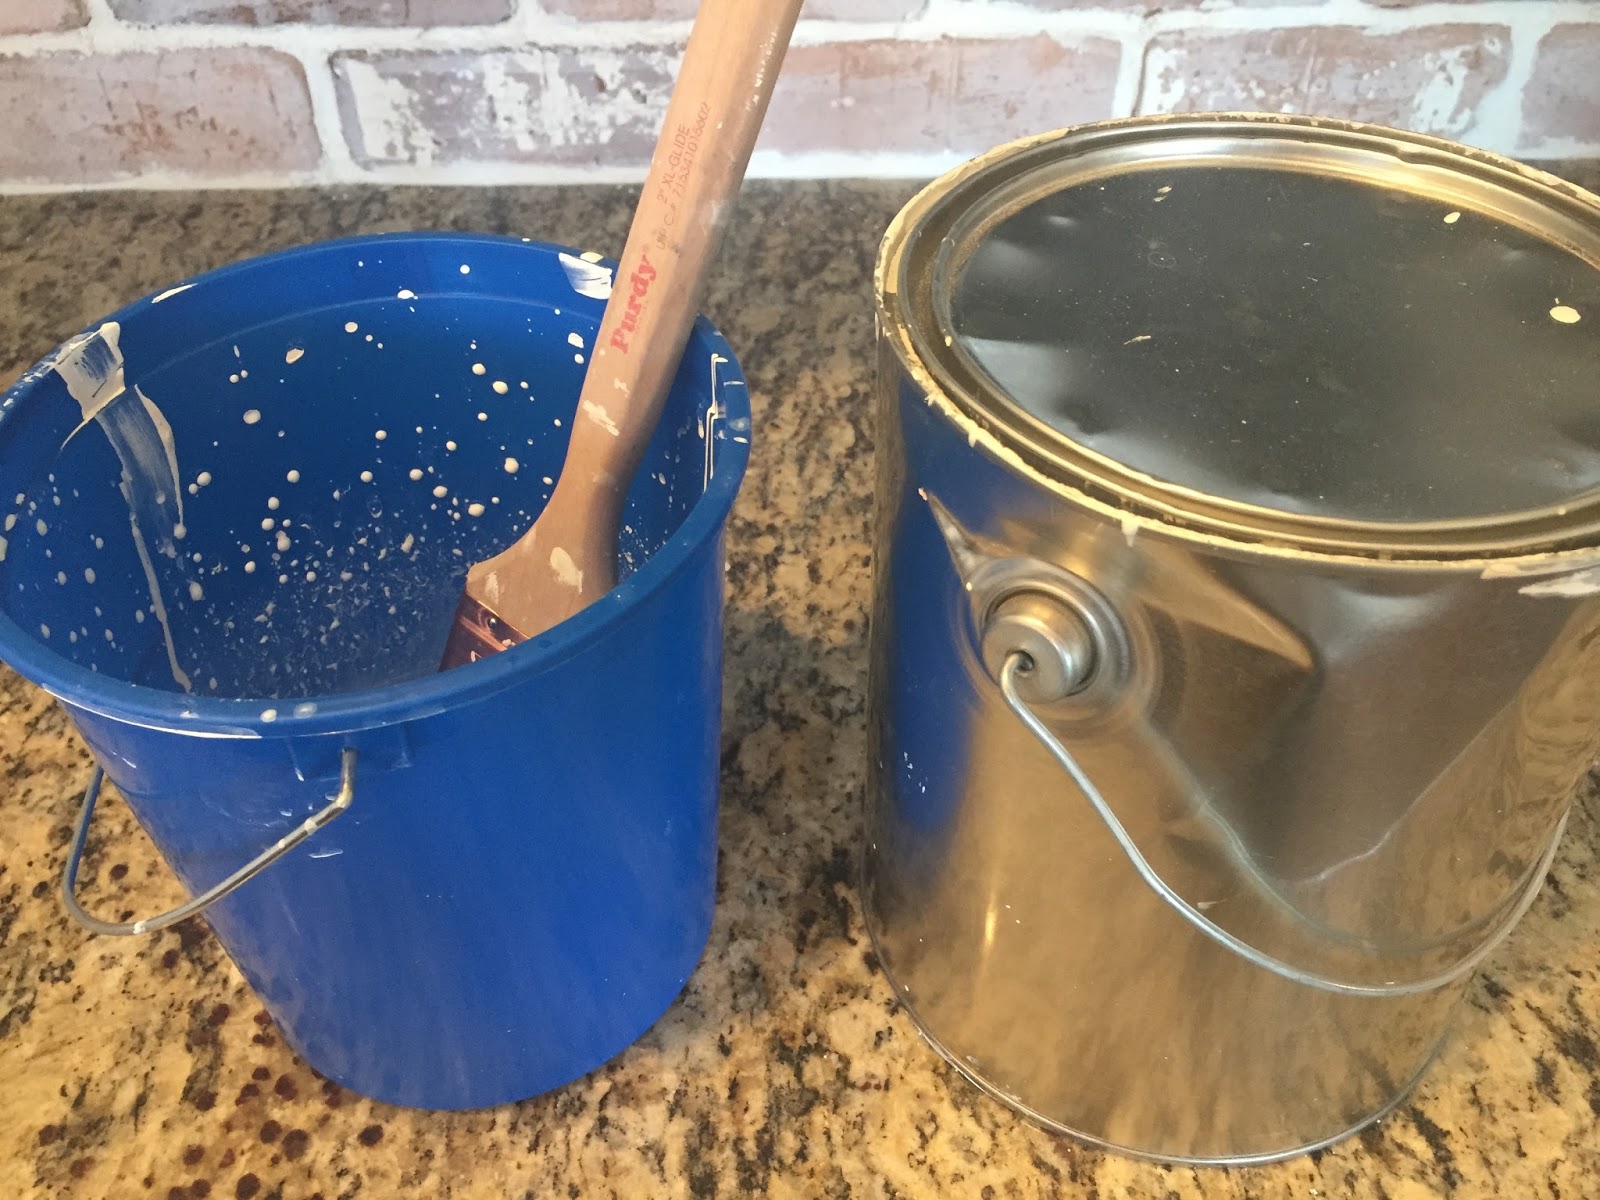
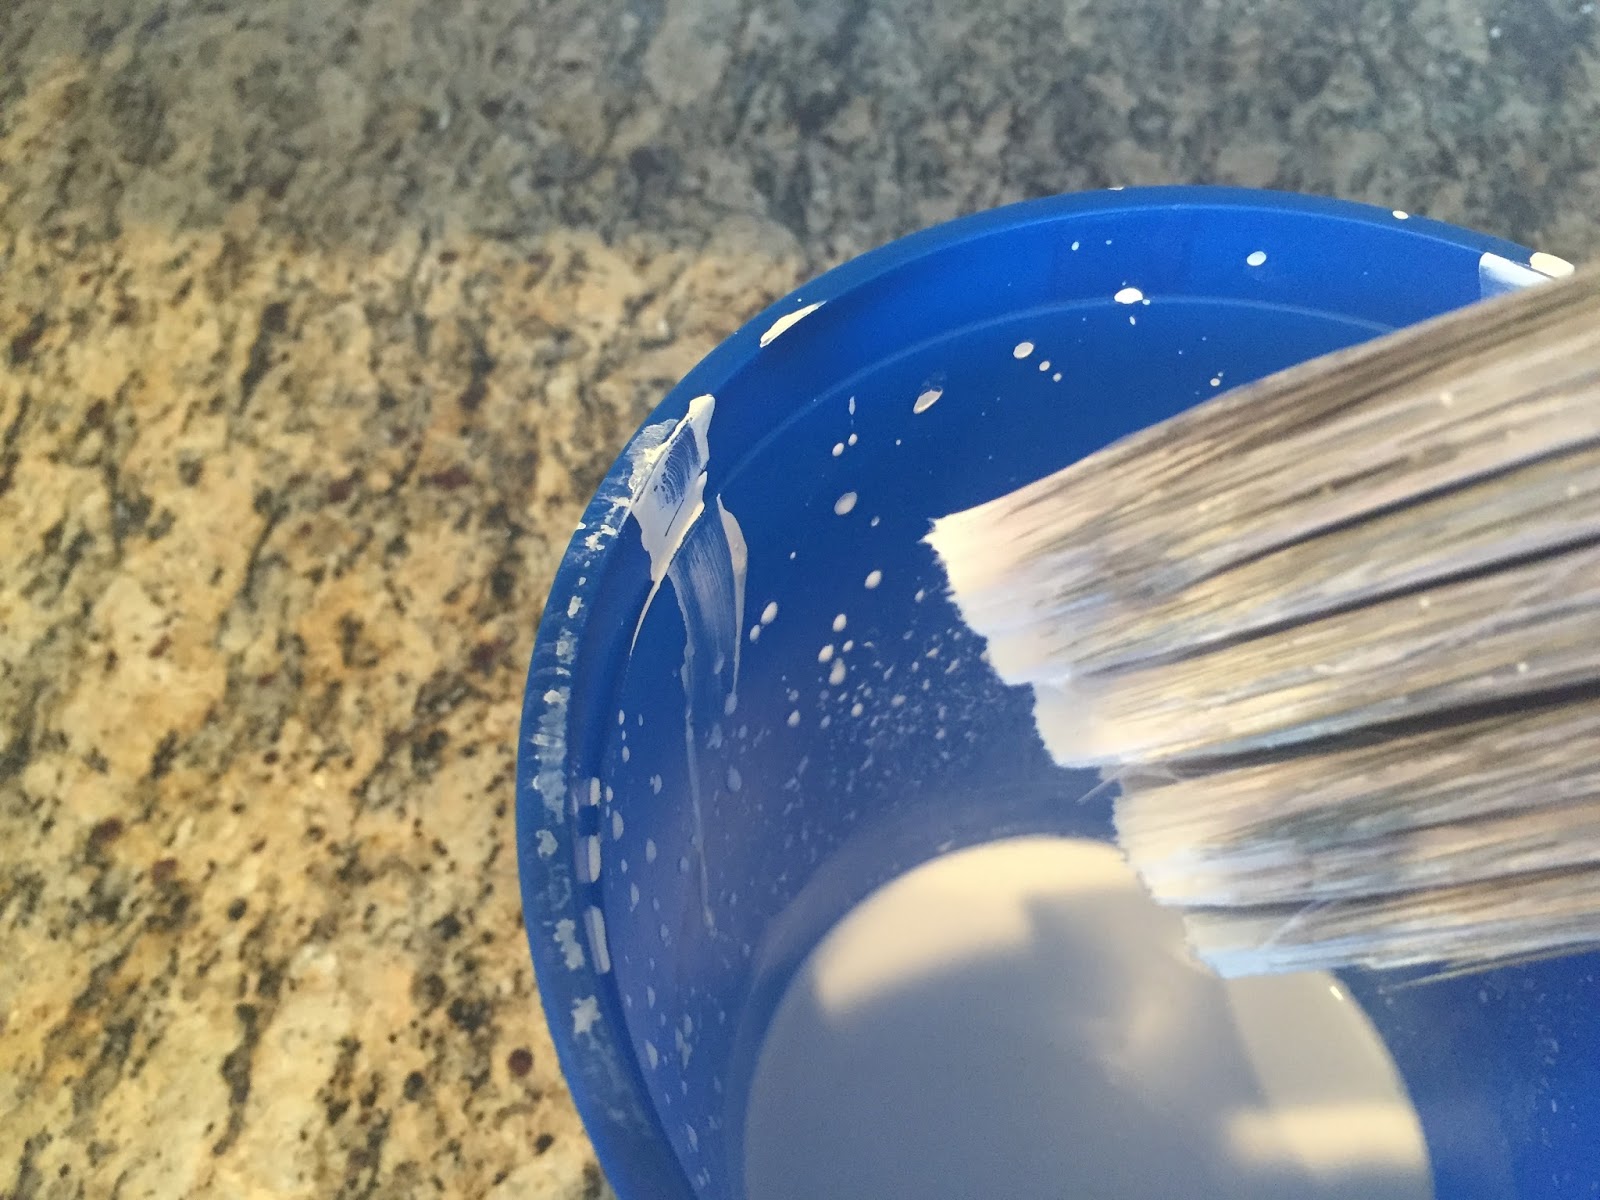
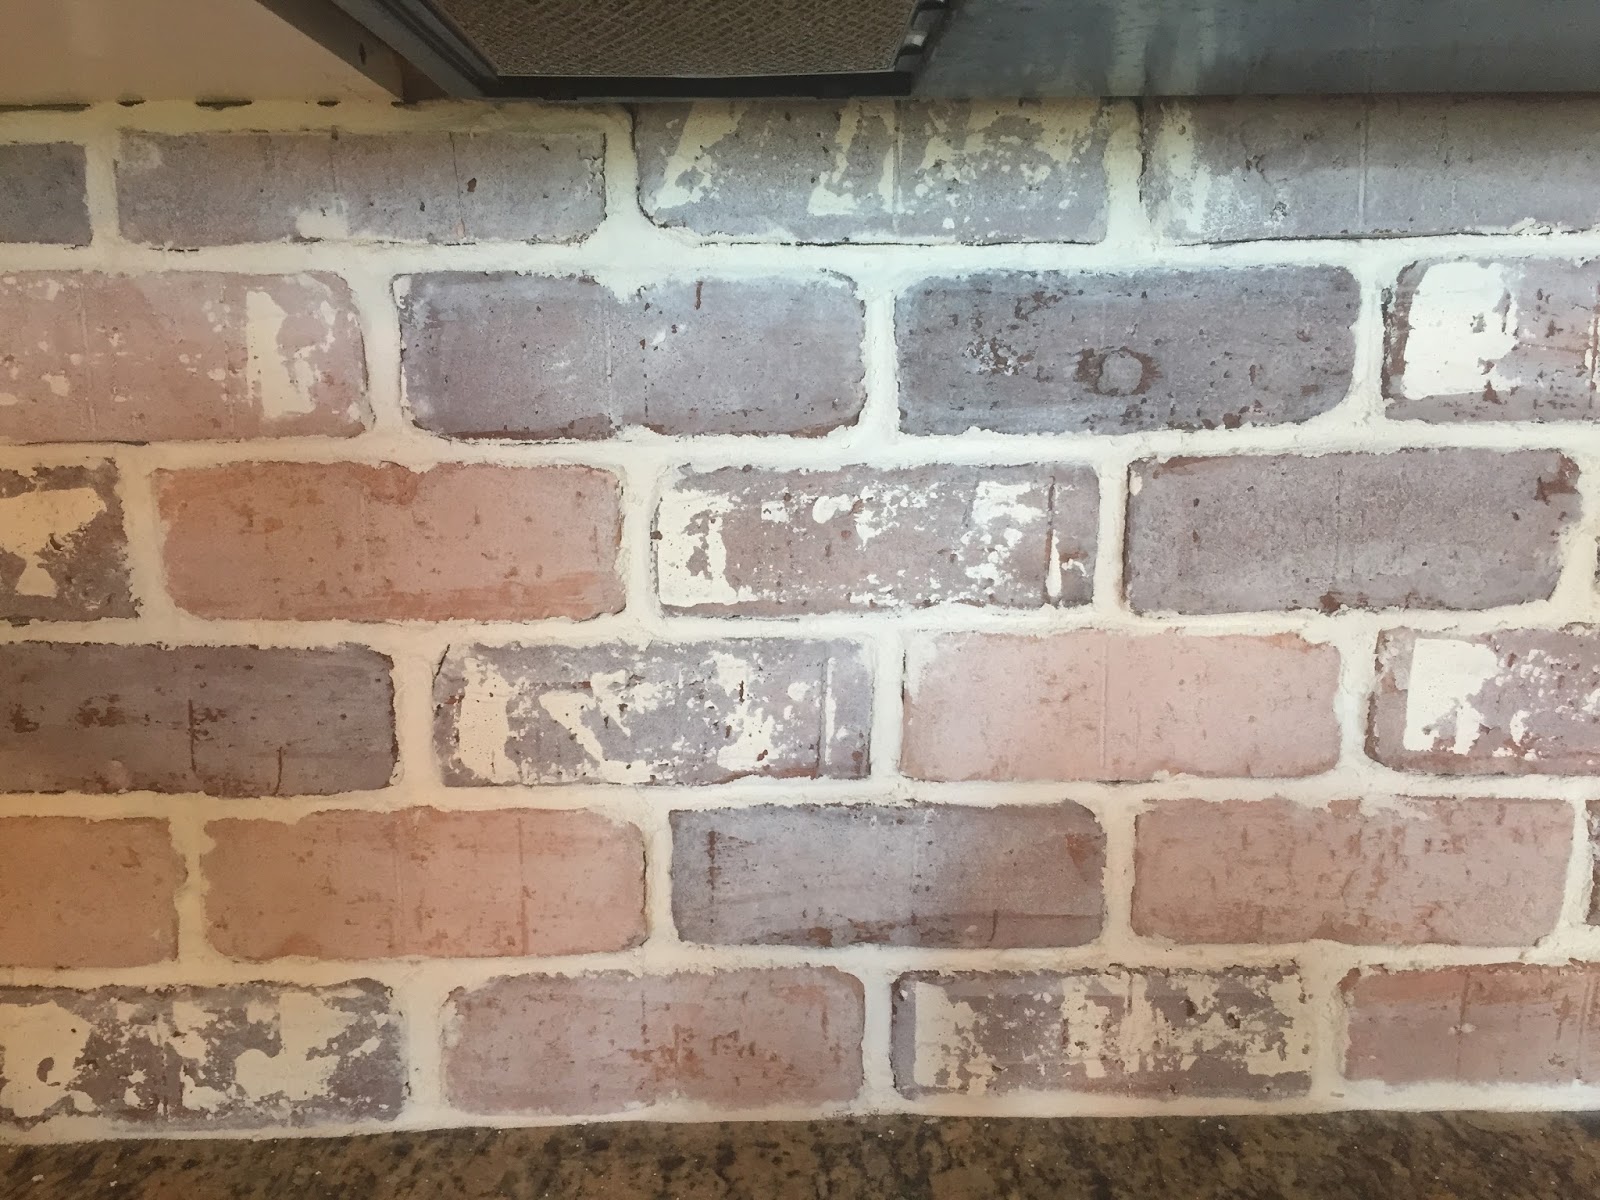
Now that all our bricks are in place along the whole backsplash, we frost the cake so to speak! The grout is more for appearance than function. I used a grout bag to fill in the gaps between the bricks. After filling around 6 or 7 bricks, I went back with my finger and smoothed out the grout like you would see on a real brick wall. Continue this process until there are no more gaps left. I chose to use premixed grout. I don’t own a mixer and didn’t want to deal with the mess so I chose this option even though its more expensive. I used white grout, but there are several more options.
Shop The Supplies
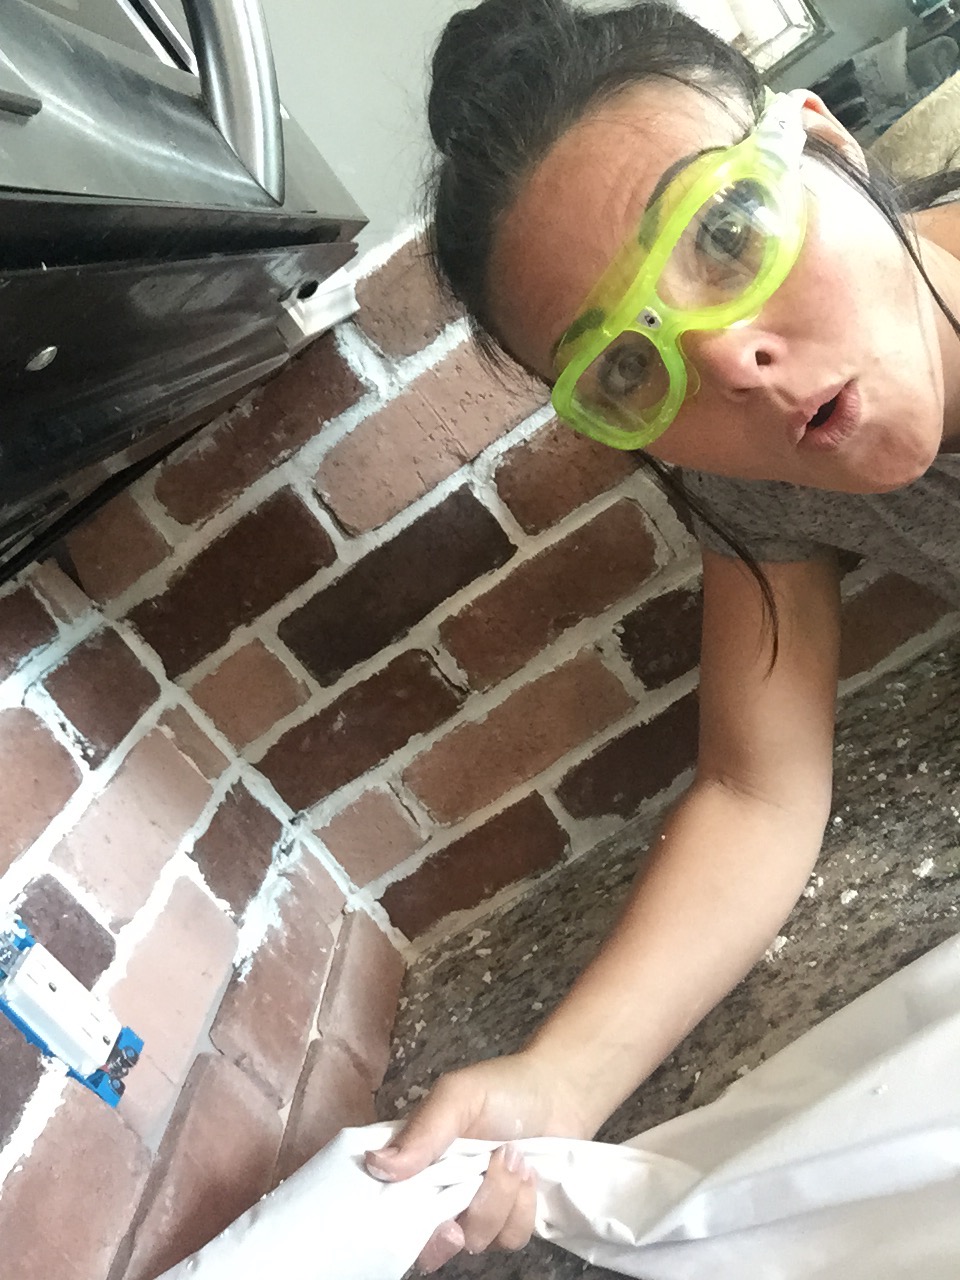
obviously my sons goggles aren’t necessary! Just having a bit of fun haha!
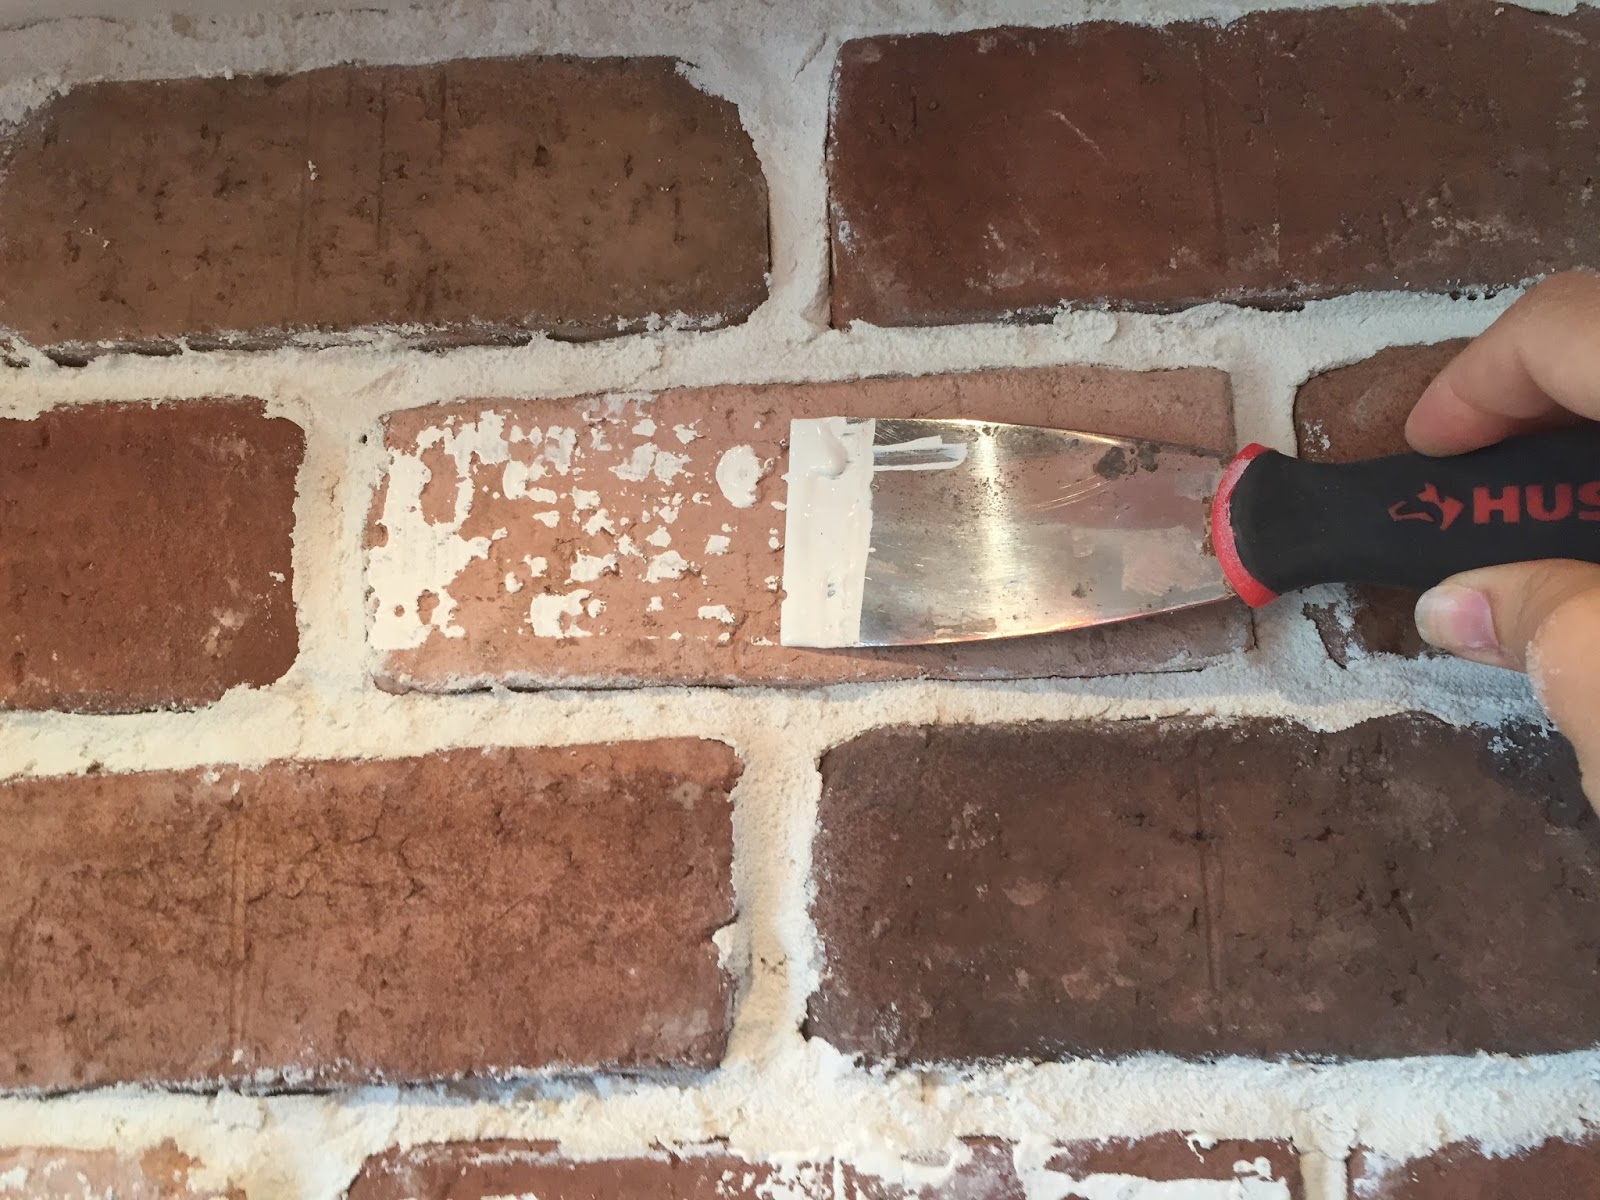
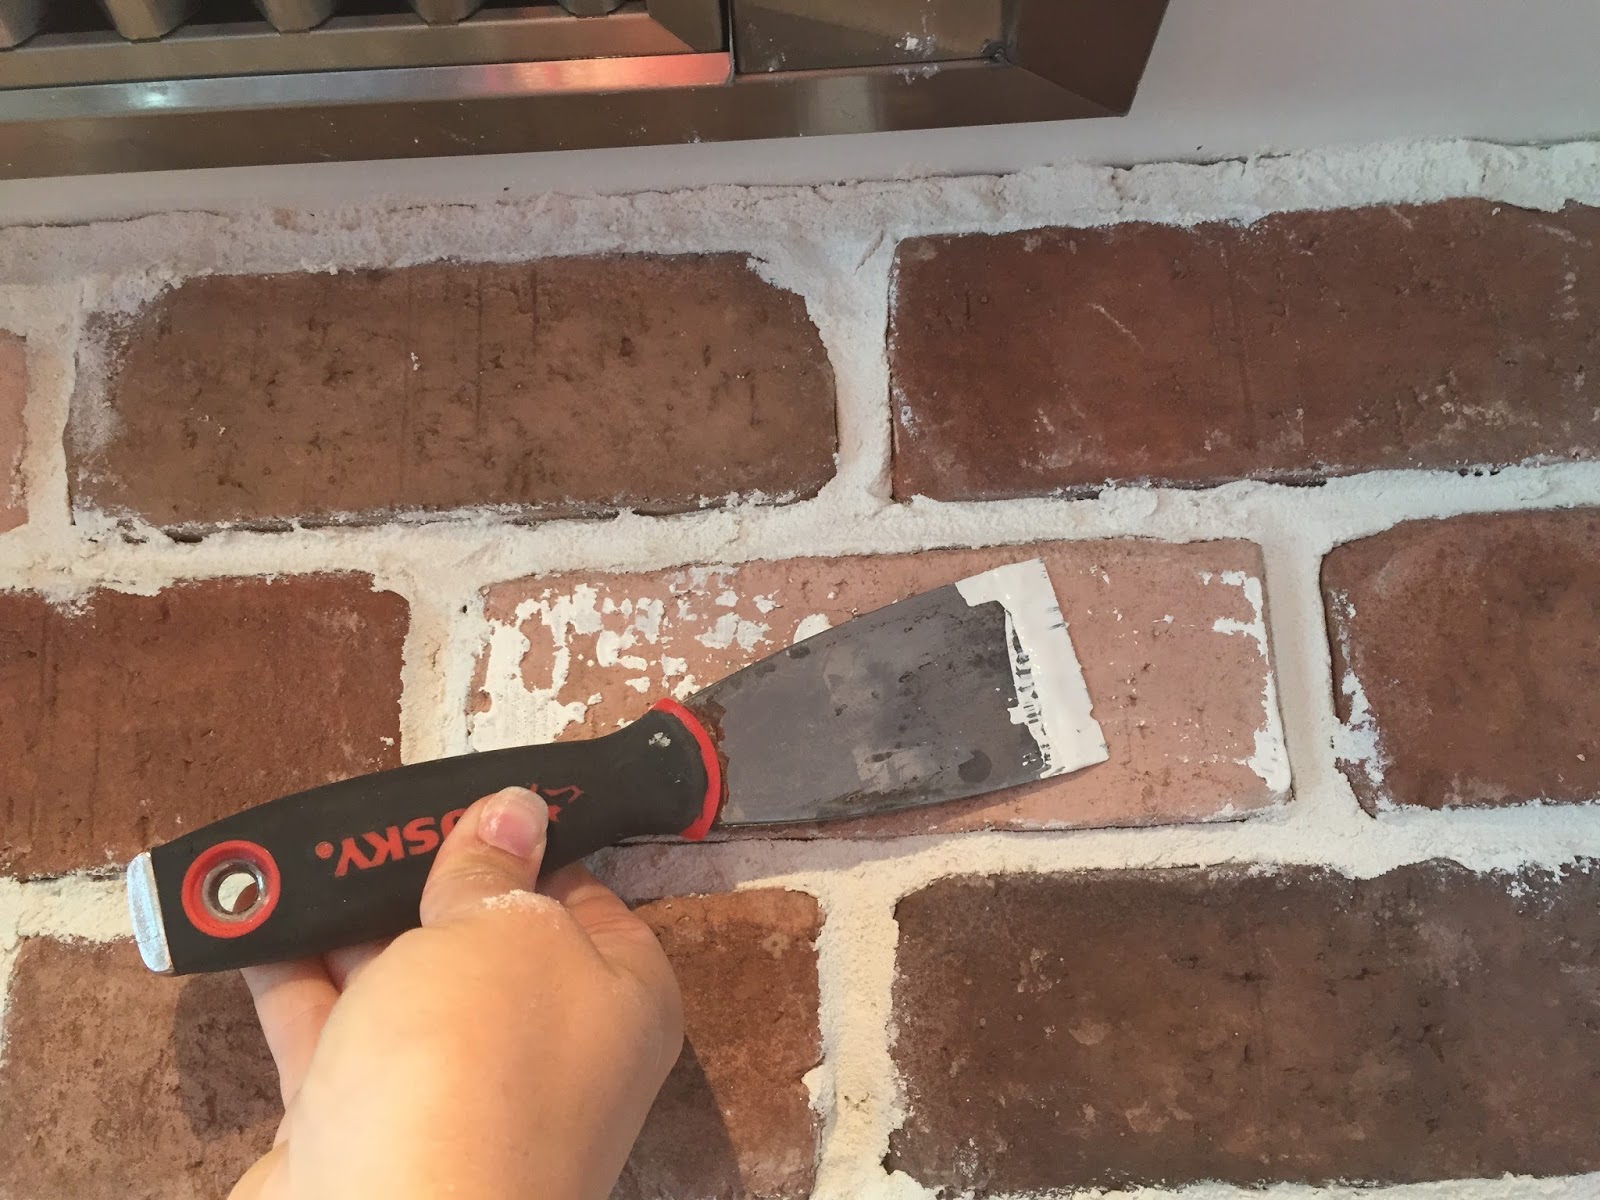
At this point, some of you could be done with your backsplash. The intensity of the red bricks you see here doesn’t work in my space, but could very well be perfect for yours. Using a putty knife dipped in chalk paint, I chose bricks a random to roughly trowel over. I used Annie Sloan chalk paint in Old White mixed with True White. This created a more aged look and added more texture.
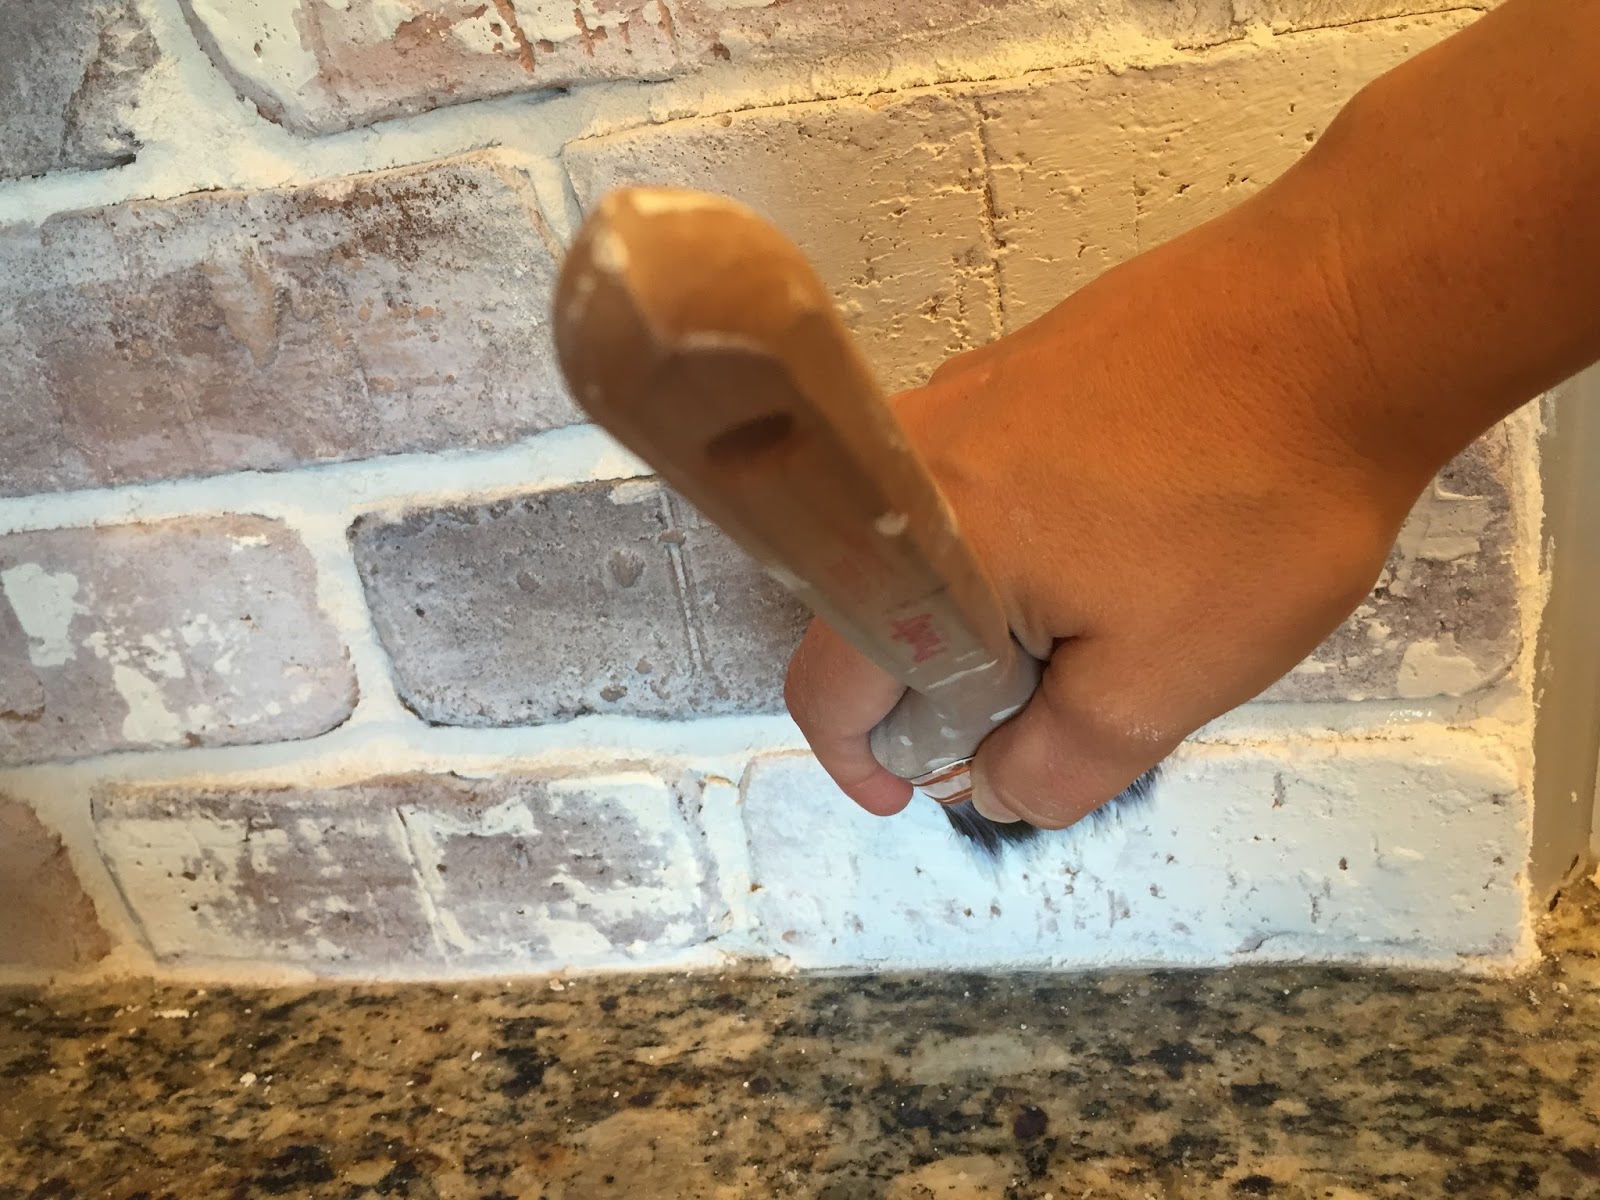
Next I mixed about a 1/2 cup of the same chalk paint with 1 cup of water in a small bucket to create a white wash. White wash is basically just what it sounds like… watered down paint. I continued to add water to the mixture till I reached the desired transparency. Test it on a few bricks before you paint in on your wall. You can always add more paint and more layers of wash, but once the paint is on the bricks, its very difficult to take it off. This is not an exact science just a preference! Using a paint brush go over the whole backsplash once. If your want more of a white look add another…so on and so forth!
I love how the white wash changed the whole look of the backsplash. I still wanted a little more white, so I decided to paint some of the bricks with the chalk paint. I randomly painted the bricks one by one until I got my desired look. Once I was happy with the overall appearance I brushed a cement sealer over the whole backsplash to protect the painted bricks from food and grease. I purchased the sealer at Home Depot. It comes in a high sheen (wet look) or Low luster. I chose the latter.
I would definitely do this project again. It was easy and required very little math (which is really good for me haha)! Good luck on your Do it yourself brick veneer backsplash! If you follow my tutorial please feel free to ask questions, or let me know if I missed any constructive pointers! I’d also love to see your pics as well! And don’t forget to subscribe to my blog to get more Do it yourself projects emailed right to your in box!
Hi great job!!! What did you end up doing the electrical outlet face plates??
Thank you. Once you install the extenders, the original face plates will screw right back in.
Hi, I'm kind of late to this party, but I LOVE your backsplash! Looks exactly like what I want, and you made it look about my speed. I just have a question about the edges of it that are exposed, like under your microwave? How did you finish those edges that we can see on top and around the edge going down vertically? I hope that's clear. I'm so excited to have found your project! ~Charlotte
I am thinking of doing a brick backsplash, but wondering how difficult it is to clean grease, etc. behind the cooktop?
Me too! Did you end up doing it??? I’ve got boxes of leftover brick from another project and really want to use it but the cleaning concerns me a bit.
HiJodi, Im not sure what your asking? I did install the brick backsplash and sealed it with a concrete sealer so it can be wiped down. I really haven’t had any issues with cleaning or staining
Hi charlotte! Im so glad you like my backsplash! You will LOVE it in your home to I'm sure! I finished off the edges with grout all the way down the vertical lines. That way it blends in with the rest of the backsplash. I hope that answers your question
We cook a lot of bacon over there and so far there has been no problem or even residue build up! However I did seal it for that reason. If you read through the tutorial it shows which one I used!
I Love this!! Great job! I am only finding 7.3 square feet for about $58 at Home Depot.. For 50 square feet it would cost $397 for the brick. Anyone find a better price? Thanks
I ordered mine through Lowes. It was $250 for 45 square feet
Thanks for sharing your source for everyones benefit! Can’t wait to see your finished product!
Do you have a link by chance?
Hi melissa, a link for what?
love, love, love!! I just need to get brave enough to try this!!!!
Hey there! I love this look. Is there a reason why you chose to use chalk paint as opposed to any other type of paint?
Hi ashley. I used chalk paint for 2 reasons: 1) its flat and I didn’t want a shiny look. 2) Chalk paint adheres to all surfaces. If your going to use a different type of paint, i would recommend an epoxy paint. However it does have a high sheen to it.
Hi. Wondering where you got the valance with exhaust fan over your stove? Everything looks beautiful. We are in process of putting brick veneer in our kitchen as well. Thx
Heather
Hi heather I had the hood custom made but I ordered the fan off amazon!
Looks great!! We are wanting to do the same thing but are having the same issue as one of your other commenters. The Home Depot price is a lot higher than what you were able to get it for originally. Bummer.
oh shoot. if you shop around maybe you can find something else
I got my bricks from Morton Stone in Davie, Fl. The prices vary depending on what you get but mine was about $230 for 45 sq ft. They do ship it, but we are local so just picked it up so not sure how much shipping costs.
hi! Beautiful Job! Did you smooth the grout with your finger tip after applying it with the grout bag? The brick stayed so clean.
Hi Sondra
Yes I used my finger tip. That seemed to work the best for me. Thank you
Looks great! So glad I found this-I did mine in old Chicago this past summer then the kids summer camp ended and I never grouted or did the outlets. You make it look so easy-I am so finishing this now!
I know you can do it! I totally love mine and I’m sure you will love having yours done
Mysha,
You did a fabulous job with your kitchen!!!
I was wondering if you would kindly share the color blue paint of your kitchen island that has the beadboard?
Patty
Hi Patty and thank you. Its abusson Blue by annie sloan
Hi Mysha – LOVE your backsplash & appreciate the very detailed tutorial… this is just what I’ve been seeking to finish my kitchen refresh & will save me from paying yet another disappointing contractor who doesn’t get my vision!! On another note, I’m also loving your chairs – where did you find those? TIA!!
Hi Debi i’m so glad you found it helpful. My kitchen chairs were thrifted and unfortunately they no longer make them. I’ve searched and searched for a source! So sorry
Hi! I am literally working on this project right now and am having a terrible time getting the grout to come out of the grout bag. Any tips?
Hmm, I didnt have that issue. Perhaps cut the hole a bit larger so the grout can come out easier?
Looks Great! We are doing the same thing in our kitchen with a white brick veneer that we found. What sealer did you use? (I didn’t see 1 linked) Also did you caulk the space between your counter top and the 1st row of bricks? And lastly, can you tell me which vent you purchased off of amazon? We are building a hood and I’m not sure which one to get. Thanks!
hi joeli
I think i used a concrete sealer from Lowes. I am out of town so I can’t look up the brand so sorry. I did caulk between the brick and grant with a clear caulk. I will get back to you on the vent hood. good luck
Thank you! I look forward to your reply about the vent and sealer : )
You may be able to find it for Less on Amazon or homedepot.com
Were you able to cut the brick horizontally with that tile cutter??? I will have to cut a ton horizontally and I don’t know if I should just rent a wet saw??!?
I was able to do so. I don’t think a wet saw is necessary but if you feel like your not getting the results you want. You can always rent one! Good luck and I would love to see a your finished result! You can tag me in a photo on instagram @remingtonavenue or email me at mysha@remingtonavenue.com. Thanks and I m excited for you!
Hi so I’ve been reading this post for awhile and really want to tackle this project myself. Do you think it’s pretty hard? Can anyone do it? I’m worried about the grout because it’s permanent. Any thoughts?
Hi lisa
Yes I would recommend this project! Because of the imperfections in the thin brick (variations in size) it did not require the same amount of percission that most tile projects do. I eyeballed most of it. Good luck, you will love it
I just tackled this project after following this pin for the last 6 months. I love the way it turned out and I am so glad I came across this blog!! It’s my favorite project I have done so far and it made a huge impact on my kitchen. It did take a whole weekend to do and the grouting part was pretty tedious but I am so glad I attempted this. I have never laid tile or anything remotely close to this so I am sure if I did it you can too! 🙂
Melissa thank you so much for taking the time to post your results! I am always so happy to hear back! I would love to see a picture if you wouldn’t mind tagging me on instagram @remingtonavenue or just posting one here in the comments.
This is great. I recently bought a house that has a red and black brick backsplash and we hate it. I am going to update it with new grout lines and white wash it like you did! I know it will save a ton of money verses replacing it and I already love the look.
fantastic! Id love to see the final product
Did you do the brick around your sink? Have you had issues with moisture on the brick?
I haven’t had any moisture issues with the brick. There are more photos of my sink area on instagram @remingtonavenue. Thanks and good luck
Hi! I love the color of the original brick. What brand/color its it? TIA!
Hi Destiny the brick color and brand is listed right in this post. I ordered it from Home depot
I love this and want to do it to mine, but I can’t find this brand of brick or color at my Home Depot. Do they only sell it in certain states? I live in Texas and I looked on Rocky Mountain Stone’s website and they don’t have Texas listed as a dealer. 🙁
It was a special order. Have you talked to a representative about the brick veneer options they offer in your area?
Not yet. I just found your page today and looked online. I will go to the store this weekend. Also, what granite color do you have?
I dont know the granite color. It was here when we moved in.
Hi. Why did you remove the granite backsplash? Couldn’t you just apply on top? Just curious. Thinking about doing this but don’t want to remove it. Thanks!
Hi Amy! You could totally apply the brick veneers right above the existing granite backsplash. I chose to remove mine to give it a more seamless transition. That is my personal preference. They are not hard to remove either. Good luck and be sure to post a picture in the comments when you compete it. I’d love to see!
I love your brick back splash!! Inspired me 🙂
we are in the middle of doing ours now…
I’m going to love it … I think! My husband cut all the faces off of reclaimed bricks! Its been a bit of work… but I think I am going to really love the look.
I have a couple of questions:
1. Was that one gallon of grout enough to do your whole back splash?… and approx how many square feet did you do?
2. Do you have any staining issues behind your cooktop?… is it holding up well – like behind the sink?… are you still glad you did it?
thanks again for the tutorial!! Most helpful 🙂
I dont have any staining issues and I really can’t remember how many square feet I did, but I used 1 and a half buckets of grout! Cant wait to see.
I LOVE the soft rustic, whitewashed color of the bricks. What you’ve done is exquisite. Brick is pretty but like you, the original color is just too strong. I’m now making some decisions about new backsplash and countertop for my 20-year old kitchen and I’m having a hard time deciding between the whitewashed brick and a gorgeous product called Stikwood. I’ll be changing my ancient formica to quartz and either one will look great with it. Decisions! Decisions!
Thanks for the inspiration and for showing us that DIY is always possible.
Im so glad you found inspiration here. Both would look absolutely gorgeous although I wonder how the stik wood will hold up against water?
Thank you for your blog! I bit the bullet and did the brick back splash and painted and glazed cabinets! Followed your instructions on backsplash to a tee!
Wow thats amazing! Could you email me a photo or share a pic here in the comments? You could also tag me on instagram @remingtonavenue. I would LOVE to see


 Add to favorites or read later
Love!!!!
Hi
great job!!! What did you end up doing the electrical outlet face plates??
Thank you. Once you install the extenders, the original face plates will screw right back in.
Hi, I'm kind of late to this party, but I LOVE your backsplash! Looks exactly like what I want, and you made it look about my speed. I just have a question about the edges of it that are exposed, like under your microwave? How did you finish those edges that we can see on top and around the edge going down vertically? I hope that's clear. I'm so excited to have found your project! ~Charlotte
I am thinking of doing a brick backsplash, but wondering how difficult it is to clean grease, etc. behind the cooktop?
Me too! Did you end up doing it??? I’ve got boxes of leftover brick from another project and really want to use it but the cleaning concerns me a bit.
HiJodi, Im not sure what your asking? I did install the brick backsplash and sealed it with a concrete sealer so it can be wiped down. I really haven’t had any issues with cleaning or staining
Hi charlotte! Im so glad you like my backsplash! You will LOVE it in your home to I'm sure! I finished off the edges with grout all the way down the vertical lines. That way it blends in with the rest of the backsplash. I hope that answers your question
We cook a lot of bacon over there and so far there has been no problem or even residue build up! However I did seal it for that reason. If you read through the tutorial it shows which one I used!
I Love this!! Great job! I am only finding 7.3 square feet for about $58 at Home Depot.. For 50 square feet it would cost $397 for the brick. Anyone find a better price? Thanks
I ordered mine through Lowes. It was $250 for 45 square feet
Thanks for sharing your source for everyones benefit! Can’t wait to see your finished product!
Do you have a link by chance?
Hi melissa, a link for what?
love, love, love!! I just need to get brave enough to try this!!!!
Hey there! I love this look. Is there a reason why you chose to use chalk paint as opposed to any other type of paint?
Hi ashley. I used chalk paint for 2 reasons: 1) its flat and I didn’t want a shiny look. 2) Chalk paint adheres to all surfaces. If your going to use a different type of paint, i would recommend an epoxy paint. However it does have a high sheen to it.
Hi. Wondering where you got the valance with exhaust fan over your stove? Everything looks beautiful. We are in process of putting brick veneer in our kitchen as well. Thx
Heather
Hi heather I had the hood custom made but I ordered the fan off amazon!
Looks great!! We are wanting to do the same thing but are having the same issue as one of your other commenters. The Home Depot price is a lot higher than what you were able to get it for originally. Bummer.
oh shoot. if you shop around maybe you can find something else
I got my bricks from Morton Stone in Davie, Fl. The prices vary depending on what you get but mine was about $230 for 45 sq ft. They do ship it, but we are local so just picked it up so not sure how much shipping costs.
hi! Beautiful Job! Did you smooth the grout with your finger tip after applying it with the grout bag? The brick stayed so clean.
Hi Sondra
Yes I used my finger tip. That seemed to work the best for me. Thank you
I am doing it!!!…Thanks for the push ?
Looks great! So glad I found this-I did mine in old Chicago this past summer then the kids summer camp ended and I never grouted or did the outlets. You make it look so easy-I am so finishing this now!
I know you can do it! I totally love mine and I’m sure you will love having yours done
Mysha,
You did a fabulous job with your kitchen!!!
I was wondering if you would kindly share the color blue paint of your kitchen island that has the beadboard?
Patty
Hi Patty and thank you. Its abusson Blue by annie sloan
Hi Mysha – LOVE your backsplash & appreciate the very detailed tutorial… this is just what I’ve been seeking to finish my kitchen refresh & will save me from paying yet another disappointing contractor who doesn’t get my vision!! On another note, I’m also loving your chairs – where did you find those? TIA!!
Hi Debi i’m so glad you found it helpful. My kitchen chairs were thrifted and unfortunately they no longer make them. I’ve searched and searched for a source! So sorry
Hi! I am literally working on this project right now and am having a terrible time getting the grout to come out of the grout bag. Any tips?
Hmm, I didnt have that issue. Perhaps cut the hole a bit larger so the grout can come out easier?
Looks Great! We are doing the same thing in our kitchen with a white brick veneer that we found. What sealer did you use? (I didn’t see 1 linked) Also did you caulk the space between your counter top and the 1st row of bricks? And lastly, can you tell me which vent you purchased off of amazon? We are building a hood and I’m not sure which one to get. Thanks!
hi joeli
I think i used a concrete sealer from Lowes. I am out of town so I can’t look up the brand so sorry. I did caulk between the brick and grant with a clear caulk. I will get back to you on the vent hood. good luck
Thank you! I look forward to your reply about the vent and sealer : )
You may be able to find it for Less on Amazon or homedepot.com
Were you able to cut the brick horizontally with that tile cutter??? I will have to cut a ton horizontally and I don’t know if I should just rent a wet saw??!?
I was able to do so. I don’t think a wet saw is necessary but if you feel like your not getting the results you want. You can always rent one! Good luck and I would love to see a your finished result! You can tag me in a photo on instagram @remingtonavenue or email me at mysha@remingtonavenue.com. Thanks and I m excited for you!
Hi so I’ve been reading this post for awhile and really want to tackle this project myself. Do you think it’s pretty hard? Can anyone do it? I’m worried about the grout because it’s permanent. Any thoughts?
Hi lisa
Yes I would recommend this project! Because of the imperfections in the thin brick (variations in size) it did not require the same amount of percission that most tile projects do. I eyeballed most of it. Good luck, you will love it
I just tackled this project after following this pin for the last 6 months. I love the way it turned out and I am so glad I came across this blog!! It’s my favorite project I have done so far and it made a huge impact on my kitchen. It did take a whole weekend to do and the grouting part was pretty tedious but I am so glad I attempted this. I have never laid tile or anything remotely close to this so I am sure if I did it you can too! 🙂
Melissa thank you so much for taking the time to post your results! I am always so happy to hear back! I would love to see a picture if you wouldn’t mind tagging me on instagram @remingtonavenue or just posting one here in the comments.
This is great. I recently bought a house that has a red and black brick backsplash and we hate it. I am going to update it with new grout lines and white wash it like you did! I know it will save a ton of money verses replacing it and I already love the look.
fantastic! Id love to see the final product
Did you do the brick around your sink? Have you had issues with moisture on the brick?
I haven’t had any moisture issues with the brick. There are more photos of my sink area on instagram @remingtonavenue. Thanks and good luck
Hi! I love the color of the original brick. What brand/color its it? TIA!
Hi Destiny the brick color and brand is listed right in this post. I ordered it from Home depot
I love this and want to do it to mine, but I can’t find this brand of brick or color at my Home Depot. Do they only sell it in certain states? I live in Texas and I looked on Rocky Mountain Stone’s website and they don’t have Texas listed as a dealer. 🙁
It was a special order. Have you talked to a representative about the brick veneer options they offer in your area?
Not yet. I just found your page today and looked online. I will go to the store this weekend. Also, what granite color do you have?
I dont know the granite color. It was here when we moved in.
Hi. Why did you remove the granite backsplash? Couldn’t you just apply on top? Just curious. Thinking about doing this but don’t want to remove it. Thanks!
Hi Amy! You could totally apply the brick veneers right above the existing granite backsplash. I chose to remove mine to give it a more seamless transition. That is my personal preference. They are not hard to remove either. Good luck and be sure to post a picture in the comments when you compete it. I’d love to see!
I love your brick back splash!! Inspired me 🙂
we are in the middle of doing ours now…
I’m going to love it … I think! My husband cut all the faces off of reclaimed bricks! Its been a bit of work… but I think I am going to really love the look.
I have a couple of questions:
1. Was that one gallon of grout enough to do your whole back splash?… and approx how many square feet did you do?
2. Do you have any staining issues behind your cooktop?… is it holding up well – like behind the sink?… are you still glad you did it?
thanks again for the tutorial!! Most helpful 🙂
I dont have any staining issues and I really can’t remember how many square feet I did, but I used 1 and a half buckets of grout! Cant wait to see.
I LOVE the soft rustic, whitewashed color of the bricks. What you’ve done is exquisite. Brick is pretty but like you, the original color is just too strong. I’m now making some decisions about new backsplash and countertop for my 20-year old kitchen and I’m having a hard time deciding between the whitewashed brick and a gorgeous product called Stikwood. I’ll be changing my ancient formica to quartz and either one will look great with it. Decisions! Decisions!
Thanks for the inspiration and for showing us that DIY is always possible.
Im so glad you found inspiration here. Both would look absolutely gorgeous although I wonder how the stik wood will hold up against water?
Thank you for your blog! I bit the bullet and did the brick back splash and painted and glazed cabinets! Followed your instructions on backsplash to a tee!
Wow thats amazing! Could you email me a photo or share a pic here in the comments? You could also tag me on instagram @remingtonavenue. I would LOVE to see