I know ya’ll are freakin’ out right now! Did she really paint her tile? Did it work? Is it already scuffed up? Will it chip? These are all the questions I asked myself before undertaking this DIY project. We paint our walls, our furniture, and even our concrete…so why the heck can’t we paint our tile? The simple answer to all these questions is… YES! IT CAN BE DONE! AND IT WILL STICK! I’m the girl who painted her tile!!!
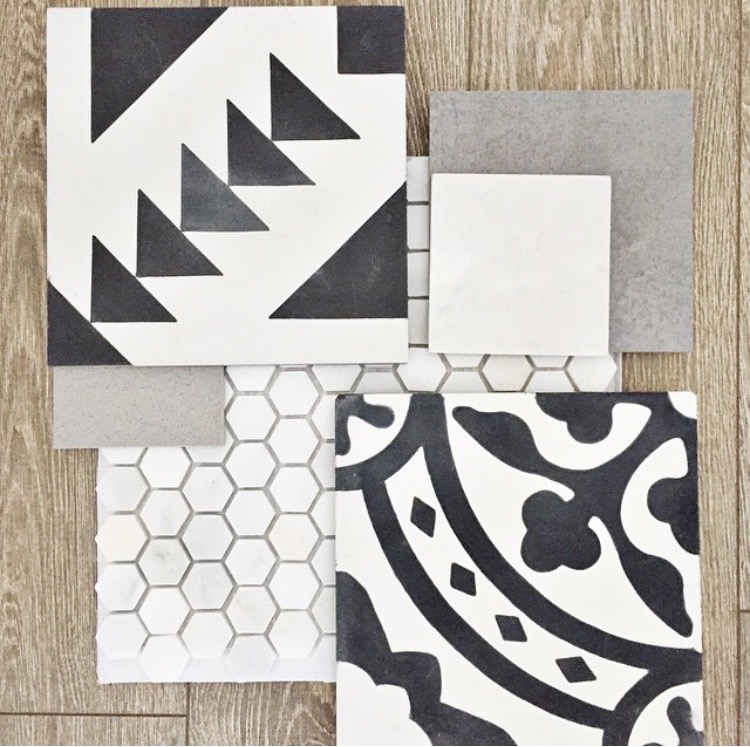
Have you all seen those cement tiles that come in so many cool prints? Ive fallen in love with all the graphics. Not wanting to replace all my tile got me thinking how I could accomplish this high impact look for less. This is what I came up with!
LIST OF SUPPLIES:
–Annie Sloan chalk paint in decided colors (I used Old White and Graphite) Note: I’ve also used Rust-Oleum brand with success
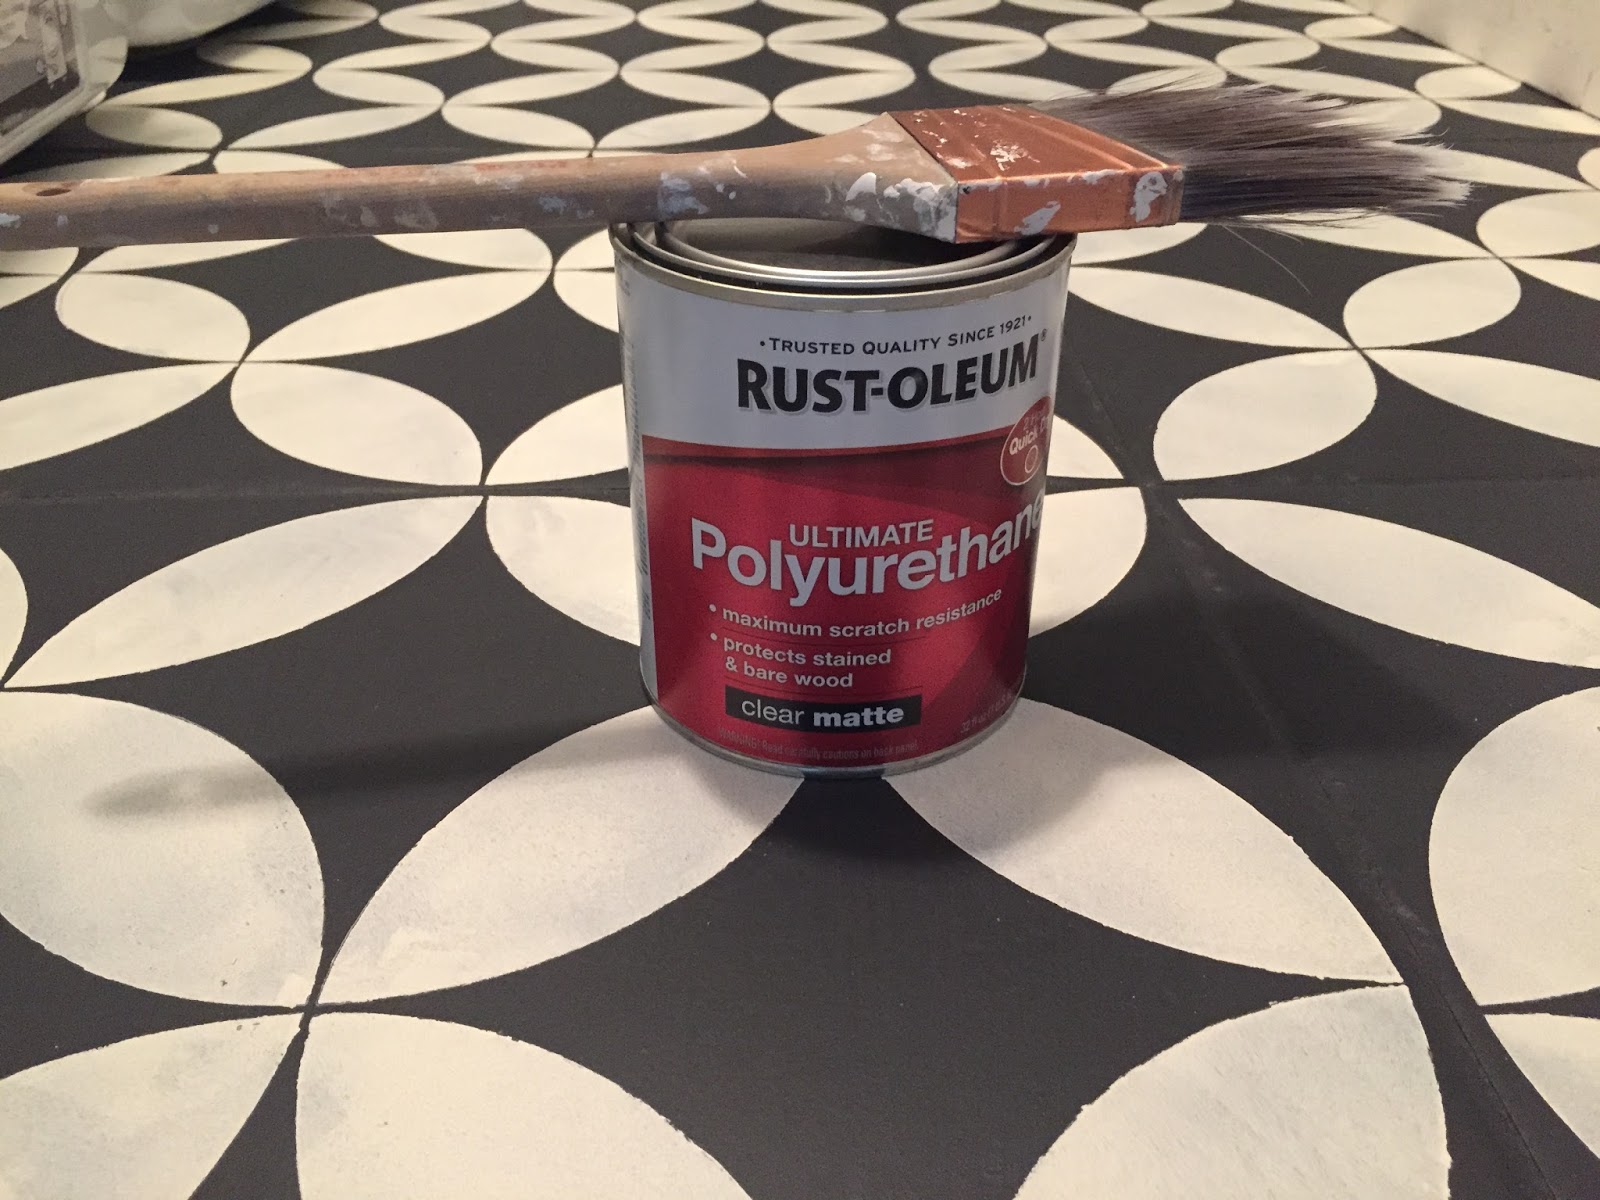
–Polyurethane for sealant (I used a low Luster because I did not want shiny)
Step 1: Vacuums and clean your floor with soap and water thoroughly. DO NOT SKIP THIS STEP. If your floor has any dirt, dust, or crumbs on it the paint will chip off leaving little specks where the paint did not take.
Step 2: Using your painters tape, tape along the bottom of the baseboard or wall the meets your tile. This will protect it from mishaps.
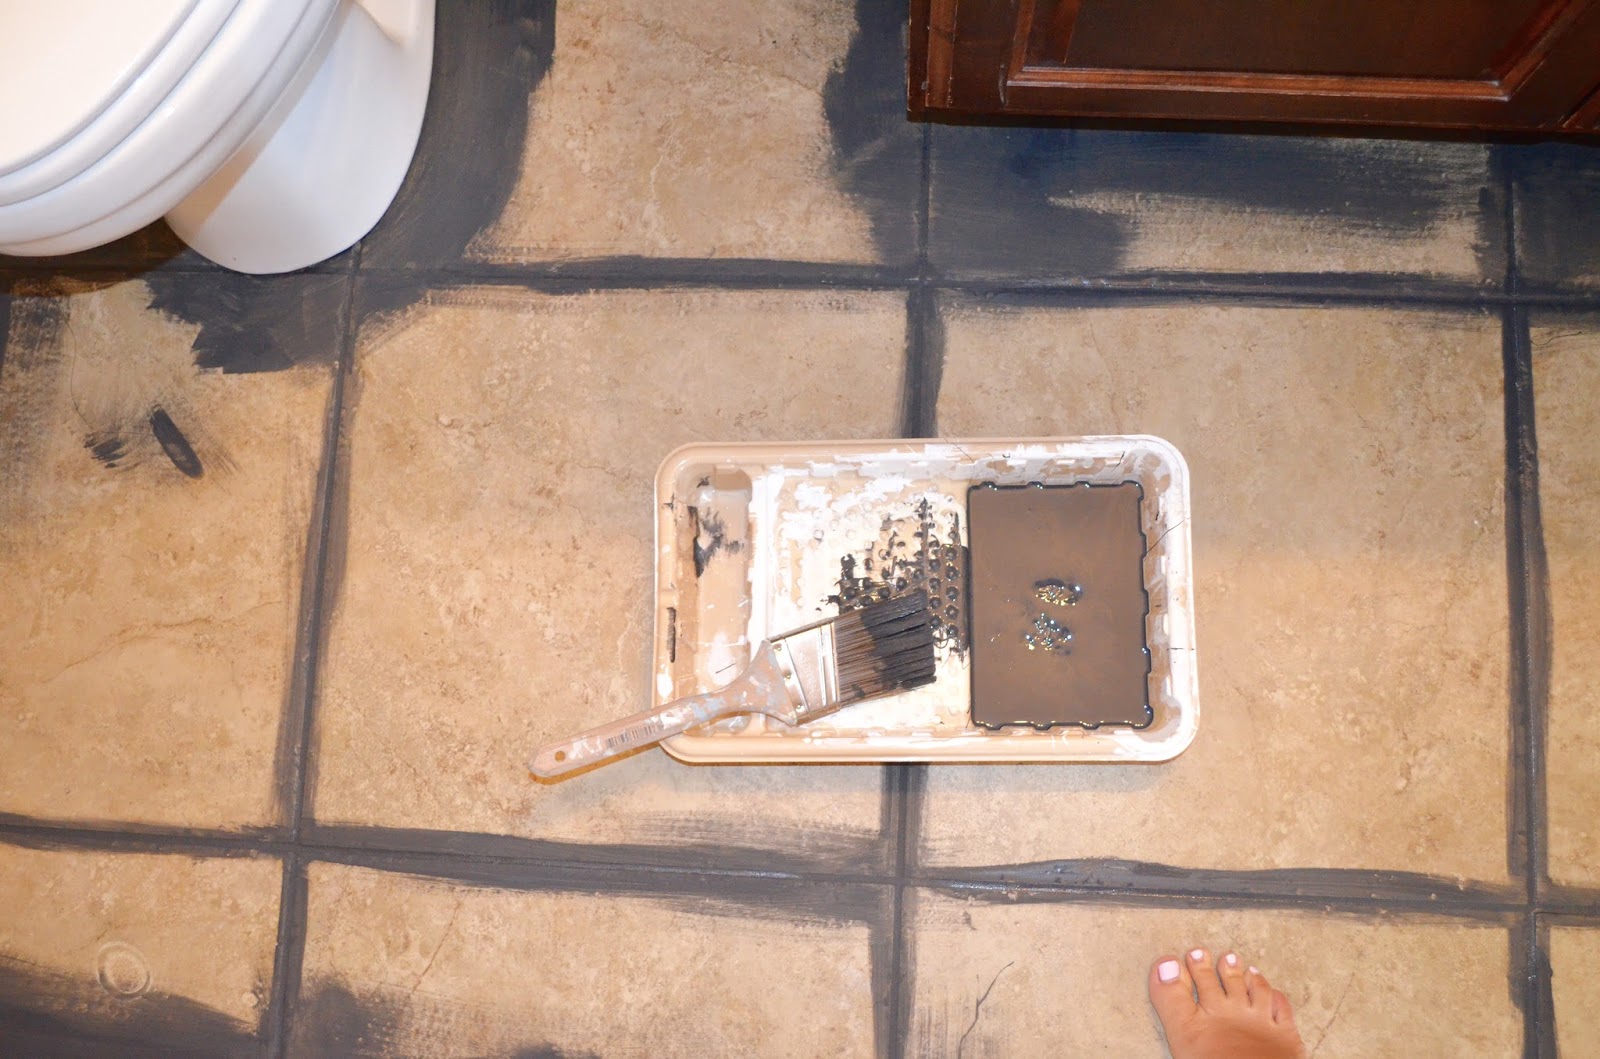
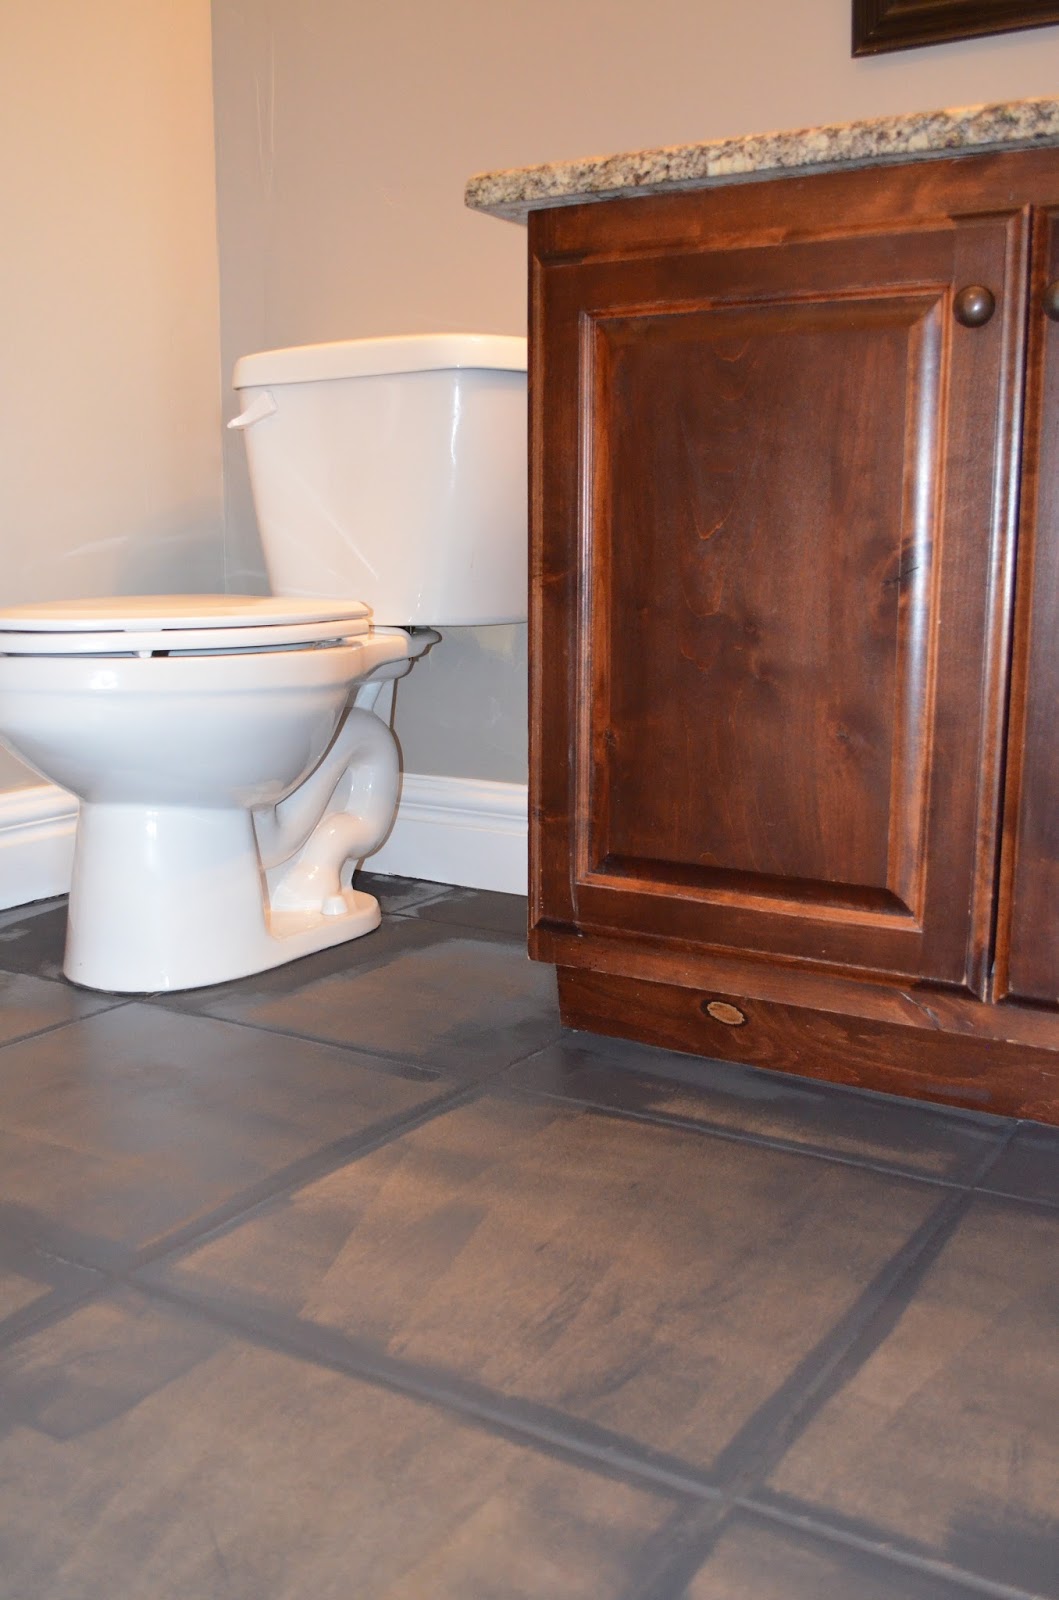
Step 3: Paint along the sides where the baseboards or walls meet the tile and along the grout lines. I used the Graphite color as my base color because I wanted more black than white in my pattern. Use your favorite angled paint brush for this step. I only did one coat here. The paint took very well. Let dry 1 hour.
Step 4: Using your foam roller, roll on the same paint all over tile. Make sure to go over all the spaces you already painted with the roller as well. This is what my floor looked like after one coat. Let dry 1 hour.
Step 5: Repeat step 4 until your floor is fully covered and there are no light spots. The chalk paint will scuff easily until its sealed so wear socks while stepping on the floor and avoid walking on it except to paint.
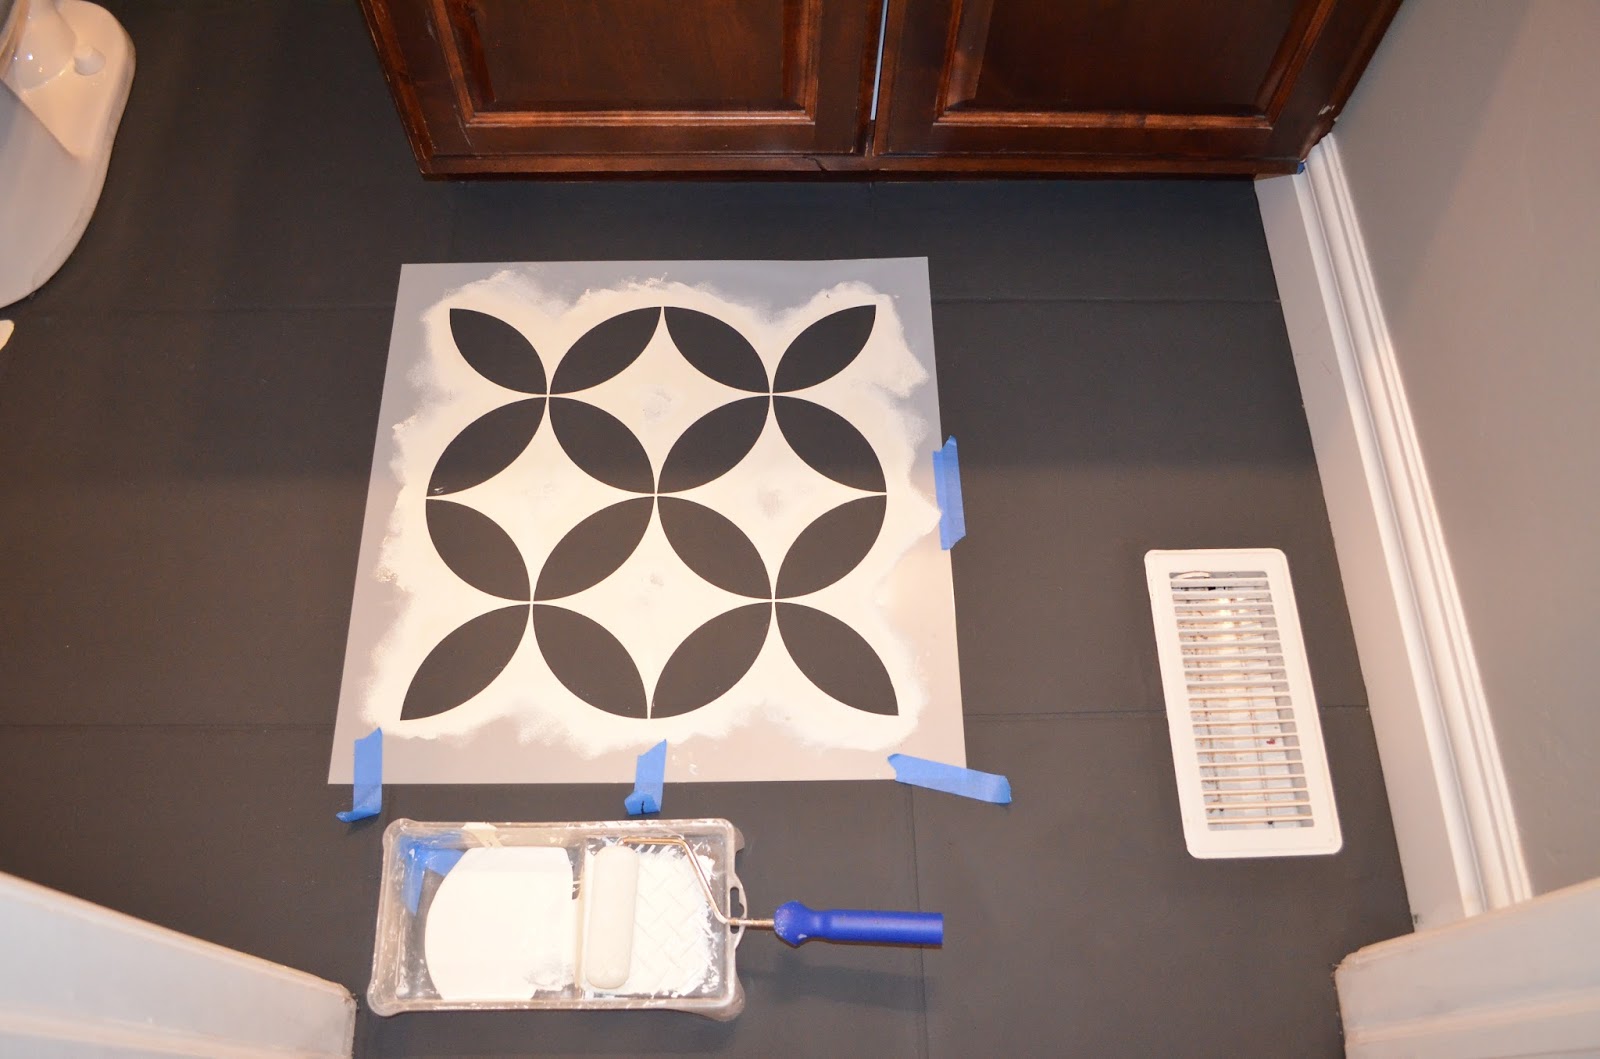
Step 6: Get your stencil out! I ordered mine custom, but Cutting Edge has some great options now. It’s funny, since this post went viral, they actually came out with a collection that mirrors so many of the cement tile patterns! Shop them just below or click HERE to see all the tile stencil options.
Make sure when you measure your tile you are exact. My tile was a 17.5 inch square. I made sure to specify what I would be using the stencil for so that the graphic would match the size of my tile. When you receive your stencil, it will be larger than your tile, but the graphic will be the same size.
Shop The Supplies
Step 7: Align your stencil with the corners of your tile. The outer most tips of my design came to each corner perfectly. Make sure its on strait and tape down lightly with your blue painters tape.
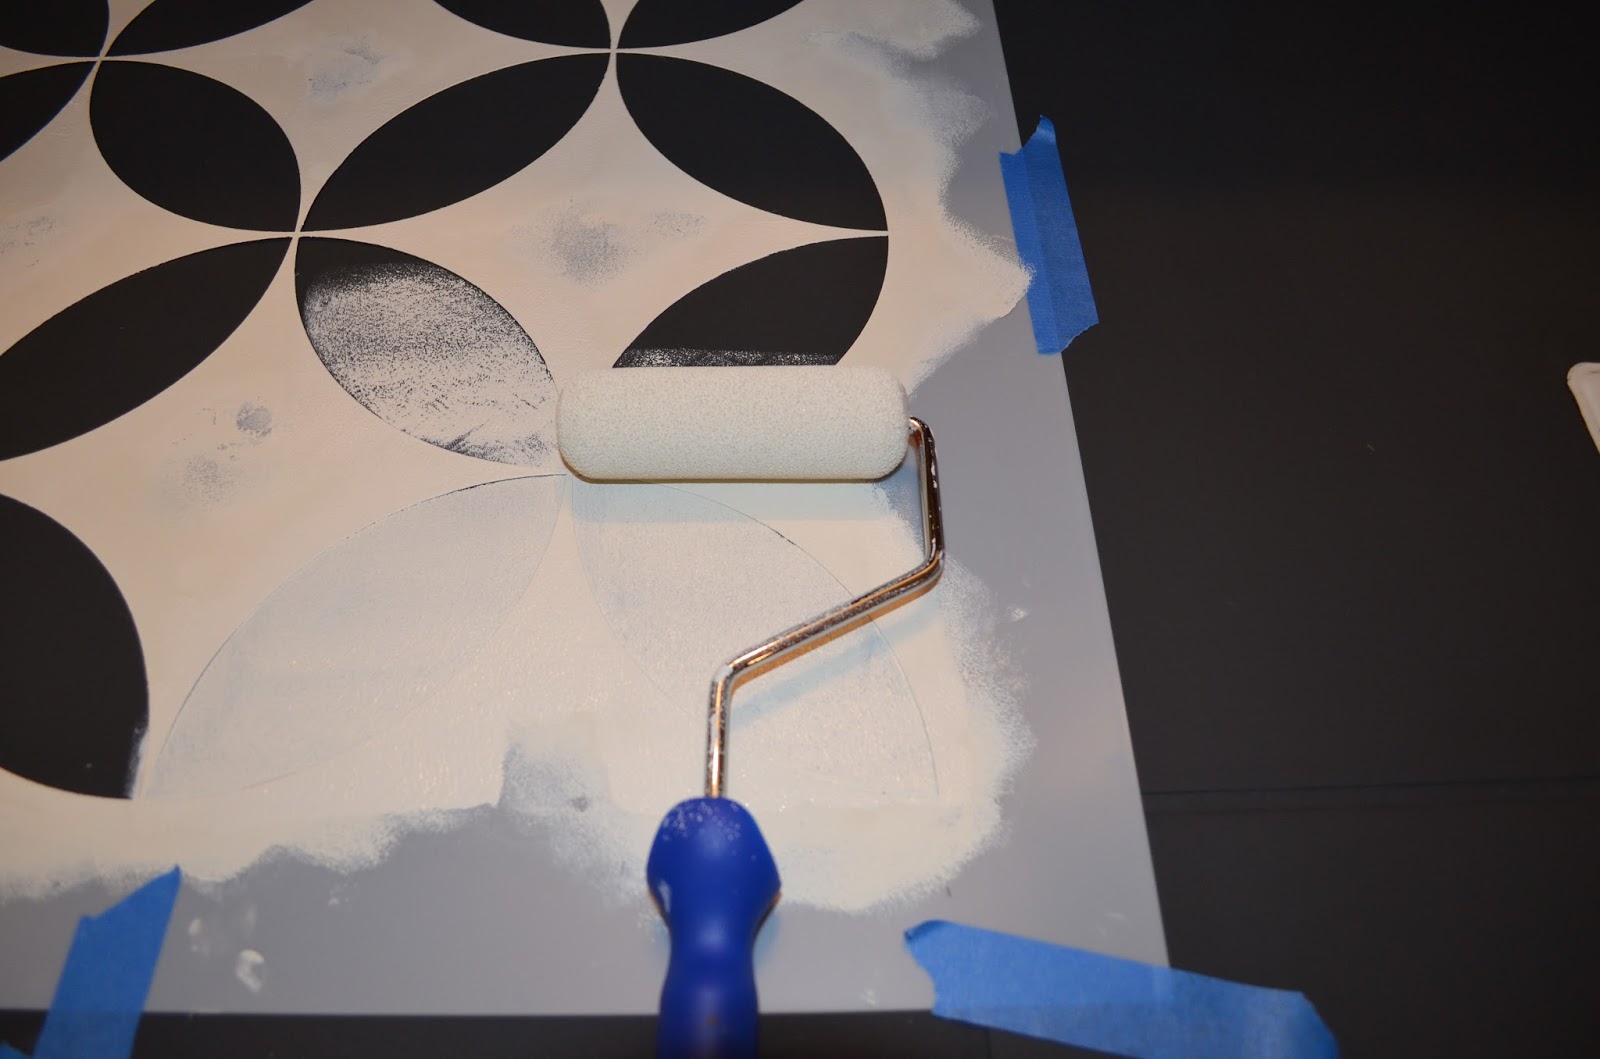
Step 8: Using a NEW foam roller pad, roll your second color over the stencil making sure to cover all exposed areas. You will want to paint fairly quickly as chalk paint drys fast. Roll over each small section at a time rather that over the entire image. This will help avoid roller marks.
Step 9: Carefully remove the stencil and place on another tile. Do not place on an adjoining tile. Because the actual stencil is larger than the tile, it will mess up the fresh paint if you paint a tile right next to it. Stagger the stencil on tiles diagonal and then go back and fill in the rest.
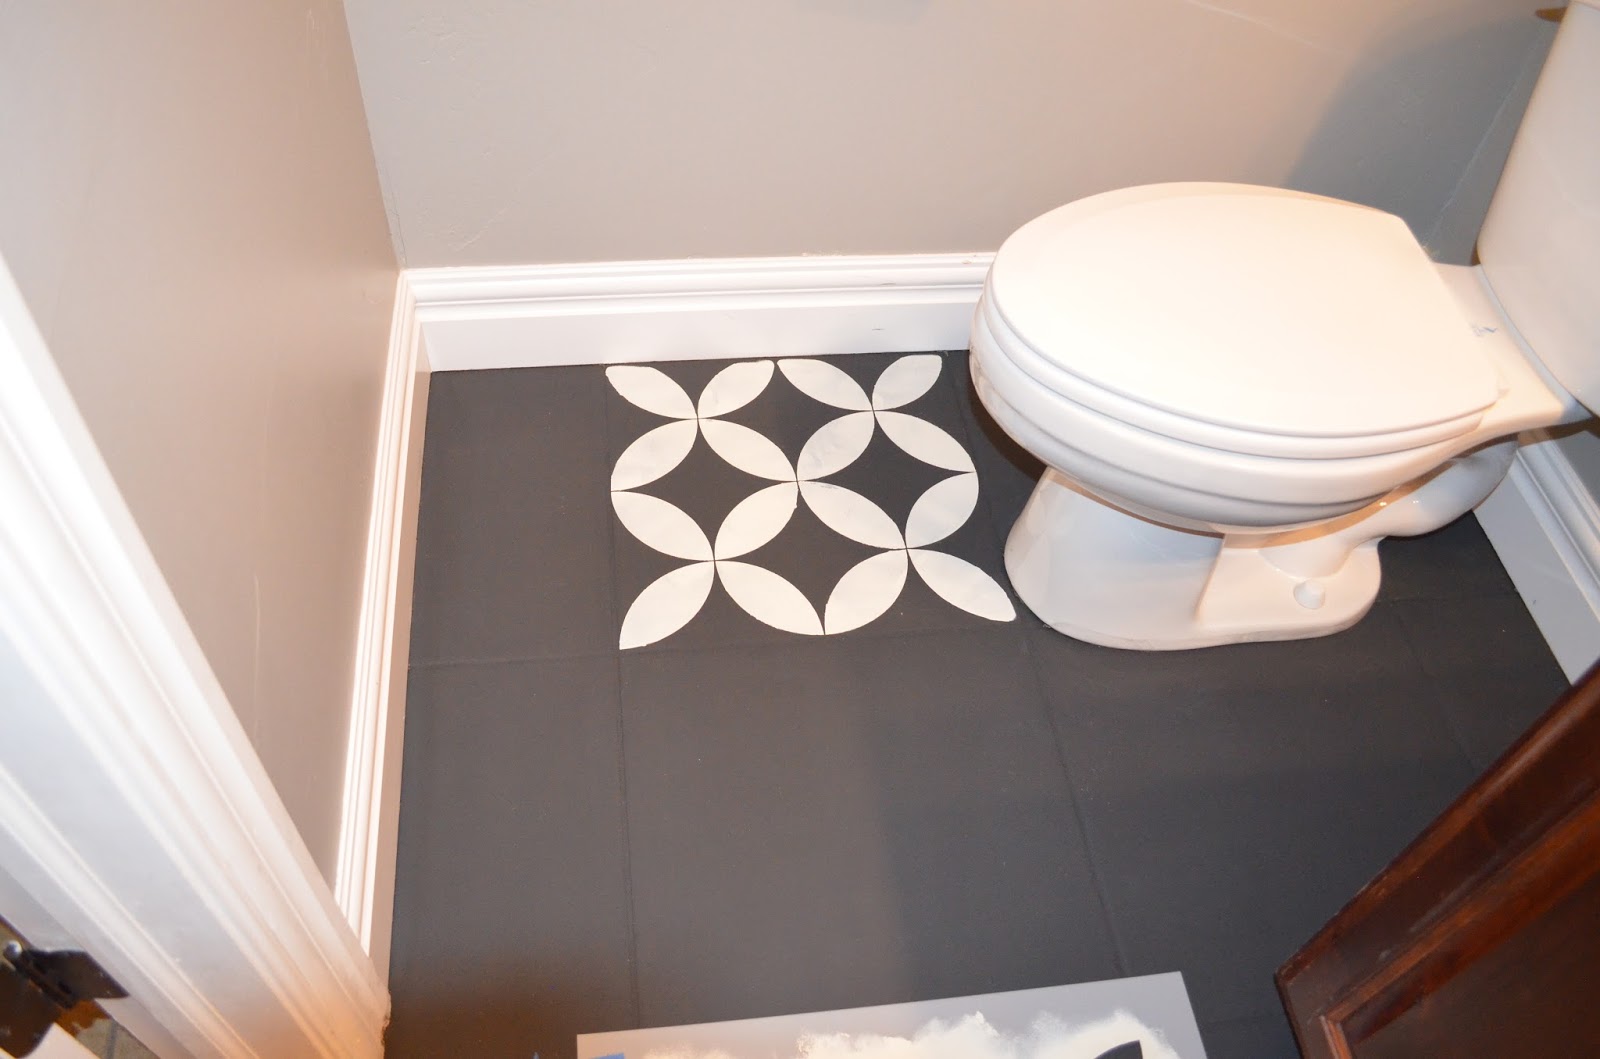
Step 10: When you come to the edges, some of your tiles may not be full size.. Mine weren’t. This part can be tricky, but the stencil bends easily. Match the corners of stencil with corners of tile and bent stencil so that you can roll paint all the way to the baseboard or wall. You may not be able to get exactly all the way but it can be touched up with the smaller brush later.
Step 11: Once your floor is complete let dry for at least 2 hours. Then go back and do touch ups. First use your base color and small paint brush to fix any areas where the paint may have bled. Let dry all the way and wash brush completely. Then go back with your second color (white) and fill in any areas needed. The more detailed you are, the better your finished product will look. The goal is to make the tile look as if your purchased it this way, not painted it yourself 🙂
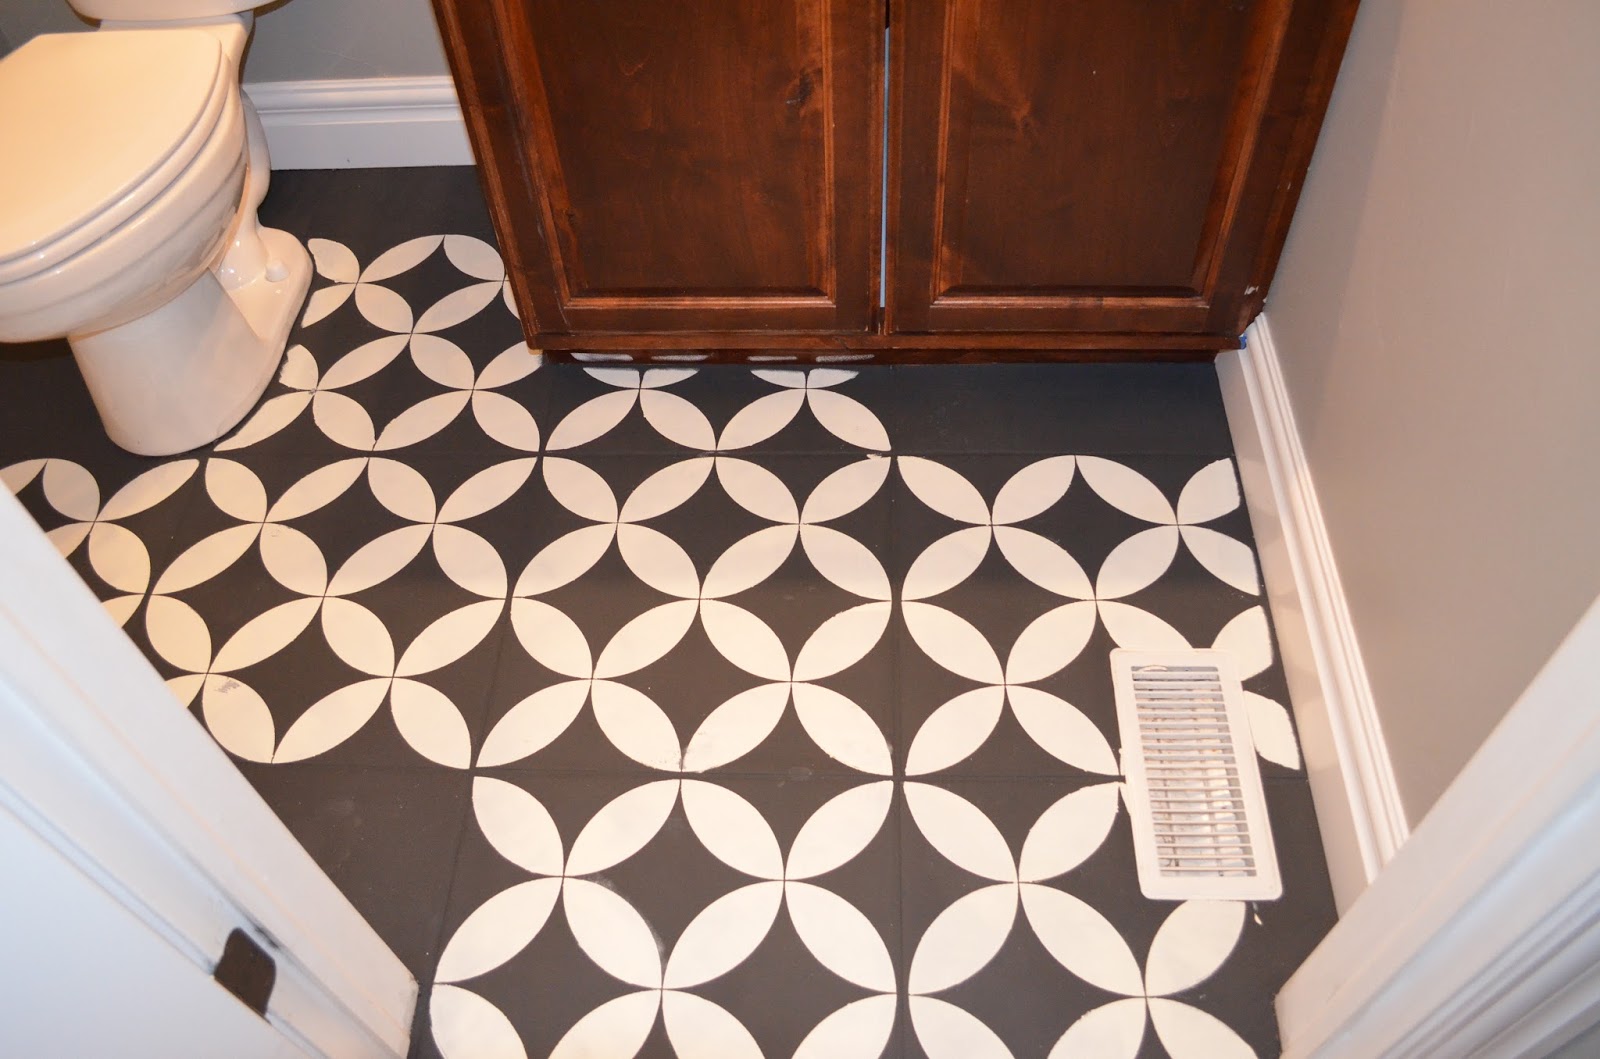
Step 12: After drying over night, brush on the first coat of polyacrylic. Cover floor completely but avoid over brushing. Let dry 2 hours between each coat. Roll on the rest of the coats using a NEW foam roller. I did 4 coats of polyacrylic. This step will keep your floor from scuffing and protect all your hard work! Don’t skimp! After the last coat, let it dry overnight before walking on it. Remove the blue tape form the walls the next morning.
Shop the Supplies
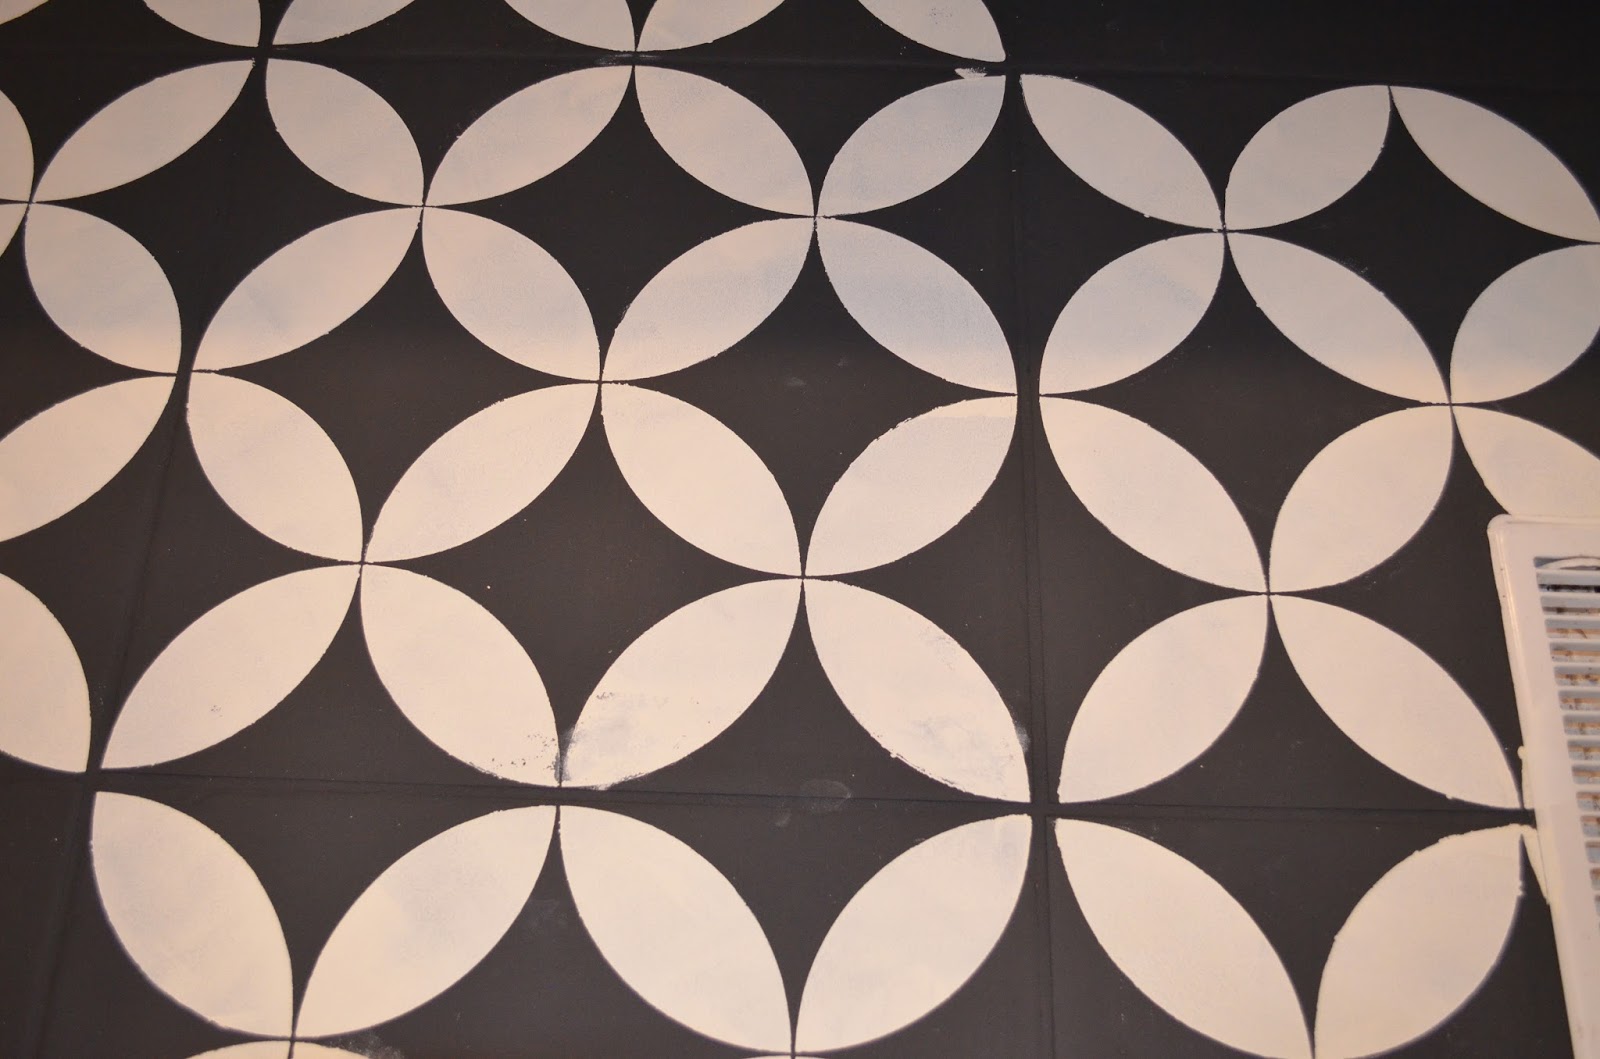
Step 13: Enjoy your new floor! You worked hard for it!!!!
Such an awesome idea! I attempted to paint my tile with some latex paint for a faux marble look, but it didn't look good! Might need to try your technique with the chalk paint!
Darling idea!!! I love fun floors. Looks great–now where can I do this in my house Mysh???
This is fabulous!!! I love love love what you did girl! Thanks for sharing!
Thanks so much Kara! YOU should totally do it
I love this but I can’t find the stencil pattern on the website
Jen I linked the online stencil company in the tutorial. It was a custom order
I also would like the same stencil. How did you customize it
I measured my tile and ordered the design from a company online. I listed it in the blog post
How are your floors holding up? I’m thinking about doing this.
Dana they are holding up great! Be sure to read my latest painted tile tutorial also. I used a different product and the link to this tutorial is on this same post!
Haha way too much travertine in your palace
Thank you Alma! That really means a lot girl
You have just inspired me to do this! I'm looking online at the stencil store. Do you remember what your stencil was called?
In the quilting world this pattern is called “Orange Peel”. Hope they call it that at the stencil place.
You did an amazing job! I can't wait to try this. Thanks for sharing!
Is the stencil pattern one already available for purchase on their website or is it one you sent them? Also, if it is there for purchase do you recall the name? Thanks this inspired me to finally do something about the horrible 1950's tile in our bathrooms!!
Ok, this is just the inspiration I needed to paint my floors too! Thank you for sharing. Your floor looks gorgeous! Has it been holding up well?
This is totally fantastic!!!!
I can't wait to see what you do!
It was a custom order. I sent in a pic of the design and specified size according to my tile.
Hi Rem,
The hubby gave me the green light to paint our kitchen floor. I am making my own design too, but quick question… how thick was the stencil that you ordered? 10 mil? Thanks!
How exciting. Gosh I can’t remember but i did list the source I ordered it through in the post. They just took care of it for me
They might know it by the pattern “Orange Peel” – that’s what it’s called in a quilt block pattern.
Thank you Bethany
Thank you so much Tracy! Its held up fantastically
What about now?? How has your painted tile held up after all this time? How do you clean your floors?? I have white ceramic and I absolutely hate it. I have to do something. Anything more durable than poly acrylic? Did it yellow over time?
its held up really well considering its off the garage entry and my most used half bath in the house. I have had a few little scratches I have patched up but thats it. I steam clean with water and very mild soap.
It was a custom order. I sent in a pic of the design and specific measurements according to my tile size. Good luck
This is amazing!!! Love it!
thanks so much erica
You should ask them to carry that stencil in their store. I was looking for it too. It's a popular and classic design.
Okay, I'm really about ready to do this!!!! It is just gorgeous! Is it still holding up okay?
It sure is! Tag me in a pic if you do. Id love to see
Can you SCRUB it, like one would weekly on bathroom cleaning day? Can you use bleach on it – it is still a bathroom floor and I like to do that once a week.
If the answers are “no”, could you maybe use some kind of industrial-like pourable more rugged glassy kind of poly? Would you know what that might be called????
Will do…thanks tons for the inspiration!!
You're awesome and this looks fabulous! Wish I had seen this post prior to me having taken up all of my white bathroom floor tile ?
Thanks so much susan! I wish i could have saved you the trouble too
Why do you think the chalk paint works best?
I liked chalk paint for this process because it bonds will to surfaces that have already been sealed. I also like the low luster quality that it provides. I did not want a shiny floor, I wanted it to resemble cement tile as much as possible. That being said, you could use an epoxy paint for a project like this too. It would be durable, but would be more shiny. I hope that answers your question. Thanks for visiting my blog Lindsay
Love what you did here! What if I did my floor in Epoxy white then did a stencil over the top in grey with chalk paint. Would the two stick together and bond? I would hope so but you never know- nice post!
Ok, so I LOVE this idea. What about cleaning it afterwards though? What do you use?
This comment has been removed by the author.
Lori I would think it would work fine, but I haven't tested it so I can't say for sure. If you take this project on, please tag me. I'd love to see
Hi Danie, I just use my steam mop that I use on all my floors.
LOVE this!! I have very ugly, shiny tile in both of my bathrooms. Do you think I will need to sand the floors down at all before I do this?
LOVE this! I have super ugly, shiny tiles in both of my bathrooms. Do you think I will need to sand them down first? Will the paint actually stick to these?
Hi kate. They say chalk paint adheres to everything but if your tile is super shiny I would def take a fine grit sand paper to it. It definitely wouldn't hurt anything!
Beautiful! How has this held up over time?
Its held up great. Its a very high traffic area. I had one little chip and i just patched it up with paint and sealed it. no problem.
This looks great! I'm going to try this in my foyer. The tile is ugly and i don't have the money to do a total redo so this looks like a great option. I already ordered a stencil. How many cans go chalk paint did you use and how large is the area you did? I LOVE AS chalk paint! Thanks 🙂
i used one can of each color, but i had leftovers
This looks so fun! What about corners do I need to order a smaller stencil for that ?
I’d order two and cut one for the tiles that are not whole squares. It’s a matter of budget, but if you can afford two, I’d do that 🙂
You could if you wanted, but i just waited to do the corners till last and cut my stencil down to fit!
I just painted tiles in my guest bath using Graphite and Paris Grey. I love your work, and the stenciling is perfect!
Do you think it would work if some of the stencil part was in the grout? I have tiles that are all different sizes. I dont think I could find a stencil that would fit perfectly inside each tile. I just wonder if it would be more likely to chip or something. Thanks!
thanks so much carolyn! And i bet yours turned out beautiful too
Melissa I don't think it would be more likely to chip, but it may look a bit wonky if you use the same stencil on different size tiles. That parts up to you though! I could def be wrong
I really want to try this on my horrible bathroom floor. Can I use regular interior paint? I have leftover paint from the vanity I just painted. Also, would a bathroom rug ruin the finish over time?
Hello there! Ive been thinking of doing this on my bathroom floor as well. I would not recommend using a regular interior paint. I chose chalk paint because it adheres well to all surfaces even ones that have been sealed. If you don't like chalk paint, you could try an epoxy paint such as you would use for garage floors. good luck
Love your floors!!! And I am a huge fan chalk paint but have only used it on furniture. Two questions… why the darker color first? If the tile pattern is fairly even, would you recommend the lighter color first? We are painting cement in the basement laundry/Mudroom so I’m trying to decide between my much- loved chalk paint and patio/floor paint… could we do the main color in the floor paint and the stencil design in chalk? Sorry- that was definitely more than two questions!!
Hi marta, first of all thanks for stopping in! I did the dark color first because that is the look I was going for. I had a girl use my tutorial and same stencil but painted white first and did the pattern in black and it turned out beautifully! I think you could totally use patio floor paint or chalk paint, but I haven’t yet used the patio paint on tile so I couldn’t tell you how it will hold up!
Yikes! Too late! I did sand it really well. I got impatient and wanted to use leftover paint. I will poly many coats!! Hopefully it works. So, do you think putting down a bathroom rug will ruin it?
good call on the sanding. Hoping it holds up for you. let me know please, I'm interested. Putting down a rug shouldn't affect it at all. I have one over mine right at my door.
So far, so good! It looks gorgeous!!!
Thank you so much for sharing your project; it's really helpful. You did a wonderful job. Anne.
Beautiful job! I've always wanted to do this over my ugly tile but I've read so many bad outcomes. Would this technique be OK to use on tile throughout the house and not just the bathroom?
Hi Vera, I think you could totally do it throughout your home. Just keep in mind youlll need to reseal about twice a year just to prevent scratches or nicks
Has the polyurethane yellowed the white? On a table I've done with chalk paint that's exactly what it did. I want to do this on my laundry room, but afraid of yellowing.
Leasha… It hasn't yellowed a bit. However I did use old white which is a creamy color so maybe that has something to do with it. Anyway no yellow at all and we are coming up on a year at the end of summer
The polyacrylic doesn’t yellow, but polyurethane will. This looks great!
This is just what I have been searching for! I have ugly ceramic tile in my sunroom but it will cost $$$ to replace! Thanks for the tutorial!
I am so GLAD I found your post! I have been wanting to Chalk paint my floors for years! I’ve painted my Kitchen cabinets, Bathroom cabinets, Desks, Dining room set and pretty much everything else in my house with the chalk paint. But the floors everyone said NOOOOO it will look horrible. We have 15 year old terra cotta color 12 x 12 tiles with gray grout they look so dated. Words can’t describe how much I hate that tile…and I have it in two bathrooms and my laundry room! ugh. So I just keep looking for a post or a pin….Until I found yours! YAY! This is Awesome! Thank You for sharing! I can’t wait to get started!
Looks great, I really love it! I was wondering how it’s holding up and if there’s anything you would do differently if you were to do it over again?
Thank you meghan. I love it and it has held up wonderfully. I’ve had a couple small chips in the paint, but they were easy to patch since it is just paint! If I were to do it again i would do the exact same process adding just a light sanding first to the tiles.
I’m just beginning my journey with chalk paint and took on a big project of 5 1980’s chrome framed with upholstery seats and backs. Used a DYI recipe. It is going great and I’m really in the middle of transforming. So excited whrn I found your blog and am planning to be very busy updating many more pieces. The floor tiles!!!! I am so going to do my master bath floor now. Have you ever tackled title counter tops? If so any tips would b greatly appreciated.
Oh how fun! I have never done countertops but I’m certain the same process would work
I have cream colored tile with black grout I want to paint my tile but I want to redo the grout too. I want to go with a dark gray on my tile but I’d like to use black grout with glitter in it should I paint the tile first and then do the tile or vise versa? Can you give me any advice on doing this? Thanks.
Hi billie. I painted right over my grout. If you paint your tile and grout like me your black glitter grout won’t show up! Hope that helps
Would this work on a tiled shower wall? Typical 70s square tiles. Thanks! Love what you did!
Stacy…Ive been dying to try in on a shower in my house. I have some ideas. Will update you soon
Just did this in my bathroom, or part of it. Did just the little room with toilet to see how it went before doing entire bathroom. Looks good – need to do a few more touch ups. Thank you for your post – really lightened up the room and the ugly builder tile.
so awesome! Id love to see a pic! maybe tag me on instagram or shoot me an email!
These are beautiful! When you were putting on your first top coat of polyurethane did you use a brush and then a roller for the next three coats? If so, why?
Thank you!!!
yes i did Katy! i just wanted to get maximum coverage and brushes sometimes cover differently than rollers. also the brush worked really well for cutting in the edges!
This is amazing!! I love it! What a clever idea. You girl 🙂
OK. I am convinced. This looks spectacular and my bathroom is in serious need of a revamp.
trying to design an economic kitchen backsplash. Have some ceramic tiles from a resale store. Didn’t find a large quantity so trying to piece together a design. Have lots of white and some with designs. Can you paint new ceramic wall tiles before installing them. If so, what type of paint would work. Thanks Thanks.
You can paint new ceramic tiles before installation! If you plan to stencil a design i would recommend doing that before you install. However, if you are planning paint a solid color, I would go ahead and do that after installation. I would use the same method and products I recommended in this post.
Hi I am about to start my bathroom floor. I am really DESPERATELY wanting the same stencil you used on your floor. IS there anyway you could tell me what it is called or how you found it? I went to the website you said but honestly that website is a bit confusing for me. THANK YOU for your help! I love your blog!
Hi sarah it was a custom stencil. I sent them the design I wanted according to the measurements of my tile and they made it special for me. Hope that helps
Hi, my wife and I are currently putting down the base coat and picking up the stencil today. My tile is 17.5″ squared but that does not include the grout lines. I’m a little confused about how to align the corners of the stencil to connect the pattern into one flowing design. Should I get the stencil at exactly 17.5″ or 18″ to compensate for the grout lines. Thank you for sharing your work!
Hi there! When you order the stencil make sure to specify that you need the actual design to measure 17.5 so that it aligns to your tile size. The actual stencil will be larger than your tile size but the design will be the same. Good luck
May I ask how this application has held up? I did it to our fireplace and sealed with wax instead and in constantly requires touch-ups;).
Thank you!
Meghan
It has held up beautifully. It is my mudroom which is the most used entrance to my home. It gets salt, water, dirt, sand, you name it! I have only had a couple spots chip and its been on my heavily used floor for over a year!
Hi Mysa,
I’m venturing into tile painting and wanted to clarify which sealant you used. The product you write about and link don’t match the images of the product you used (polycrylic vs. polyurethane). However, I can’t for the life of me find the exact product you show in the pictures. Are they comparable products? Because you state such good results in high traffic areas, I wanted to use exactly what you did to seal the floors.
Thank you!
Hi monica thanks so much for bringing that to my attention. I have updated the link to the exact product I used so you should be good to go. It’s polyurethane not acrylic btw
Hi did you paint the floor in your shower as well ? If not do you think it would work in the shower ? I want to paint my floor but would look odd if it didn’t follow through into the shower .
Your floor looks great !
Thanks for sharing
Hi jo, I will be doing a new tutorial specific for bathrooms and high water areas soon. Stay tuned
How has your floor held up? Have you experienced any chipping yet? I’d love to try it but am scared it might not hold up in our high traffic hallway!
Holding up great! Mine is in the most high traffic area in home and I have had a few small chips. The great thing is…its paint, so i just patched them and good as new. My stenciled floor has been painted on over a year now, so a few small chips is no big deal to me.
Hi,
I just painted my half bath floors with chalk paint. I waited two days to let it dry before applying clear coat. The paint seems to be coming off onto the paint brush of the ploy. Any tips?
Thanks!
That is weird. I’m not sure why that would happen. Did you properly clean your floors first. If in a greasy area like a kitchen, did you use a degreaser..?
This also happened with me. I followed your exact instructions. However I also waited two days before I applied my polyurethane. As I started brushing on the first coat, the black started streaking into the White (it was a brand new brush), and I could not wash it off once it began. Now the floor looks a little dirty. From a distance it just looks like it’s aged tile, so I’m trying to get over it. But after so much detail work with the touch ups, I was a little bummed that this happened.
Hi! Can you please tell me why you brushed on the first coat of polyurethane? I have applied the chalk paint to my sunroom floor. I didn’t stencil a pattern. I just want a solid color.
The area is quite big to brush on the polyurethane. Can I not just roll it on?
I brushed on the first coat along all the grout lines and baseboards. Sometimes those areas are harder to cover just with a roller.
Hi! I love this idea and want to try it out this weekend. I live in a condo and may want to resell in a few years, can this paint be removed?
Hi kristen. It probably can be removed with paint thinner but I cannot guarantee the result.
Mysha. I am curious about this also, have you found any information on removal?
No but you could use a paint thinner to remove it Im sure
Hi there. Looks like it’s been a year since you painted your floor – how is it holding up? Thanks!
Hi Alex my painted floor is doing great! It is by far my favorite floor in our home. I have had a couple nicks here and there but I just patched them up. Thats the great thing about paint!
Did it! Not as easy as I thought as my tile floor was glossy and the paint didn’t want to stick in a few spots. I had to sand and add another coat. I also learned that it’s probably not the best to make this your first attempt stencilling as I made plenty of discoveries as I went. I’m happy with the transformation but my next one will be even better! Can’t wait to to try another floor! Thank you for sharing!
Coleen way to go for it! I am so happy for your success and would love to see a photo if you wouldn’t mind sharing! You can post one here or tag me on instagram @remingtonavenue.com
Cheers!
I am in the process of doing this to my bathroom. I have completed the dark base coat and am ready to stencil. It already looks better. It’s cold right now and it is forcing me to have to wait much much longer to dry between coats. If you are doing this in cold weather you should take that into consideration. I’ve got 2 room heaters to help out but it’s still taking a half day to dry.
I painted mine in the summer so that is great info! Thanks for sharing amy
I really need to try this one. How the paint will perform on a glased surface? This question se really bothering me. I`m thinking to buy a small mosaic handmade pieces and create a backsplash with it (all tiles will be white, of course). Then i will paint them in different colors and if i dont like it i just remove paint and start from a scratch
You are such an inspiration! I’m obsessed with morracan tile, but my entire first floor is mostly basic porcelin tile, making it a gigantic project that could easily cost a small fortune. About how many square feet did you do and how long did it take you? Any idea how much of each color paint it took to cover your area? thank you for posting your hard work! It paid of beautifully!
i painted about 60sqft and it took 1 can of white and 1.5 cans of charcoal. It took me parts of 3 days to complete including drying time and all my usual everyday duties. Good luck on your endeavor…I dont regret painting my tiles one bit
What an amazing job!! I love DIYS and Im going to try something like this for my bathroom! I’m tired of the 90’s tiles we have.
LOVE the painted tile! i have zero ability in any type of crafting or painting. Truly want to try this. Want to paint floor in my first floor half bath. How do i end the paint before it gets to the hallway?
Hi terri. If your tile is the same in the bathroom and continues into the hallway I would paint the entire space. If it is two different types of floors then you could get away with just doing the bathroom. For example, I painted my mudroom but it connects to my laundry and half bath all with the same tile. I painted all the tile throughout but stopped at eh kitchen where my wood floor begins. Good luck
Do you have any ideas of ways to stop it before going into the hallway? Yes tile in my bathroom goes out into the hallway and then through out the majority of the house. There’s no real natural ending spot :/
Thats a tricky one. I may not do this if all your floors are connected. I fear it will end up looking DIY.
Thank you so much for this post. This is actually my second time finding it and the first time I saw it a while back I decided, yep. Defo going to do this in our kitchen. Hubby is a bit nervous so I researched the bejeepers out of it and found your site with specific details and decided to go through with this in our kitchen, utility, and sunroom. Aaagggghh so excited. My stencils are in the mail from Royal Design Stencils already only after a year of procrastination/research.
Thank you so much.
Cheers from Ireland.
Marie 🙂
fantastic marie…please do send me an email of your finished floor. Id love to see
I’m a bit late to the party but this has Blown My Mind!
We have very dated 1980’s white and blue tiled bathroom floor with a questionable (and not quite matching) feature tile on the walls. I’m inspired (although I do feel a bit trepidatious about how to stencil around the toilet!!).
Is your floor still holding up well?
Mysha, do you re-coat the painted tiles with polyurethane once (or twice) a year or do you just touch up any chipped paint as needed? When you repair any chips, do you re-seal the little area that been touched up?
Also, can I ask if the floor gets slippery when it’s wet?
Ta for the inspiration – my mind is full of patterns and possibilities!
Hi Karolina
My tile is holding up beautifully. In fact Im going to do another floor. I have patched a few scratches and overtime I patch, I reseal that tile square with the poly. In addition I have resealed the whole are once since the initial paint job. My floors did not get anymore slippery then before. Good luck and you will love it.
Hello!, My name is Debbie and I was inspired bathroom floor thanks to you. I did it!!! Andwith wonderful results! I renovated the whole bathroom and left the floor tiles for the end. I bough a very nice stencil antique look and Benjamin Moore chalk paint and used the minmax policrylic at the end. The results were wonderful!!! I took before and after picturesI wish I could post them for you to see them. We are all amazed by the final result and it also gave me confidence to make other renovations. SO gracias, gracias forever!!!
Debbie! Thank you so so much for sharing your results! I would absolutely love to see your before and after pictures. If you are on instagram you can tag me at remingtonavenue or you can email me the photos at mysha@remingtonavenue.com. I’m so excited for you!
I would love to see other success photos. I am planning on giving this a try very soon in my kitchen.
Has anyone else any final photos?
There are a couple on my instagram feed you can check out. (@remingtonavenue) Other then those photos, I have heard a ton of people tried it and loved it.
Hi. Your stenciled floors are just gorgeous! I would love to do this on the floor tile in front of our gas fireplace. Do you think it would hold up? Thank you! Keep up the wonderful inspirations!
I think that would be the perfect spot
Hi! Love the tutorial, it looks great! I was wondering how well your painted tile has held up? We are moving into a fixer upper and I would like to make a few updates without breaking the bank while we save up for our big updates. Has the paint chipped/scratched? If so, is it an easy fix? Thanks ahead of time!
Oops, sorry, just saw your comments on how it is holding up above mine 🙂 Thanks!
Your floor looks amazing and I have started to do the same on my old kitchen floor but I’m unable to find the product rustoleum polyurethane in the uk. Would a floor polyurethane varnish do the same thing??? Would be grateful for any help
Any polyurethane would do the job!
Thank you so so much for taking the time to post this 😀
The effort is just something though why go on and do laborious when you can just buy tiles which are already made with the patterns that you prefer. Just saying! still good job though
It is time consuming. I know some people have time to do a project like this but not the means to tear out and replace tile. To each their own!
I have small tiles about 1/2 inch each in my powder room. The house was built in 1977 and the tiles are brown and white. What are your thoughts of doing a larger stencil over the small tiles?
YOU could defiantly try it! It could be challenging to keep the edges from getting messy though. I would try it and see how its working. YOu’ll know pretty quick. IF you dont like it then you can always paint a solid color
Hi! Found your blog recently after searching for some tutorials…it looks awesome! Anyway, quick question if you don’t mind…I had planned on doing a dark navy blue base, but have not found any chalk paint that has navy as a color. Have you ever used regular latex paint? Or tried making your own? Thank you for the post and advice!
Hi michelle, so glad you found me! You could mix black with a blue to create a navy. I have never made my own chalk paint, but that doesnt mean it wouldn’t work. I would be hesitant to use a regular latex on tile, but and epoxy paint would work great. Good luck
I’m not sure what i did wrong, but i bought all of the same supplies and followed all directions. Mine was even simpler as I only wanted to paint 1 solid color with no design. When i painted the polyurethane some of the chalk came up. No problem, i let everything dry, removed the paint from the damaged tiles and started over. This did not work, the paint dried differently and the painters tape around the repainted tiles pulled up that paint. This has been a nightmare and the reason we chose this was because re-tiling was out of our budget. Now we are left with terrible looking floors in our kitchen! Nobody do this please, its a mistake that I greatly regret.
Hi Courtney I’m so sorry this didnt work out for you. I have truly loved my floors and I know so many who have used this tutorial and loved it as well. I’m wondering if you used a degreaser on your kitchen floors to clean them before applying any paint. Just curious?
Well after reading and re-reading your instructions, I decided to give it a try! Although I regret the stencil I chose (much too intricate and difficult!) I love the end result ! Thank you so much for your pictures and step by step instructions!! 🙂
Oh yeah! I would love to see pics if you want to post one here or tag me in a photo on instagram @remingtonavenue
Hi Mysha! I have been thinking about this tutorial since I first saw it on Instagram over a year ago. Finally built up the courage to do it! I have a question, did you go over all of the design after you rolled it, or just touch up? With rolling, there are spots that are lighter than others. Thanks for the great tutorial!
Hi angela, i touched up as needed. Cant wait to see
Hi! another question if you don’t mind…I’m just finished the 2nd coat of polyacrylic and scratched a spot. Did you find after the 24hrs of the poly that it didn’t scratch as easily? I hope I didn’t ruin the floors 🙁
Just wondering how your floors are holding up? I used the polyurethane/ polyacrylic that you recommended when I painted my floors and they looked awesome for about a month…and then while I was on vacation for a week our ac unit went out, and the house heated to well over 100 degrees (we live in Las Vegas). Now all of the white paint on my tiles is a pee yellow! Black and pee! Lol. Any tips on how to get rid of this, or do I need to sand them down and start from scratch?
Alix that is so weird! I have had my tiles painted for 2 years now and I haven’t had that issue. It must have been a reaction to the extreme heat. I wish I could tell you there was a way to get rid of the yellow tint, but your best bet would be to start over. I would suggest a clear epoxy finish in your case due to the extreme temperatures in your area.
How do you clean it? I have a bathroom with big tiles with a pink tint that i don’t like but I worry about having to be delicate with bathroom floors because of the finish…
Hi i just use a mild soap and steam clean
I have someslate tile, that is not smooth. Do you think it would look ok?
I could be difficult to stencil a rough texture like that but you could paint it for sure
Thanks so much for including my painted tile tutorial
Hello! I love your blog and am thinking of giving this a try in my kitchen. How do you clean the floors once the tile is painted? And…did you have any cracked tiles before painting…not sure if there’s an easy fix for this.
Hi Gab,
No I didnt have any cracked tiles but you might look into repairing those with some kind of caulk before painting over them. Also I steam mop my floors
This was a great tutorial. I noticed a lot of people asked in the comments what the pattern was and you reply “custom” but not the name. For all the people that want the name it is called Nagoya and you could possibly ask for a custom size but the website does not offer custom stencils. It is available in lots of sizes but not a 12
x 12 tile size. Hope this saves someone some time as I was looking all day.
thank you for sharing
Nice article! by Mysha Roberts Bolen
I have read these tutorials so many times a thank you – I have my stencil which is the Augusta stencil… do you think it would be ok to paint white on a black floor with that? I’m curious if the white paint would be dark enough to cover in one coat on the stencil without bleeding… thanks!!!!!
Yes I think it totally would work! I painted white over black tile on this post. The other floor i did was the opposite. you can see it here. https://remingtonavenue.com/?s=stencil+tile
Hello! I’m testing this out to see if it could work for my laundry room. Tiles are from ’85, so rather than busting them up, I think this would be a great alternative! I applied 3 coats of chalk paint on a test section, and when I applied my first coat of poly and some of the paint is lifting and I can see the original color underneath. Did you sand the tile before painting to prevent this? Our original tile seems to have a gloss finish, which may have something to do with it. Just curious if you experienced this w/ your project as well.
Appreciate your help-and your floor looks great!
If you have a glossy tile i would suggest a light sanding and a primer paint…as stated in the tutorial. Im excited to hear how they turn out. Please tag me in a photo @remingtonavenue


 Add to favorites or read later
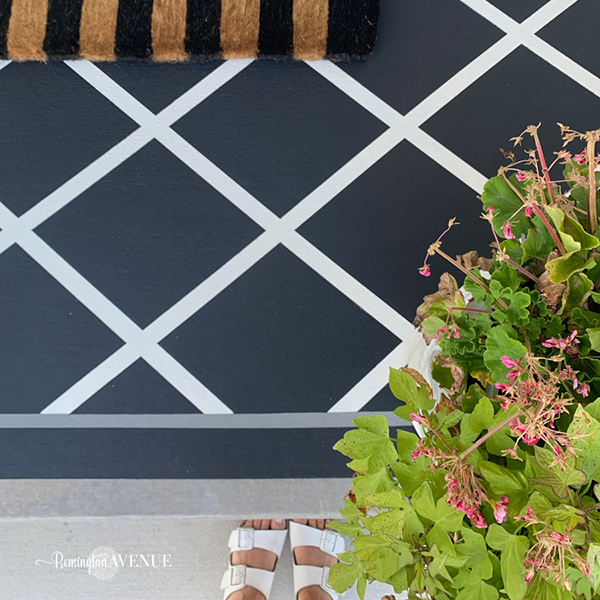
Such an awesome idea! I attempted to paint my tile with some latex paint for a faux marble look, but it didn't look good! Might need to try your technique with the chalk paint!
Darling idea!!! I love fun floors. Looks great–now where can I do this in my house Mysh???
This is fabulous!!! I love love love what you did girl! Thanks for sharing!
Thanks so much Kara! YOU should totally do it
I love this but I can’t find the stencil pattern on the website
Jen I linked the online stencil company in the tutorial. It was a custom order
I also would like the same stencil. How did you customize it
I measured my tile and ordered the design from a company online. I listed it in the blog post
How are your floors holding up? I’m thinking about doing this.
Dana they are holding up great! Be sure to read my latest painted tile tutorial also. I used a different product and the link to this tutorial is on this same post!
Haha way too much travertine in your palace
Thank you Alma! That really means a lot girl
You have just inspired me to do this! I'm looking online at the stencil store. Do you remember what your stencil was called?
In the quilting world this pattern is called “Orange Peel”. Hope they call it that at the stencil place.
You did an amazing job! I can't wait to try this. Thanks for sharing!
Is the stencil pattern one already available for purchase on their website or is it one you sent them? Also, if it is there for purchase do you recall the name? Thanks this inspired me to finally do something about the horrible 1950's tile in our bathrooms!!
Ok, this is just the inspiration I needed to paint my floors too! Thank you for sharing. Your floor looks gorgeous! Has it been holding up well?
This is totally fantastic!!!!
I can't wait to see what you do!
It was a custom order. I sent in a pic of the design and specified size according to my tile.
Hi Rem,
The hubby gave me the green light to paint our kitchen floor. I am making my own design too, but quick question… how thick was the stencil that you ordered? 10 mil? Thanks!
How exciting. Gosh I can’t remember but i did list the source I ordered it through in the post. They just took care of it for me
They might know it by the pattern “Orange Peel” – that’s what it’s called in a quilt block pattern.
Thank you Bethany
Thank you so much Tracy! Its held up fantastically
What about now?? How has your painted tile held up after all this time? How do you clean your floors?? I have white ceramic and I absolutely hate it. I have to do something. Anything more durable than poly acrylic? Did it yellow over time?
its held up really well considering its off the garage entry and my most used half bath in the house. I have had a few little scratches I have patched up but thats it. I steam clean with water and very mild soap.
It was a custom order. I sent in a pic of the design and specific measurements according to my tile size. Good luck
This is amazing!!! Love it!
thanks so much erica
You should ask them to carry that stencil in their store. I was looking for it too. It's a popular and classic design.
Okay, I'm really about ready to do this!!!! It is just gorgeous! Is it still holding up okay?
It sure is! Tag me in a pic if you do. Id love to see
Can you SCRUB it, like one would weekly on bathroom cleaning day? Can you use bleach on it – it is still a bathroom floor and I like to do that once a week.
If the answers are “no”, could you maybe use some kind of industrial-like pourable more rugged glassy kind of poly? Would you know what that might be called????
Will do…thanks tons for the inspiration!!
You're awesome and this looks fabulous! Wish I had seen this post prior to me having taken up all of my white bathroom floor tile ?
Thanks so much susan! I wish i could have saved you the trouble too
Why do you think the chalk paint works best?
I liked chalk paint for this process because it bonds will to surfaces that have already been sealed. I also like the low luster quality that it provides. I did not want a shiny floor, I wanted it to resemble cement tile as much as possible. That being said, you could use an epoxy paint for a project like this too. It would be durable, but would be more shiny. I hope that answers your question. Thanks for visiting my blog Lindsay
Love what you did here! What if I did my floor in Epoxy white then did a stencil over the top in grey with chalk paint. Would the two stick together and bond? I would hope so but you never know- nice post!
Ok, so I LOVE this idea. What about cleaning it afterwards though? What do you use?
This comment has been removed by the author.
Lori I would think it would work fine, but I haven't tested it so I can't say for sure. If you take this project on, please tag me. I'd love to see
Hi Danie, I just use my steam mop that I use on all my floors.
LOVE this!! I have very ugly, shiny tile in both of my bathrooms. Do you think I will need to sand the floors down at all before I do this?
LOVE this! I have super ugly, shiny tiles in both of my bathrooms. Do you think I will need to sand them down first? Will the paint actually stick to these?
Hi kate. They say chalk paint adheres to everything but if your tile is super shiny I would def take a fine grit sand paper to it. It definitely wouldn't hurt anything!
Beautiful! How has this held up over time?
Its held up great. Its a very high traffic area. I had one little chip and i just patched it up with paint and sealed it. no problem.
This looks great! I'm going to try this in my foyer. The tile is ugly and i don't have the money to do a total redo so this looks like a great option. I already ordered a stencil. How many cans go chalk paint did you use and how large is the area you did? I LOVE AS chalk paint! Thanks 🙂
i used one can of each color, but i had leftovers
This looks so fun!
What about corners do I need to order a smaller stencil for that ?
I’d order two and cut one for the tiles that are not whole squares. It’s a matter of budget, but if you can afford two, I’d do that 🙂
You could if you wanted, but i just waited to do the corners till last and cut my stencil down to fit!
I just painted tiles in my guest bath using Graphite and Paris Grey. I love your work, and the stenciling is perfect!
Do you think it would work if some of the stencil part was in the grout? I have tiles that are all different sizes. I dont think I could find a stencil that would fit perfectly inside each tile. I just wonder if it would be more likely to chip or something. Thanks!
thanks so much carolyn! And i bet yours turned out beautiful too
Melissa I don't think it would be more likely to chip, but it may look a bit wonky if you use the same stencil on different size tiles. That parts up to you though! I could def be wrong
I really want to try this on my horrible bathroom floor. Can I use regular interior paint? I have leftover paint from the vanity I just painted. Also, would a bathroom rug ruin the finish over time?
Hello there! Ive been thinking of doing this on my bathroom floor as well. I would not recommend using a regular interior paint. I chose chalk paint because it adheres well to all surfaces even ones that have been sealed. If you don't like chalk paint, you could try an epoxy paint such as you would use for garage floors. good luck
Love your floors!!! And I am a huge fan chalk paint but have only used it on furniture. Two questions… why the darker color first? If the tile pattern is fairly even, would you recommend the lighter color first? We are painting cement in the basement laundry/Mudroom so I’m trying to decide between my much- loved chalk paint and patio/floor paint… could we do the main color in the floor paint and the stencil design in chalk? Sorry- that was definitely more than two questions!!
Hi marta, first of all thanks for stopping in! I did the dark color first because that is the look I was going for. I had a girl use my tutorial and same stencil but painted white first and did the pattern in black and it turned out beautifully! I think you could totally use patio floor paint or chalk paint, but I haven’t yet used the patio paint on tile so I couldn’t tell you how it will hold up!
Yikes! Too late! I did sand it really well. I got impatient and wanted to use leftover paint. I will poly many coats!! Hopefully it works. So, do you think putting down a bathroom rug will ruin it?
good call on the sanding. Hoping it holds up for you. let me know please, I'm interested. Putting down a rug shouldn't affect it at all. I have one over mine right at my door.
So far, so good! It looks gorgeous!!!
Thank you so much for sharing your project; it's really helpful. You did a wonderful job.
Anne.
Beautiful job! I've always wanted to do this over my ugly tile but I've read so many bad outcomes. Would this technique be OK to use on tile throughout the house and not just the bathroom?
Hi Vera, I think you could totally do it throughout your home. Just keep in mind youlll need to reseal about twice a year just to prevent scratches or nicks
Has the polyurethane yellowed the white? On a table I've done with chalk paint that's exactly what it did. I want to do this on my laundry room, but afraid of yellowing.
Leasha… It hasn't yellowed a bit. However I did use old white which is a creamy color so maybe that has something to do with it. Anyway no yellow at all and we are coming up on a year at the end of summer
The polyacrylic doesn’t yellow, but polyurethane will. This looks great!
Thanks for sharing article about Tiles
This is just what I have been searching for! I have ugly ceramic tile in my sunroom but it will cost $$$ to replace! Thanks for the tutorial!
I am so GLAD I found your post! I have been wanting to Chalk paint my floors for years! I’ve painted my Kitchen cabinets, Bathroom cabinets, Desks, Dining room set and pretty much everything else in my house with the chalk paint. But the floors everyone said NOOOOO it will look horrible. We have 15 year old terra cotta color 12 x 12 tiles with gray grout they look so dated. Words can’t describe how much I hate that tile…and I have it in two bathrooms and my laundry room! ugh. So I just keep looking for a post or a pin….Until I found yours! YAY! This is Awesome! Thank You for sharing! I can’t wait to get started!
Looks great, I really love it! I was wondering how it’s holding up and if there’s anything you would do differently if you were to do it over again?
Thank you meghan. I love it and it has held up wonderfully. I’ve had a couple small chips in the paint, but they were easy to patch since it is just paint! If I were to do it again i would do the exact same process adding just a light sanding first to the tiles.
I’m just beginning my journey with chalk paint and took on a big project of 5 1980’s chrome framed with upholstery seats and backs. Used a DYI recipe. It is going great and I’m really in the middle of transforming. So excited whrn I found your blog and am planning to be very busy updating many more pieces. The floor tiles!!!! I am so going to do my master bath floor now. Have you ever tackled title counter tops? If so any tips would b greatly appreciated.
Oh how fun! I have never done countertops but I’m certain the same process would work
I have cream colored tile with black grout I want to paint my tile but I want to redo the grout too. I want to go with a dark gray on my tile but I’d like to use black grout with glitter in it should I paint the tile first and then do the tile or vise versa? Can you give me any advice on doing this? Thanks.
Hi billie. I painted right over my grout. If you paint your tile and grout like me your black glitter grout won’t show up! Hope that helps
Would this work on a tiled shower wall? Typical 70s square tiles. Thanks! Love what you did!
Stacy…Ive been dying to try in on a shower in my house. I have some ideas. Will update you soon
Just did this in my bathroom, or part of it. Did just the little room with toilet to see how it went before doing entire bathroom. Looks good – need to do a few more touch ups. Thank you for your post – really lightened up the room and the ugly builder tile.
so awesome! Id love to see a pic! maybe tag me on instagram or shoot me an email!
These are beautiful! When you were putting on your first top coat of polyurethane did you use a brush and then a roller for the next three coats? If so, why?
Thank you!!!
yes i did Katy! i just wanted to get maximum coverage and brushes sometimes cover differently than rollers. also the brush worked really well for cutting in the edges!
This is amazing!! I love it! What a clever idea. You girl 🙂
OK. I am convinced. This looks spectacular and my bathroom is in serious need of a revamp.
trying to design an economic kitchen backsplash. Have some ceramic tiles from a resale store. Didn’t find a large quantity so trying to piece together a design. Have lots of white and some with designs. Can you paint new ceramic wall tiles before installing them. If so, what type of paint would work. Thanks Thanks.
You can paint new ceramic tiles before installation! If you plan to stencil a design i would recommend doing that before you install. However, if you are planning paint a solid color, I would go ahead and do that after installation. I would use the same method and products I recommended in this post.
Hi I am about to start my bathroom floor. I am really DESPERATELY wanting the same stencil you used on your floor. IS there anyway you could tell me what it is called or how you found it? I went to the website you said but honestly that website is a bit confusing for me. THANK YOU for your help! I love your blog!
Hi sarah it was a custom stencil. I sent them the design I wanted according to the measurements of my tile and they made it special for me. Hope that helps
Hi, my wife and I are currently putting down the base coat and picking up the stencil today. My tile is 17.5″ squared but that does not include the grout lines. I’m a little confused about how to align the corners of the stencil to connect the pattern into one flowing design. Should I get the stencil at exactly 17.5″ or 18″ to compensate for the grout lines. Thank you for sharing your work!
Hi there! When you order the stencil make sure to specify that you need the actual design to measure 17.5 so that it aligns to your tile size. The actual stencil will be larger than your tile size but the design will be the same. Good luck
May I ask how this application has held up? I did it to our fireplace and sealed with wax instead and in constantly requires touch-ups;).
Thank you!
Meghan
It has held up beautifully. It is my mudroom which is the most used entrance to my home. It gets salt, water, dirt, sand, you name it! I have only had a couple spots chip and its been on my heavily used floor for over a year!
Hi Mysa,
I’m venturing into tile painting and wanted to clarify which sealant you used. The product you write about and link don’t match the images of the product you used (polycrylic vs. polyurethane). However, I can’t for the life of me find the exact product you show in the pictures. Are they comparable products? Because you state such good results in high traffic areas, I wanted to use exactly what you did to seal the floors.
Thank you!
Hi monica thanks so much for bringing that to my attention. I have updated the link to the exact product I used so you should be good to go. It’s polyurethane not acrylic btw
Hi did you paint the floor in your shower as well ? If not do you think it would work in the shower ? I want to paint my floor but would look odd if it didn’t follow through into the shower .
Your floor looks great !
Thanks for sharing
Hi jo, I will be doing a new tutorial specific for bathrooms and high water areas soon. Stay tuned
How has your floor held up? Have you experienced any chipping yet? I’d love to try it but am scared it might not hold up in our high traffic hallway!
Holding up great! Mine is in the most high traffic area in home and I have had a few small chips. The great thing is…its paint, so i just patched them and good as new. My stenciled floor has been painted on over a year now, so a few small chips is no big deal to me.
Hi,
I just painted my half bath floors with chalk paint. I waited two days to let it dry before applying clear coat. The paint seems to be coming off onto the paint brush of the ploy. Any tips?
Thanks!
That is weird. I’m not sure why that would happen. Did you properly clean your floors first. If in a greasy area like a kitchen, did you use a degreaser..?
This also happened with me. I followed your exact instructions. However I also waited two days before I applied my polyurethane. As I started brushing on the first coat, the black started streaking into the White (it was a brand new brush), and I could not wash it off once it began. Now the floor looks a little dirty. From a distance it just looks like it’s aged tile, so I’m trying to get over it. But after so much detail work with the touch ups, I was a little bummed that this happened.
Do you think this would work inside shower?
waiting anxiously for additional tutorial
I have travertine floors and counter tops. would love to use this method for my bathroom counter top – also. Heck – the whole bathroom!
Amazing post.. Love it…
Hi! Can you please tell me why you brushed on the first coat of polyurethane? I have applied the chalk paint to my sunroom floor. I didn’t stencil a pattern. I just want a solid color.
The area is quite big to brush on the polyurethane. Can I not just roll it on?
I brushed on the first coat along all the grout lines and baseboards. Sometimes those areas are harder to cover just with a roller.
Hi! I love this idea and want to try it out this weekend. I live in a condo and may want to resell in a few years, can this paint be removed?
Hi kristen. It probably can be removed with paint thinner but I cannot guarantee the result.
Mysha. I am curious about this also, have you found any information on removal?
No but you could use a paint thinner to remove it Im sure
Hi there. Looks like it’s been a year since you painted your floor – how is it holding up? Thanks!
Hi Alex my painted floor is doing great! It is by far my favorite floor in our home. I have had a couple nicks here and there but I just patched them up. Thats the great thing about paint!
Did it! Not as easy as I thought as my tile floor was glossy and the paint didn’t want to stick in a few spots. I had to sand and add another coat. I also learned that it’s probably not the best to make this your first attempt stencilling as I made plenty of discoveries as I went. I’m happy with the transformation but my next one will be even better! Can’t wait to to try another floor! Thank you for sharing!
Coleen way to go for it! I am so happy for your success and would love to see a photo if you wouldn’t mind sharing! You can post one here or tag me on instagram @remingtonavenue.com
Cheers!
I am in the process of doing this to my bathroom. I have completed the dark base coat and am ready to stencil. It already looks better. It’s cold right now and it is forcing me to have to wait much much longer to dry between coats. If you are doing this in cold weather you should take that into consideration. I’ve got 2 room heaters to help out but it’s still taking a half day to dry.
I painted mine in the summer so that is great info! Thanks for sharing amy
I really need to try this one. How the paint will perform on a glased surface? This question se really bothering me. I`m thinking to buy a small mosaic handmade pieces and create a backsplash with it (all tiles will be white, of course). Then i will paint them in different colors and if i dont like it i just remove paint and start from a scratch
You are such an inspiration! I’m obsessed with morracan tile, but my entire first floor is mostly basic porcelin tile, making it a gigantic project that could easily cost a small fortune. About how many square feet did you do and how long did it take you? Any idea how much of each color paint it took to cover your area? thank you for posting your hard work! It paid of beautifully!
i painted about 60sqft and it took 1 can of white and 1.5 cans of charcoal. It took me parts of 3 days to complete including drying time and all my usual everyday duties. Good luck on your endeavor…I dont regret painting my tiles one bit
What an amazing job!! I love DIYS and Im going to try something like this for my bathroom! I’m tired of the 90’s tiles we have.
LOVE the painted tile! i have zero ability in any type of crafting or painting. Truly want to try this. Want to paint floor in my first floor half bath. How do i end the paint before it gets to the hallway?
Hi terri. If your tile is the same in the bathroom and continues into the hallway I would paint the entire space. If it is two different types of floors then you could get away with just doing the bathroom. For example, I painted my mudroom but it connects to my laundry and half bath all with the same tile. I painted all the tile throughout but stopped at eh kitchen where my wood floor begins. Good luck
Do you have any ideas of ways to stop it before going into the hallway? Yes tile in my bathroom goes out into the hallway and then through out the majority of the house. There’s no real natural ending spot :/
Thats a tricky one. I may not do this if all your floors are connected. I fear it will end up looking DIY.
Thank you so much for this post. This is actually my second time finding it and the first time I saw it a while back I decided, yep. Defo going to do this in our kitchen. Hubby is a bit nervous so I researched the bejeepers out of it and found your site with specific details and decided to go through with this in our kitchen, utility, and sunroom. Aaagggghh so excited. My stencils are in the mail from Royal Design Stencils already only after a year of procrastination/research.
Thank you so much.
Cheers from Ireland.
Marie 🙂
fantastic marie…please do send me an email of your finished floor. Id love to see
I’m a bit late to the party but this has Blown My Mind!
We have very dated 1980’s white and blue tiled bathroom floor with a questionable (and not quite matching) feature tile on the walls. I’m inspired (although I do feel a bit trepidatious about how to stencil around the toilet!!).
Is your floor still holding up well?
Mysha, do you re-coat the painted tiles with polyurethane once (or twice) a year or do you just touch up any chipped paint as needed? When you repair any chips, do you re-seal the little area that been touched up?
Also, can I ask if the floor gets slippery when it’s wet?
Ta for the inspiration – my mind is full of patterns and possibilities!
Hi Karolina
My tile is holding up beautifully. In fact Im going to do another floor. I have patched a few scratches and overtime I patch, I reseal that tile square with the poly. In addition I have resealed the whole are once since the initial paint job. My floors did not get anymore slippery then before. Good luck and you will love it.
Hello!, My name is Debbie and I was inspired bathroom floor thanks to you. I did it!!! Andwith wonderful results! I renovated the whole bathroom and left the floor tiles for the end. I bough a very nice stencil antique look and Benjamin Moore chalk paint and used the minmax policrylic at the end. The results were wonderful!!! I took before and after picturesI wish I could post them for you to see them. We are all amazed by the final result and it also gave me confidence to make other renovations. SO gracias, gracias forever!!!
Debbie! Thank you so so much for sharing your results! I would absolutely love to see your before and after pictures. If you are on instagram you can tag me at remingtonavenue or you can email me the photos at mysha@remingtonavenue.com. I’m so excited for you!
I would love to see other success photos. I am planning on giving this a try very soon in my kitchen.
Has anyone else any final photos?
There are a couple on my instagram feed you can check out. (@remingtonavenue) Other then those photos, I have heard a ton of people tried it and loved it.
Hi. Your stenciled floors are just gorgeous! I would love to do this on the floor tile in front of our gas fireplace. Do you think it would hold up? Thank you! Keep up the wonderful inspirations!
I think that would be the perfect spot
Hi! Love the tutorial, it looks great! I was wondering how well your painted tile has held up? We are moving into a fixer upper and I would like to make a few updates without breaking the bank while we save up for our big updates. Has the paint chipped/scratched? If so, is it an easy fix? Thanks ahead of time!
Oops, sorry, just saw your comments on how it is holding up above mine 🙂 Thanks!
Your floor looks amazing and I have started to do the same on my old kitchen floor but I’m unable to find the product rustoleum polyurethane in the uk. Would a floor polyurethane varnish do the same thing??? Would be grateful for any help
Any polyurethane would do the job!
Thank you so so much for taking the time to post this 😀
Can you mop painted floor tile? Thanks!
yes I use soap and water
The effort is just something though why go on and do laborious when you can just buy tiles which are already made with the patterns that you prefer. Just saying! still good job though
It is time consuming. I know some people have time to do a project like this but not the means to tear out and replace tile. To each their own!
I have small tiles about 1/2 inch each in my powder room. The house was built in 1977 and the tiles are brown and white. What are your thoughts of doing a larger stencil over the small tiles?
YOU could defiantly try it! It could be challenging to keep the edges from getting messy though. I would try it and see how its working. YOu’ll know pretty quick. IF you dont like it then you can always paint a solid color
Hi! Found your blog recently after searching for some tutorials…it looks awesome! Anyway, quick question if you don’t mind…I had planned on doing a dark navy blue base, but have not found any chalk paint that has navy as a color. Have you ever used regular latex paint? Or tried making your own? Thank you for the post and advice!
Hi michelle, so glad you found me! You could mix black with a blue to create a navy. I have never made my own chalk paint, but that doesnt mean it wouldn’t work. I would be hesitant to use a regular latex on tile, but and epoxy paint would work great. Good luck
I’m not sure what i did wrong, but i bought all of the same supplies and followed all directions. Mine was even simpler as I only wanted to paint 1 solid color with no design. When i painted the polyurethane some of the chalk came up. No problem, i let everything dry, removed the paint from the damaged tiles and started over. This did not work, the paint dried differently and the painters tape around the repainted tiles pulled up that paint. This has been a nightmare and the reason we chose this was because re-tiling was out of our budget. Now we are left with terrible looking floors in our kitchen! Nobody do this please, its a mistake that I greatly regret.
Hi Courtney I’m so sorry this didnt work out for you. I have truly loved my floors and I know so many who have used this tutorial and loved it as well. I’m wondering if you used a degreaser on your kitchen floors to clean them before applying any paint. Just curious?
Well after reading and re-reading your instructions, I decided to give it a try! Although I regret the stencil I chose (much too intricate and difficult!) I love the end result ! Thank you so much for your pictures and step by step instructions!! 🙂
Oh yeah! I would love to see pics if you want to post one here or tag me in a photo on instagram @remingtonavenue
Hi Mysha! I have been thinking about this tutorial since I first saw it on Instagram over a year ago. Finally built up the courage to do it! I have a question, did you go over all of the design after you rolled it, or just touch up? With rolling, there are spots that are lighter than others. Thanks for the great tutorial!
Hi angela, i touched up as needed. Cant wait to see
Hi! another question if you don’t mind…I’m just finished the 2nd coat of polyacrylic and scratched a spot. Did you find after the 24hrs of the poly that it didn’t scratch as easily? I hope I didn’t ruin the floors 🙁
yuni its going to be amazing! So excited
Just wondering how your floors are holding up? I used the polyurethane/ polyacrylic that you recommended when I painted my floors and they looked awesome for about a month…and then while I was on vacation for a week our ac unit went out, and the house heated to well over 100 degrees (we live in Las Vegas). Now all of the white paint on my tiles is a pee yellow! Black and pee! Lol. Any tips on how to get rid of this, or do I need to sand them down and start from scratch?
Alix that is so weird! I have had my tiles painted for 2 years now and I haven’t had that issue. It must have been a reaction to the extreme heat. I wish I could tell you there was a way to get rid of the yellow tint, but your best bet would be to start over. I would suggest a clear epoxy finish in your case due to the extreme temperatures in your area.
How is your floor still holding out!?
HI kim its holding up great! love it
How do you clean it? I have a bathroom with big tiles with a pink tint that i don’t like but I worry about having to be delicate with bathroom floors because of the finish…
Hi i just use a mild soap and steam clean
I have someslate tile, that is not smooth. Do you think it would look ok?
I could be difficult to stencil a rough texture like that but you could paint it for sure
Thanks so much for including my painted tile tutorial
Hello! I love your blog and am thinking of giving this a try in my kitchen. How do you clean the floors once the tile is painted? And…did you have any cracked tiles before painting…not sure if there’s an easy fix for this.
Hi Gab,
No I didnt have any cracked tiles but you might look into repairing those with some kind of caulk before painting over them. Also I steam mop my floors
Any way this could work on vinyl flooring?
yes it does!!
This was a great tutorial. I noticed a lot of people asked in the comments what the pattern was and you reply “custom” but not the name. For all the people that want the name it is called Nagoya and you could possibly ask for a custom size but the website does not offer custom stencils. It is available in lots of sizes but not a 12
x 12 tile size. Hope this saves someone some time as I was looking all day.
thank you for sharing
Nice article! by Mysha Roberts Bolen
I have read these tutorials so many times a thank you – I have my stencil which is the Augusta stencil… do you think it would be ok to paint white on a black floor with that? I’m curious if the white paint would be dark enough to cover in one coat on the stencil without bleeding… thanks!!!!!
Yes I think it totally would work! I painted white over black tile on this post. The other floor i did was the opposite. you can see it here.
https://remingtonavenue.com/?s=stencil+tile
I wanted to try this technique on some outdated backsplash tiles.
It should still work, right?
yes a great place to use this technique. Please tag with photos
Would this work on our heated tile floors as well?
i actually don’t know
Hello! I’m testing this out to see if it could work for my laundry room. Tiles are from ’85, so rather than busting them up, I think this would be a great alternative! I applied 3 coats of chalk paint on a test section, and when I applied my first coat of poly and some of the paint is lifting and I can see the original color underneath. Did you sand the tile before painting to prevent this? Our original tile seems to have a gloss finish, which may have something to do with it. Just curious if you experienced this w/ your project as well.
Appreciate your help-and your floor looks great!
If you have a glossy tile i would suggest a light sanding and a primer paint…as stated in the tutorial. Im excited to hear how they turn out. Please tag me in a photo @remingtonavenue