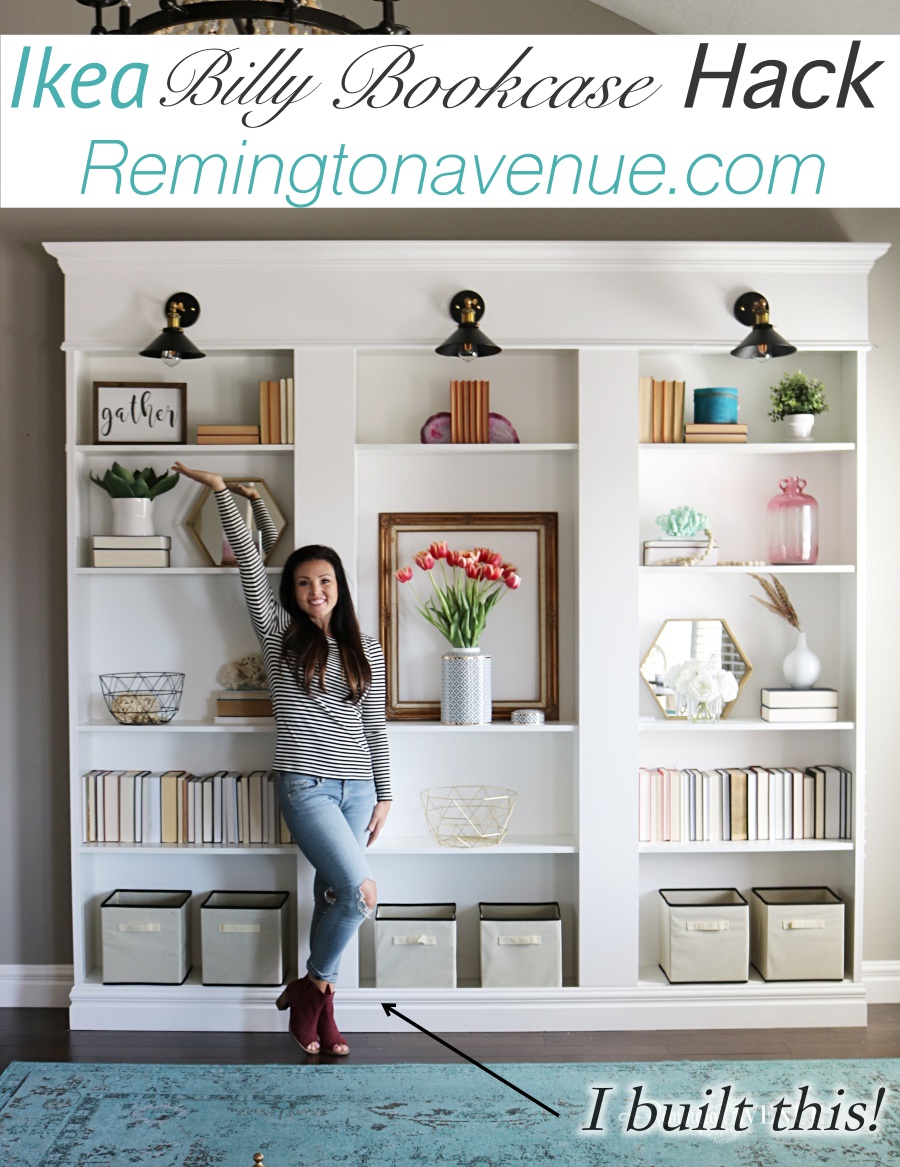
Ikea Billy Bookcase Library Hack
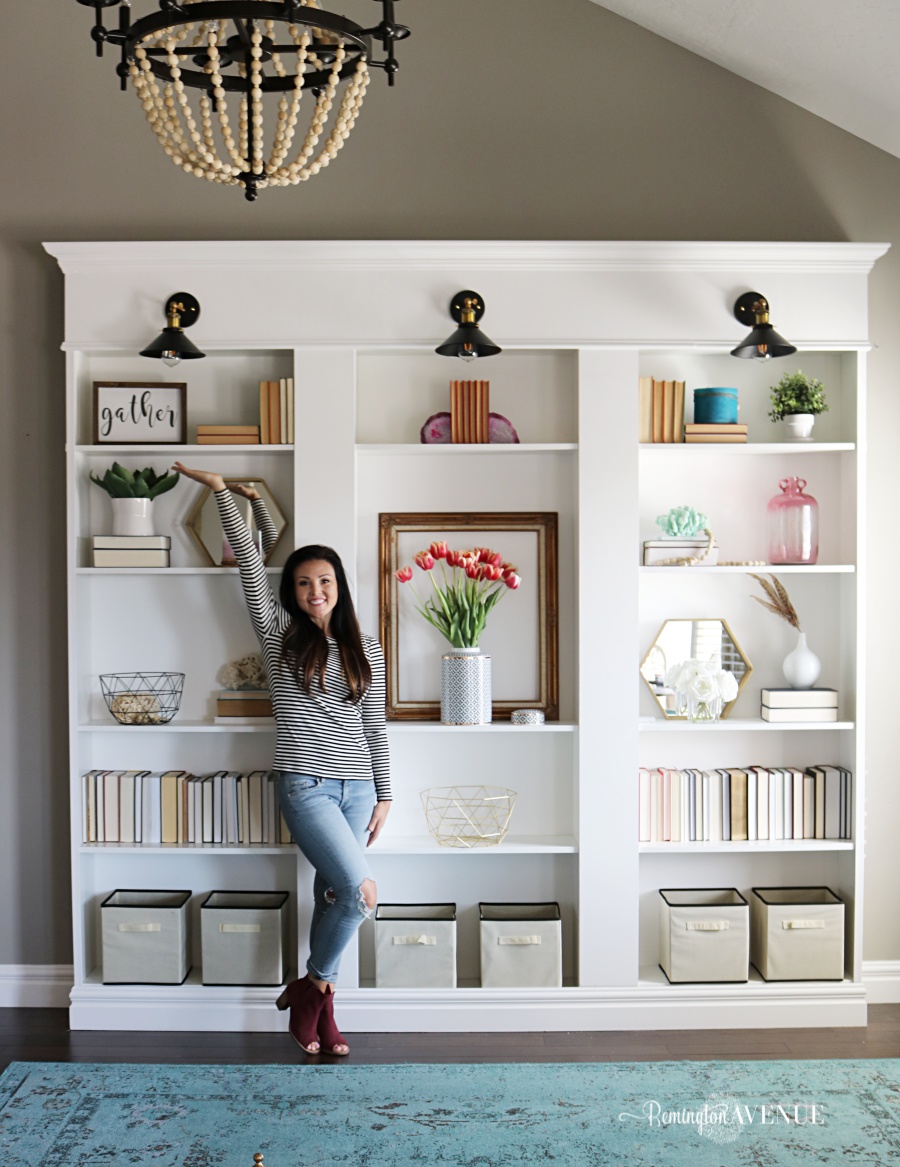
Hey Friends! You know that super top secret project I have been hinting around? Well I finally finished it! I bring to you today the full tutorial on my newly constructed diy custom built-in library with remote control sconce lighting! Whew…that’s a long title! I can’t even tell you how long I have wanted a library wall. Since day one of living in this house, I have thought my living room wall needed some architectural interest. At first I was thinking of adding board and batten 3/4 the way up the gigantic space, but after much deliberation, I decided to bite the bullet and build me some shelves! I am so thrilled with how this built in library unit turned out! So come along with me as I break down exactly how I constructed this custom built in library!
Get the Look (Scroll & Tap)

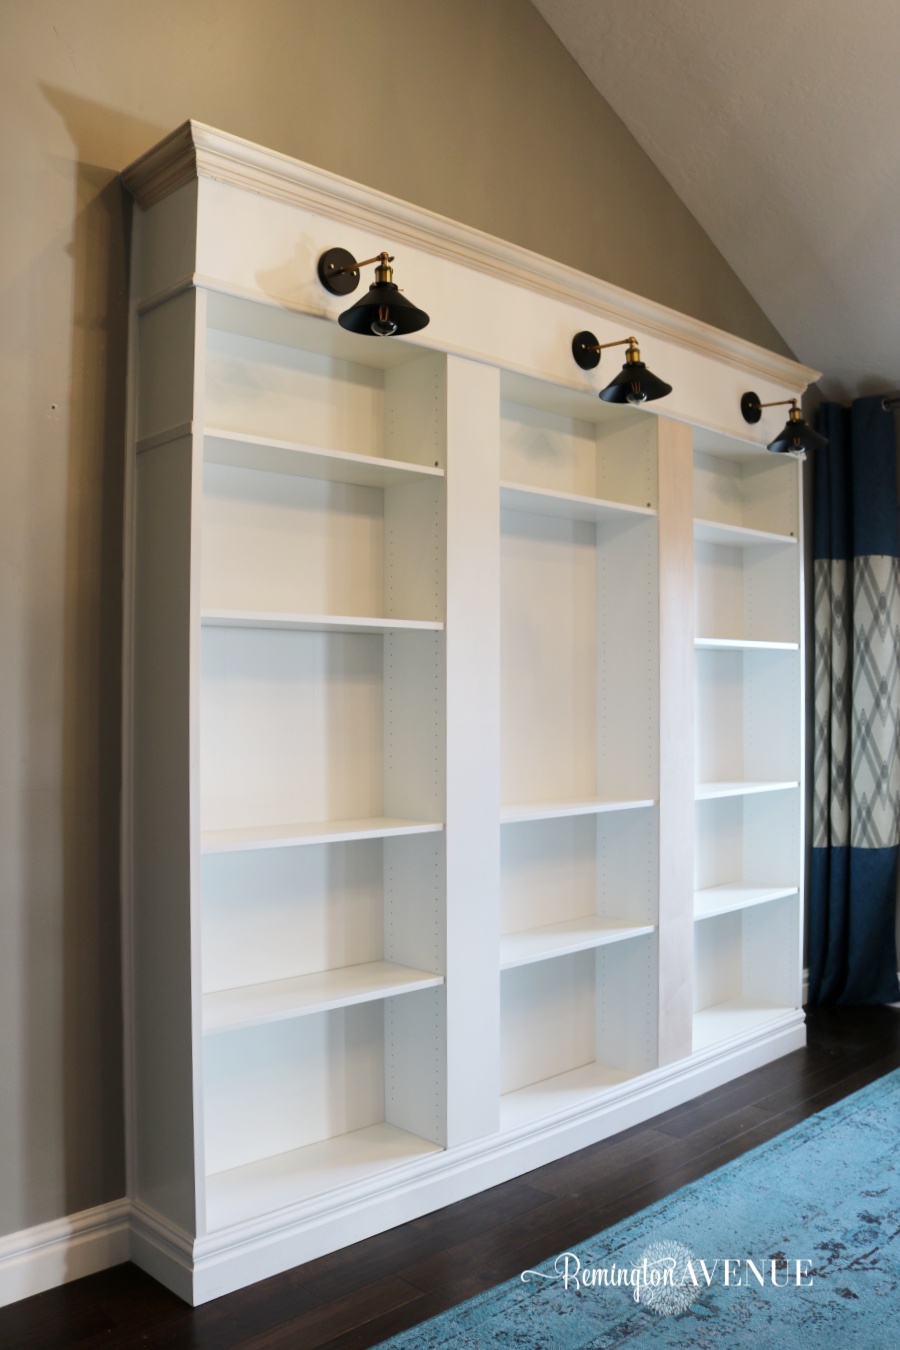
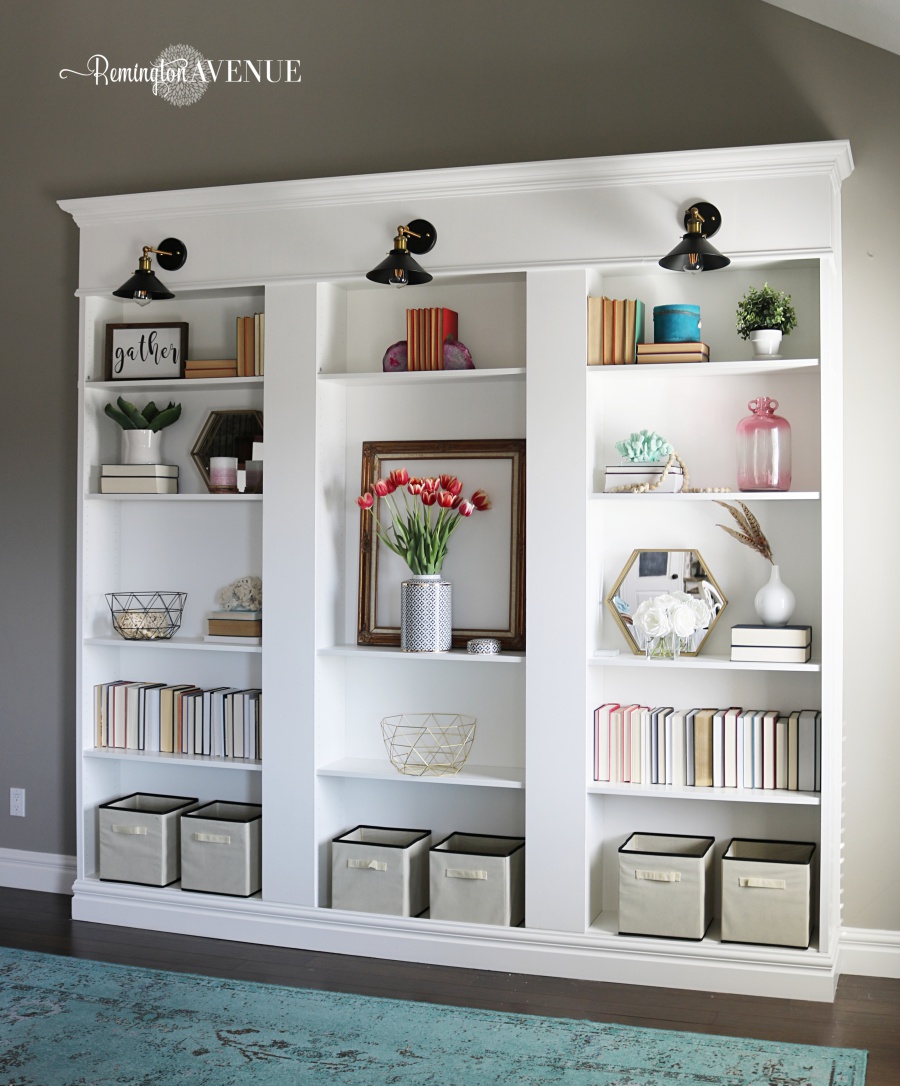
Can you believe this is a billy bookcase Ikea hack? Yep, that’s right! Having a piece built like this would have cost me roughly $3000 and that’s if I got a smoking deal. Still wanting the built-ins of my dreams, but not the steep price tag, I went to research other options. I came across a few library walls I liked on Pinterest and quickly realized I could create my vision starting with 3 billy bookcases and a whole lotta elbow grease! The whole unit (including everything) came in just under $400 and took me 5 days of nap times (roughly calculated at 10 hours of amateur mommy building time).
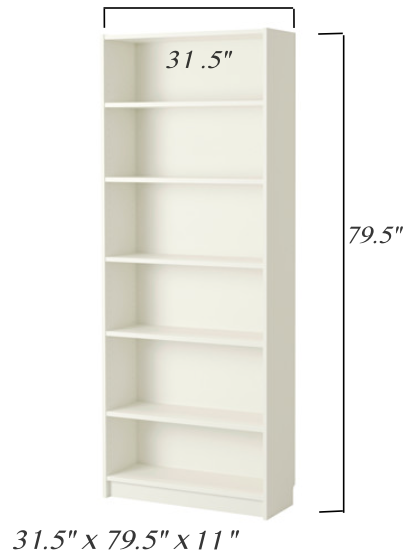
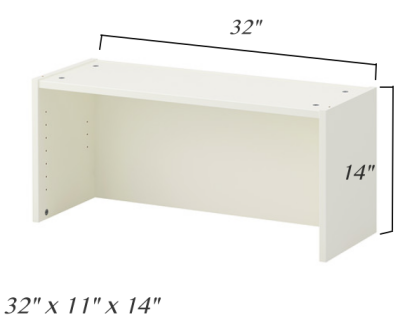
3 billy bookcases and 3 extension pieces made up the foundation of this built in library masterpiece! Found HERE and HERE!
Cut List:
*all these measurements are specific to my exact design. This unit can be modified as you see fit. Also, please take your own measurements before making any cuts as yours may vary slightly even if building this exact unit!
1 plywood underlayment board ripped lengthwise into:
2- 8″ wide planks
3- 10″wide planks
Crown molding- 107.5″ cut at a 45 degree angle on both ends (plus) 2 additional pieces measuring 11.5″ with one side at a 45 degree angle ( you can see how to cut crown corners HERE).
baseboard – 107.5″ for front piece cut at a outside 45 degree angle on ends (plus) 2 additional pieces measuring 11.5″ with one side at an outside 45 degree angle & one side at an inside 45 degree angle
trim of choice cut to above measurements
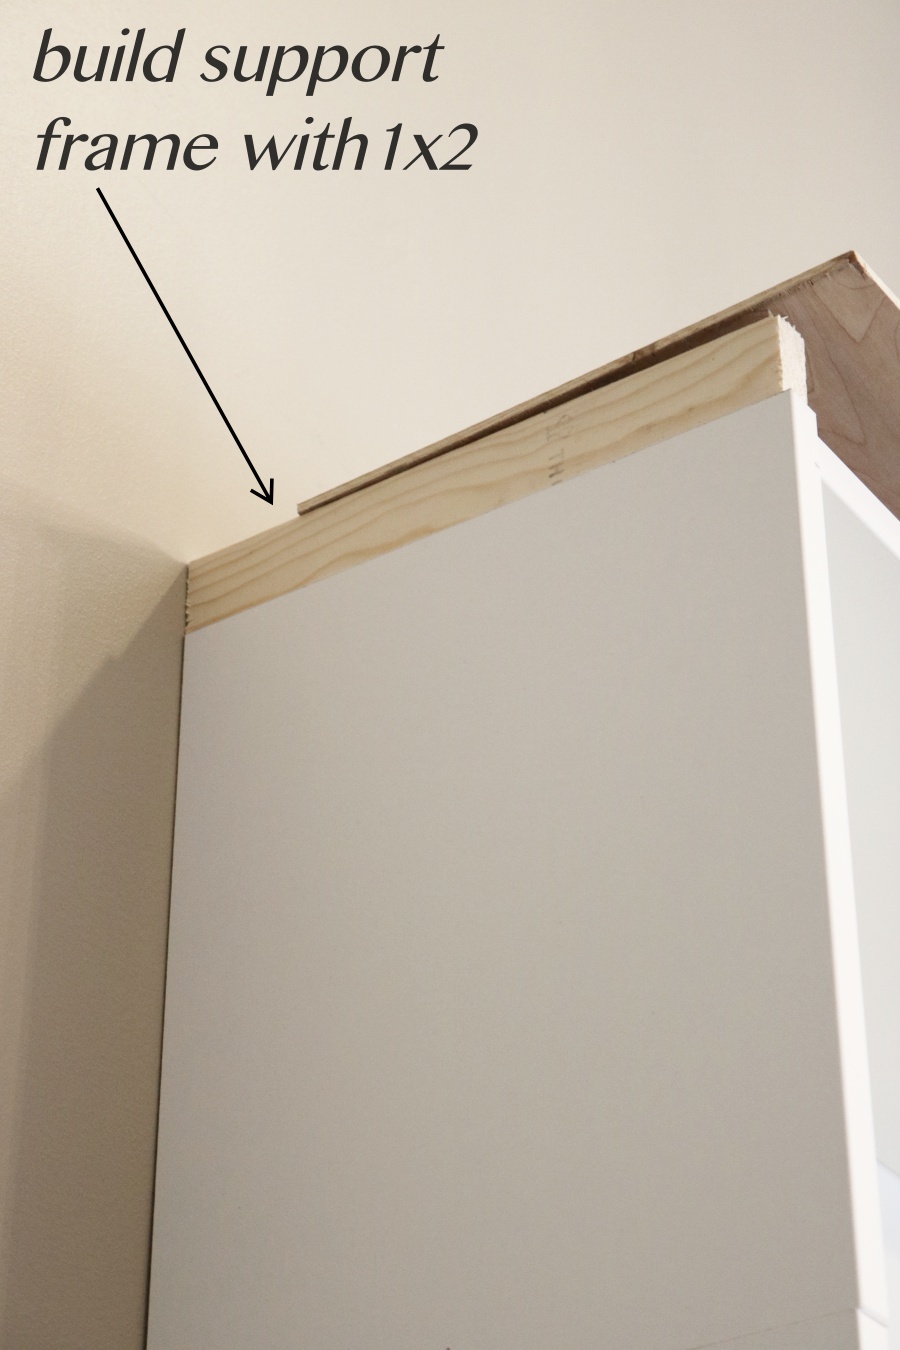
3- 1×2 boards cut to your measurements to construct frame for lighting panel. (See below)
Shop My Tools & Materials
Tools:
Miter saw
nail gun
1 1/4″ brad nails and 2″ brad nails
Oscillator
foam roller
paint brush
caulk
Tutorial:
Let’s start with the hardest part…the Ikea assembly instructions! These book shelves weigh about 100 lbs a piece. Trust me I know cause I loaded and pushed those beasts all the way through the warehouse with 2 kids and a baby in tow! I wish I had a video of that! So ya Ikea… 2 people are better then one when assembling lol!
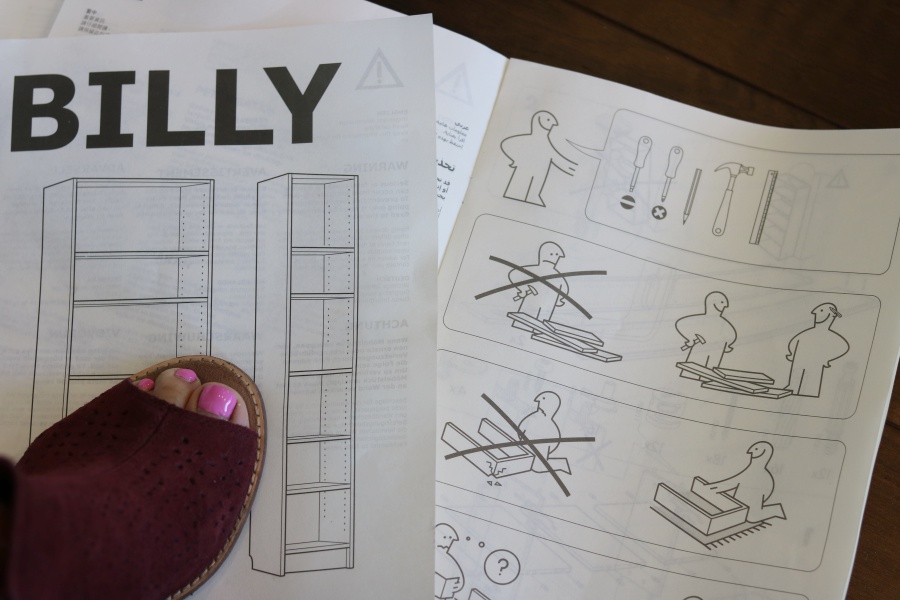
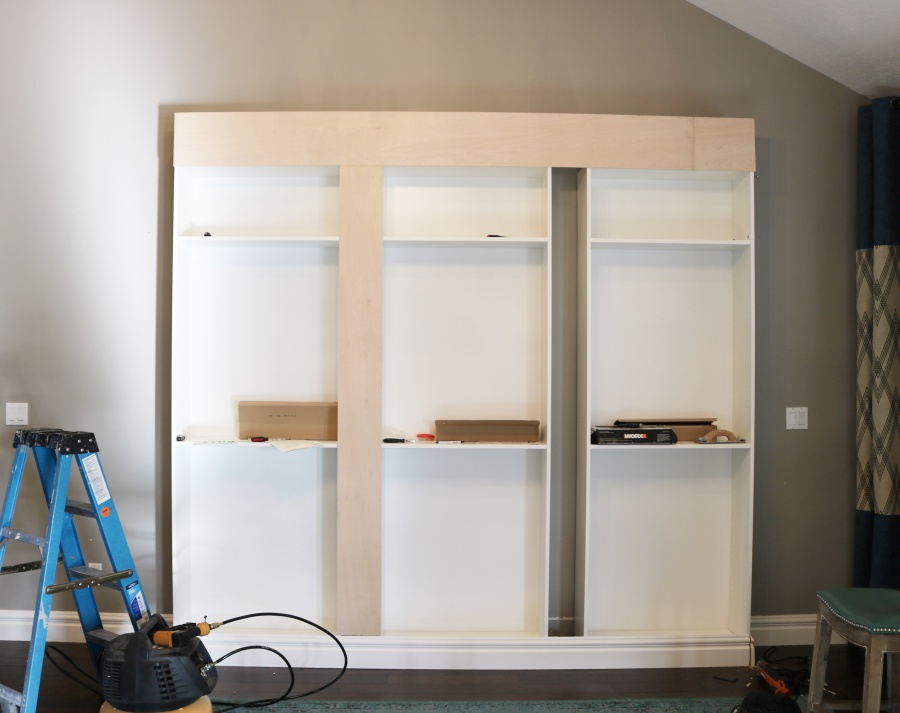
Once you master building the billy bookcases the rest is cake! I built all 3 units plus the extension pieces in 1 hour. Really not that bad! I played with the spacing of the bookcases for a bit and finally settled on 6 1/2″ spaces in between each bookcase. This would allow of an 8″ piece of plywood to cover the gap. I’ll get to that later!
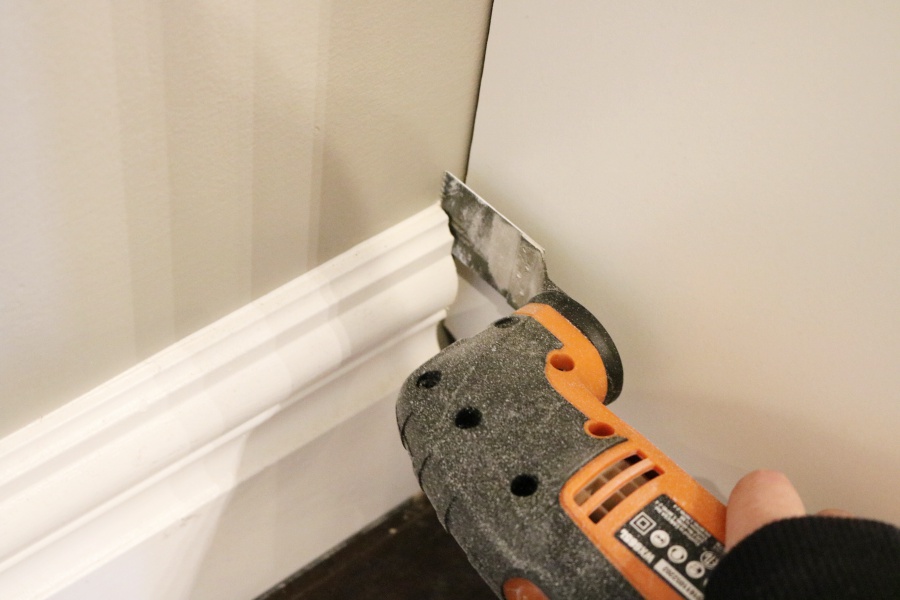
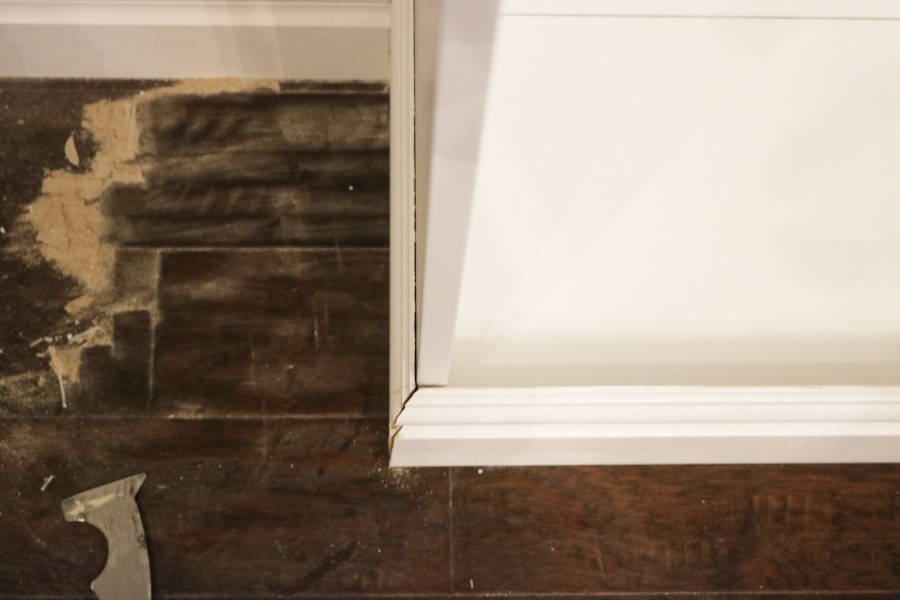
Once I had my spacing worked out, I moved the bookcases aside and used the measurements to cut out my baseboard. I just bought this oscillator, and I got to say it came in real handy. I cut my existing baseboard out, knowing I would be using it for the front of the bookcases. This would help me achieve that high quality, built-in feel. * If you intend to use your existing baseboard, make sure to cut out from wall at a 45 degree angle.
With the baseboard cut, I moved the bookcases back in place and here’s where the fun begins. I took a ride over to Lowe’s and had the friendly man (whom I know quite well now) rip a sheet of plywood underlayment into 5 pieces (specified in the cut list). I gathered the rest of my materials and returned home to build build build!
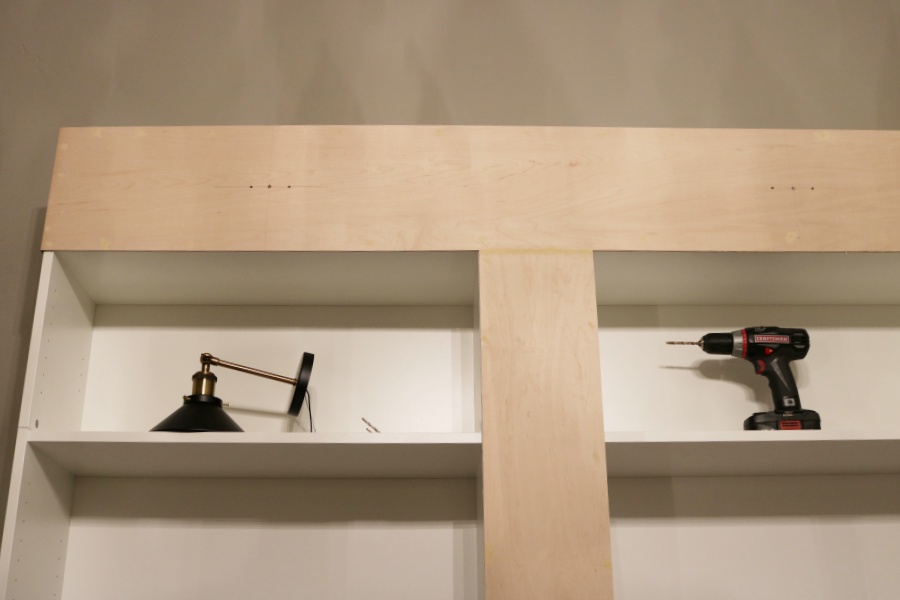
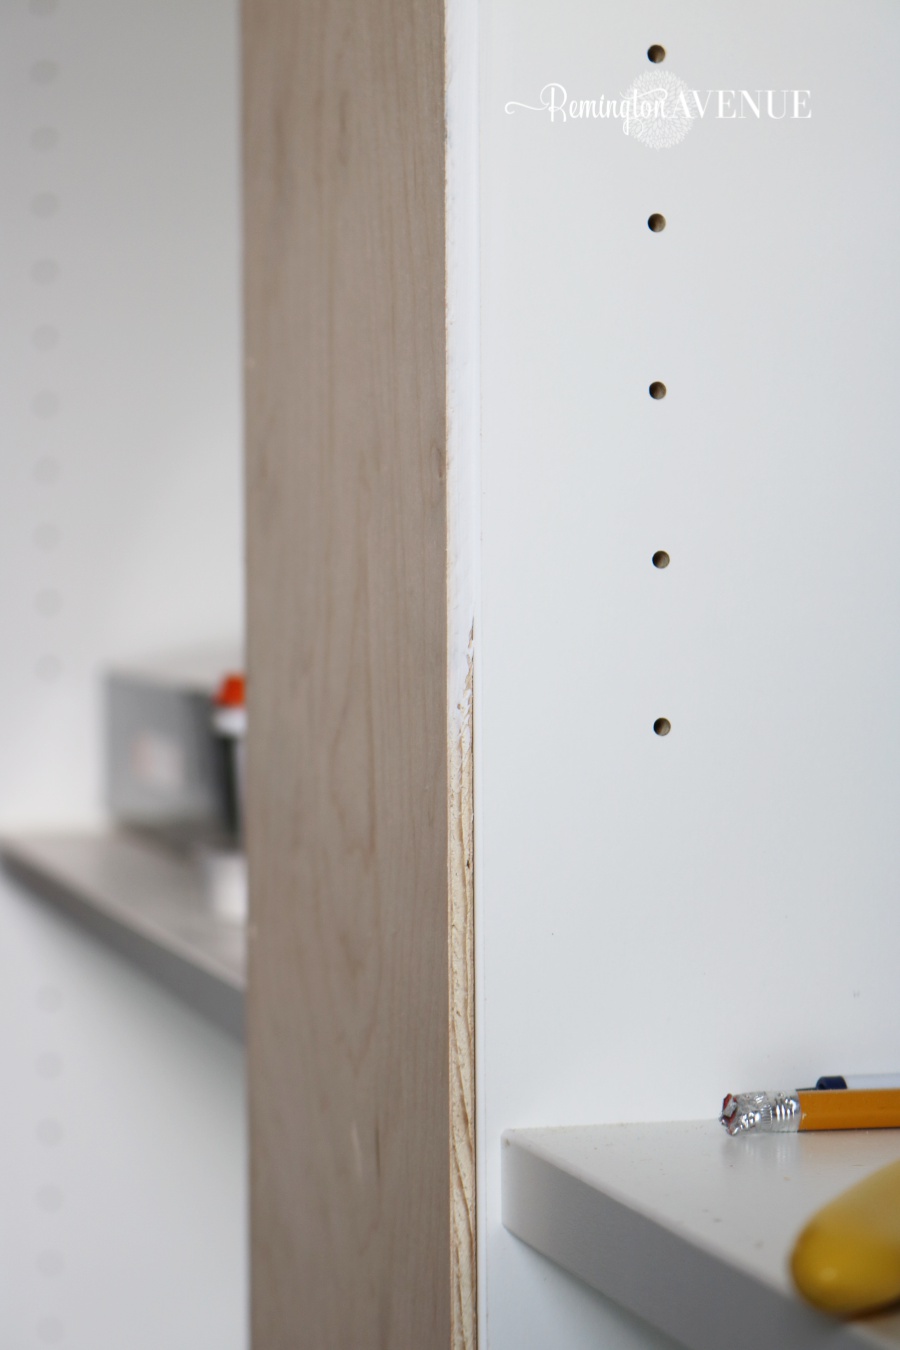
I used 1×2 boards to stabilize the thin plywood pieces along the inside almost like a frame. I nailed the boards in around the top perimeter and up each corner.

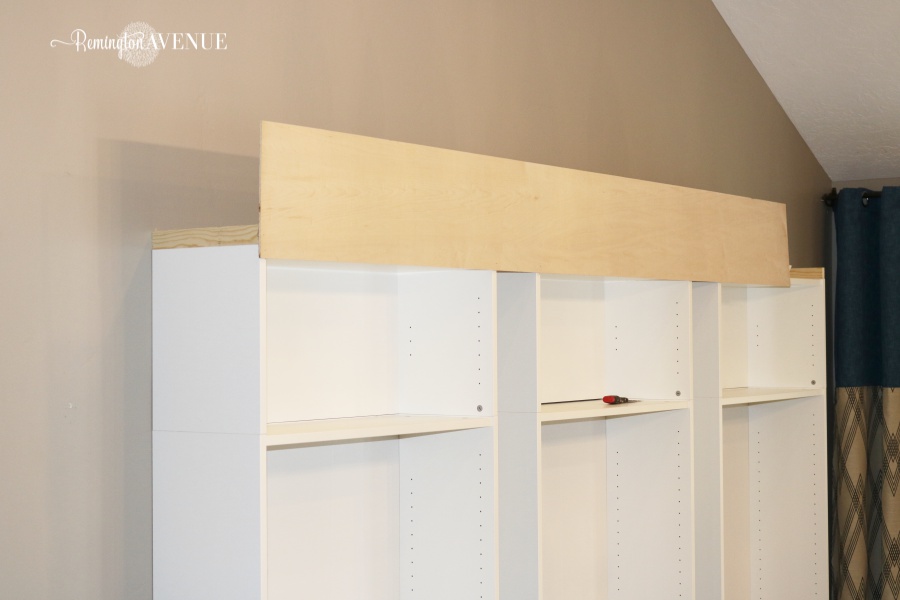
Using my nail gun, I secured a 10″ wide plank to the top of the bookcases, overlapping the front by an inch. It ran almost the whole length, minus about 10″. I cut the remaining section and nailed it up to finish the front. I then secured the side pieces which measured about 11.5″.
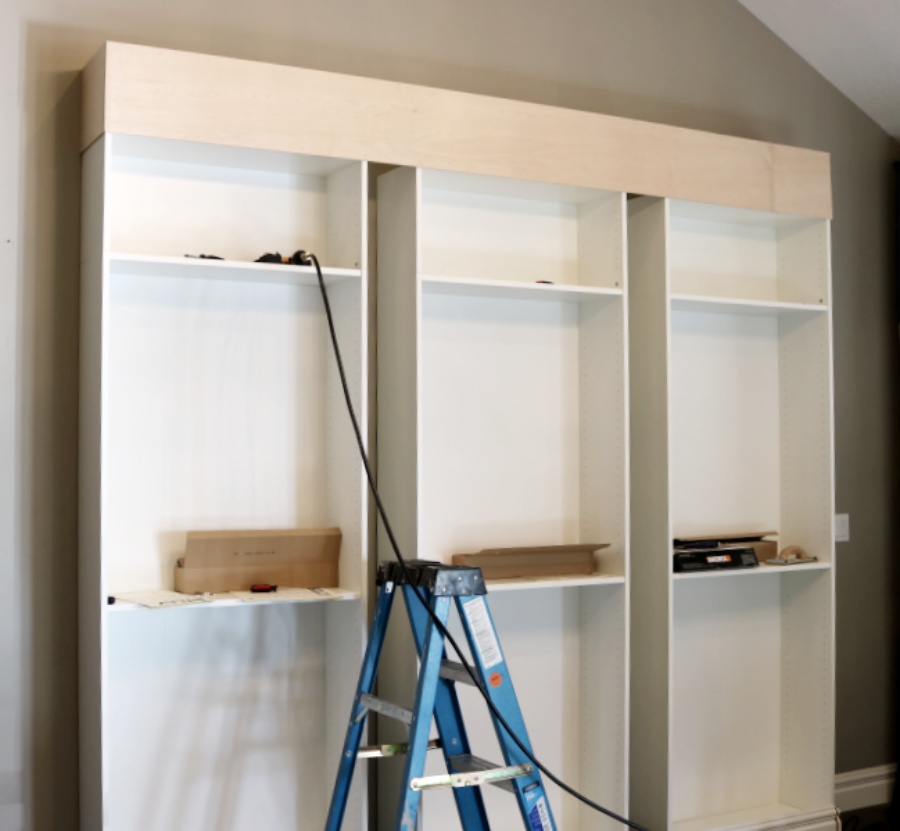
Now that I had the top panel constructed, I secured the 8″ wide vertical panel to cover the space between the bookshelves. I overlapped the panel to the bookcase sides and nailed it in using my handy dandy nail gun. I waited on nailing up the second vertical panel till I ran the electrical for the sconce lights. That’s where I’m hiding all the wires!
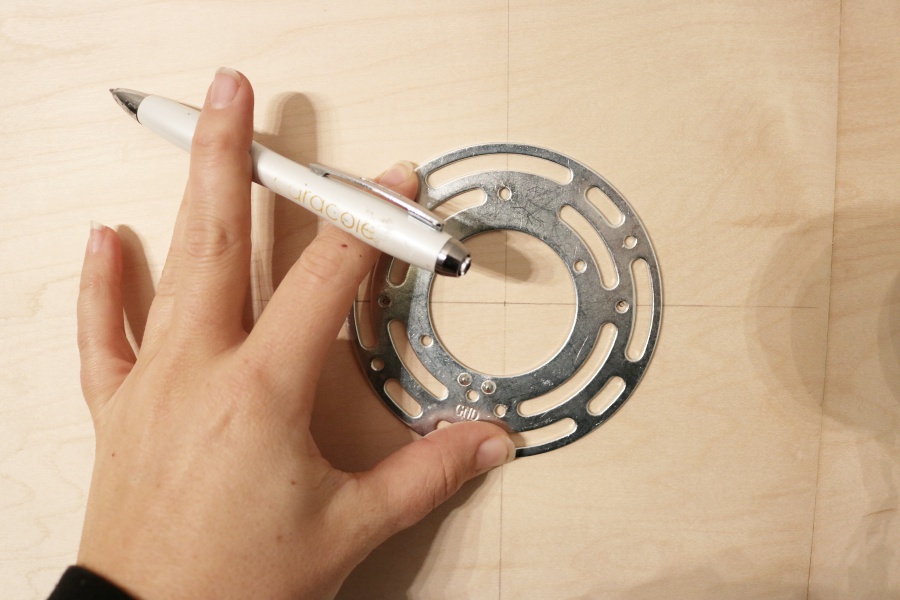
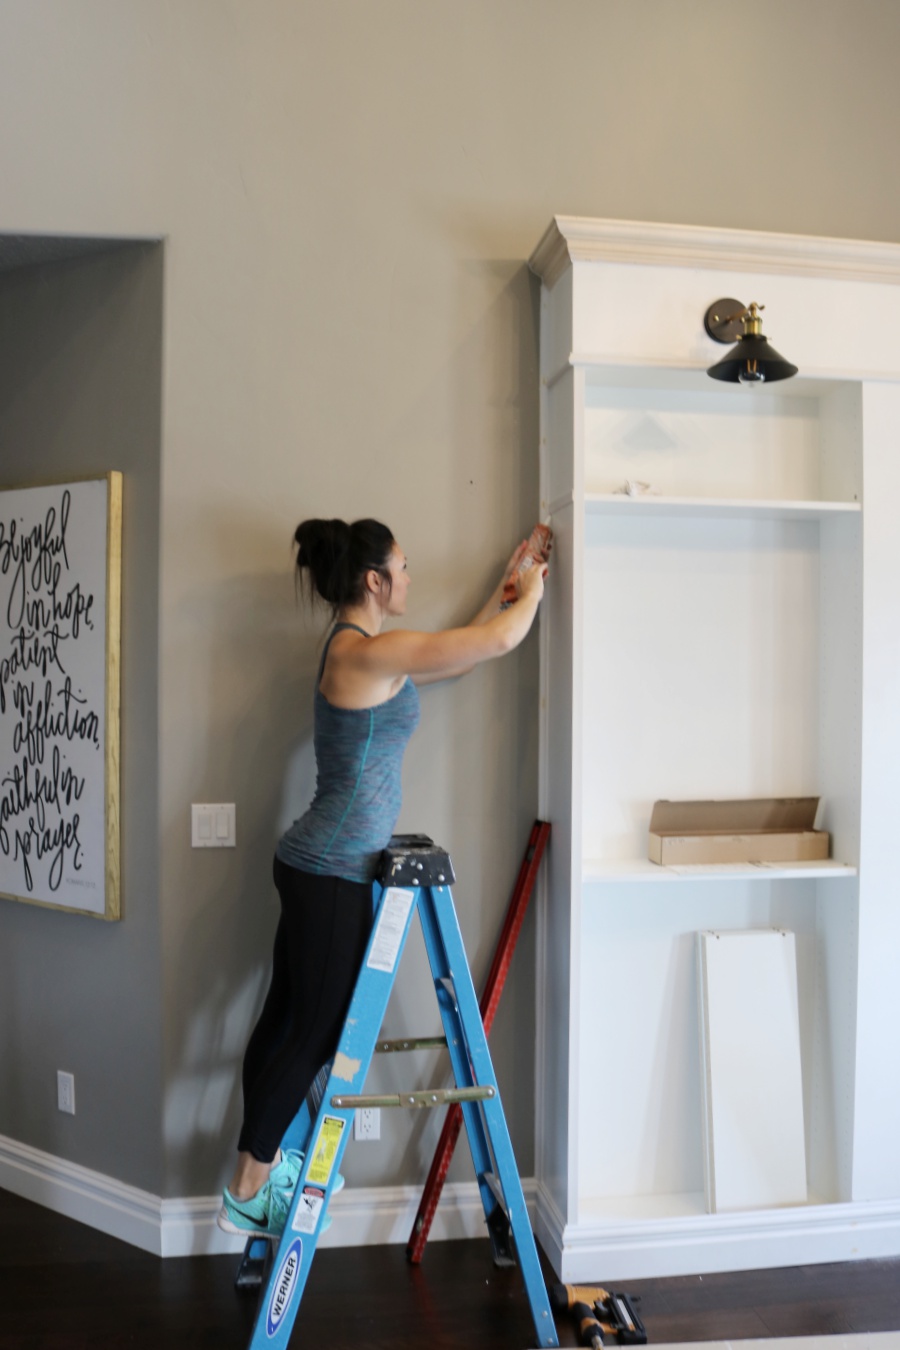
I measured and marked my drill holes for lights.
Shop my Tools & Materials
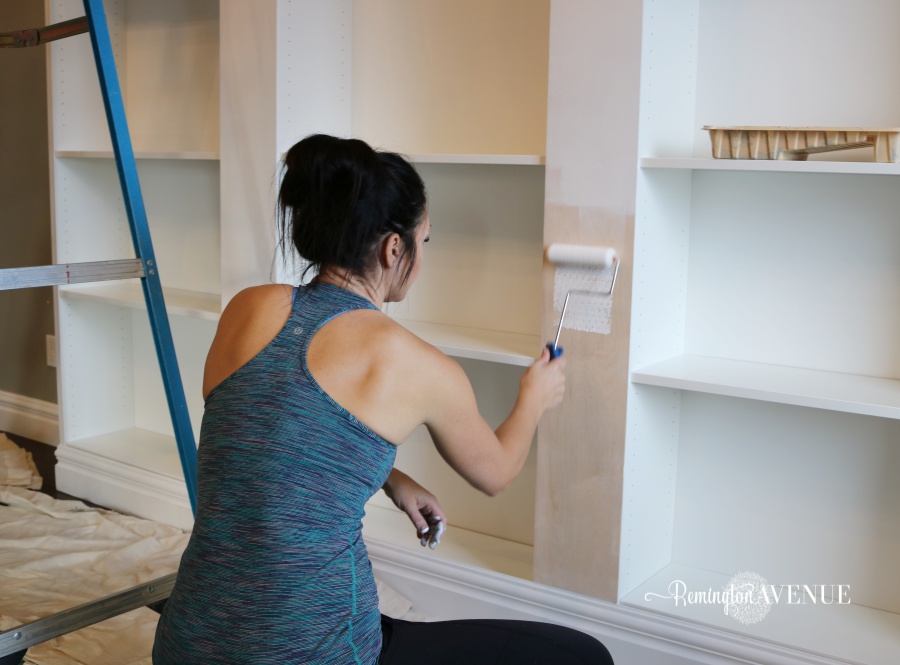
I painted the top whisper white to match the existing molding in my home. I found that a foam roller worked best! I let the paint dry overnight and installed the sconce lights the next day. (Sorry this photo was taken after I installed the lights, but you get the idea!)
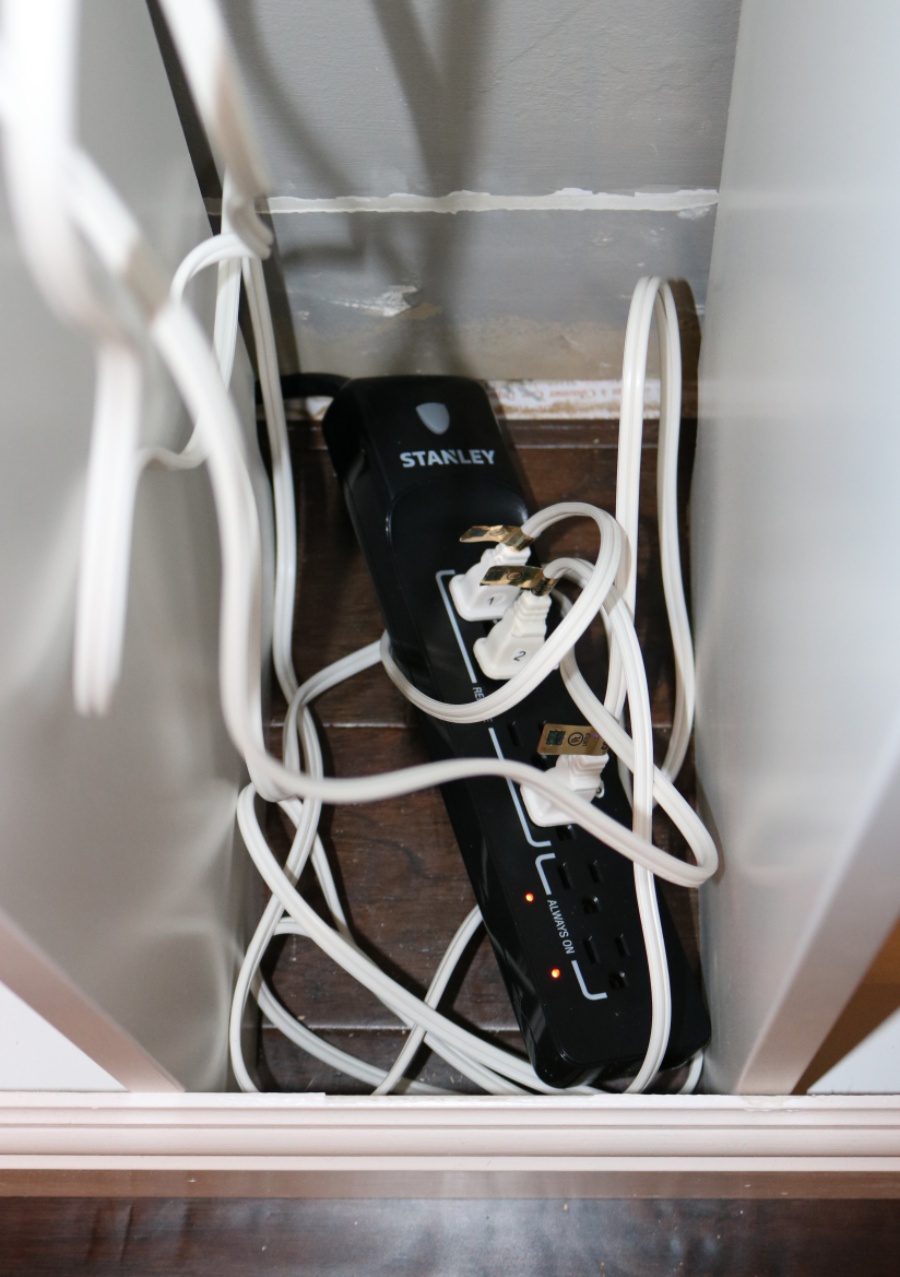
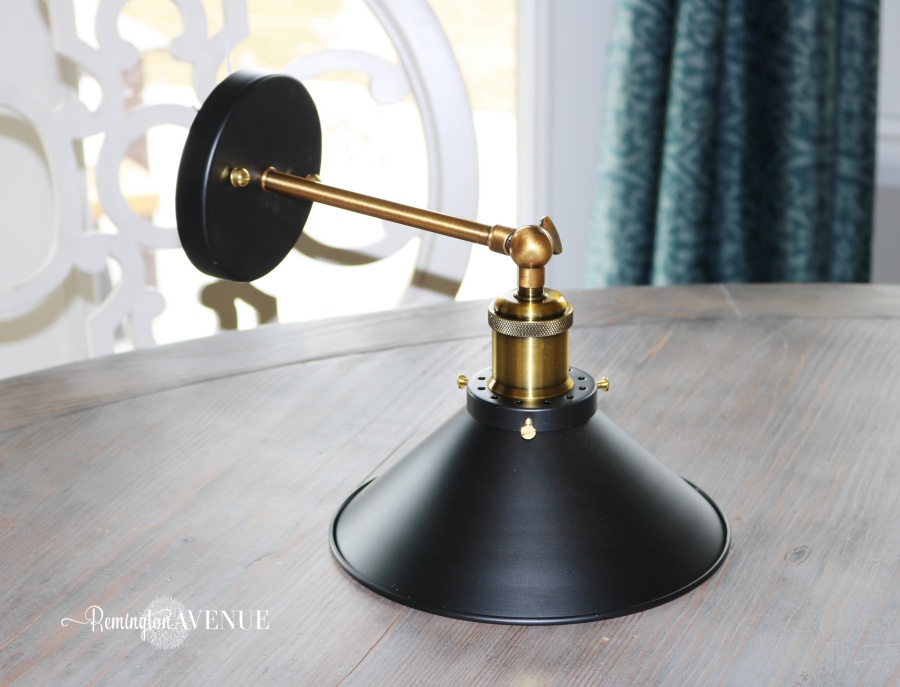
The sconce lights came hardwired, so I converted them into plug- in lights using inexpensive extension cords. (I’m no electrician, but I’ll share the simple tutorial on that next week). The cords all run to a power strip that is hidden behind the right panel. I snagged a power strip that came with a remote and BOOM! – remote lighting!
The black and brass sconce lights were a great online find. They were only $25 each. You can find 10 other lights similar to these ranging from $25-$50 HERE.
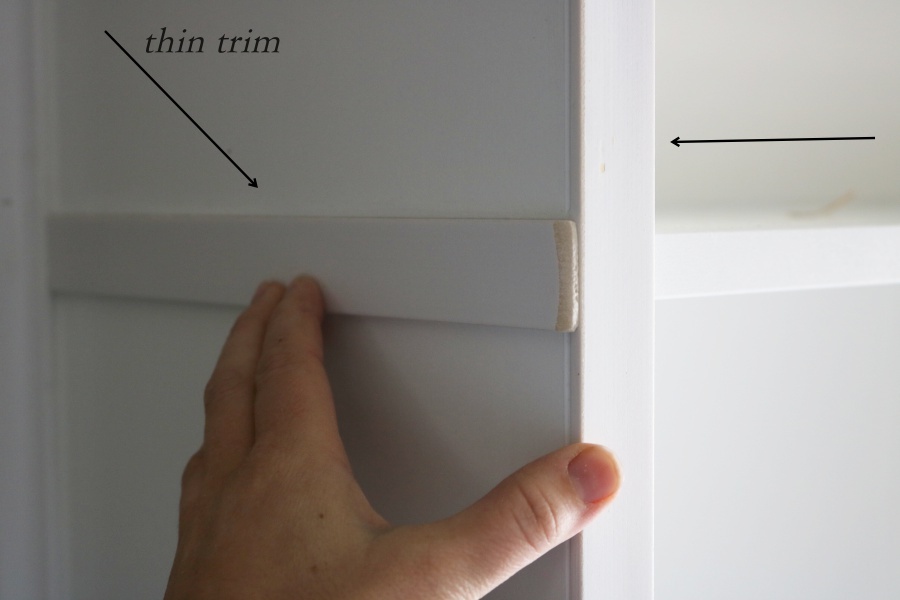
Now that I had all the critical elements in place, I fancied this beast up with crown molding and trim! This is where the real transformation happened! I used thin flat trim along the outer 2 edges to give it a smooth finish. I used the same thin trim to cover the seam between the billy bookcase and the extension unit.
I attached the crown to the top of the 1×2 frame using my nail gun. I attached a thin piece of molding at the the bottom of the light panel to hide the seams and to add more visual interest. If you’ve never cut crown before like me, make sure you watch the video I linked at the top! It was super helpful!

I finished the bottom with my original baseboard. Luckily I had some remnant pieces from the basement that I used for the sides!
Now that everything was attached, I anchored this built in beast to the wall using the hardware that came with the billy bookcases. I anchored one bracket per shelf to a stud, and the other 2 brackets for extra safety. Thats 9 brackets total for the unit, 3 of which were anchored into studs. I have 3 little hooligans running around my house and I want to make sure they stay alive and crazy!
Finally I grabbed my caulk gun and went to town on the whole shelving unit. I caulked the cracks in the crown and baseboard, and all the trim work. I am always amazed by the healing powers of caulk! Somehow it magically fixes all my mistakes and makes me look like a pro!
I even calked the sides of the plywood underlayment panels! Huge difference!
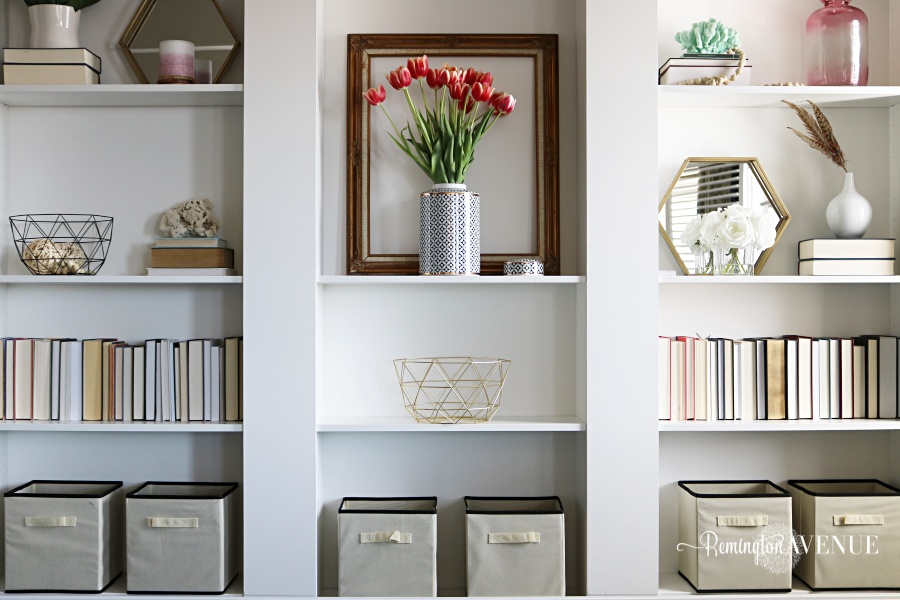
A couple coats of Kwal Whisper white enamel paint and Viola! My build-in billy bookcase library unit was complete! Remote lighting and all! I quickly styled my new library wall with items I already had. I have a feeling these shelves will be changing a lot!
Get the Look (Scroll & Tap)
I gotta say this is one of my favorite projects! I learned so much building this beauty! What do yo think? Are you brave enough to try it?
The kids have really enjoyed reading their books and playing games in here, and baby Lou loves unloading all her toys out of each bin! The library wall adds so much charm and character to our home. I can’t wait to add more personal touches. I’d say that was some well spent nap time and money!
Get the Look
I always appreciate you stopping in! If you liked this tutorial and found it helpful please help me by pinning the image below. Pin it so ya don’t forget it! I love sharing my work and helping others create the home of their dreams.
Oh ya, and here are the outfit deets just in case your in need of a good worn pair of jeans lol!
Shop my Outfit

 Add to favorites or read later

Amazing!!
This turned out so so well, the perfect addition to a blank wall. My favorite thing about built in library shelves is that you can switch out the home decor to create so many stunning styles! The sconces that you chose compliment your chandelier really wall.
Thanks so much Charlotte! It really adds so much depth to the space! They sure will be fun to style and restyle lol
Oh my goodness!! This is awesome! I’m doing this after the holidays for sure.
You will love it
Mysha!!! This is amazing!! Wow. I am blown away. I would love to try this. You make it look easy.
Woman!!! You never cease to amaze me! I want to be you when I grow up! Love this so much. It turned out amazing and styled beautifully to show off your handiwork. Plus, you look adorable as always. Thank you for sharing. You should be proud!
Traci thank you so much for taking the time to stop in. You brought a big smile to my face
Mysha!!! You are truly amazing! I hope you know that!!
Ashley that really means a lot coming from you. The compliment is returned
Go girl! So impressed!
Oh wow! I saw it on FB and jumped here. Excellent job! Really, really. 🙂
This is the first such hack I see that actually shows close up details of the trim work and the overlaps. Well done Mysha!
Thank you so much for stopping! I always appreciate the feedback. Thank you
SOOO awesome!! I love the spacing of the shelves too. Awesome job sister!
Thank you so much Chloe! I really appreciate your kind words
Looks great !
Holy smokes!!! I’m in awe!!! That’s just amazing, you go girl! You make it look so easy!!! Bravo!!!! xoxoxo
Thanks for stopping in Summer!
ps – i love leah’s tutorial’s 😉
Who is Leah?
Your room is just beautiful!!! The bookcases are phenomenal! Well done! They remind me so much of Living with Landyn’s IKEA hack bookcases that her f-I-l made. It totally makes the room!
Hi Jodi and thanks so much for stopping in. I’m so glad you like my bookcases. I’ll have to check out Living with Landyn…it sounds like we have similar taste!
Love this! I just did this in my office using the same bookshelves! I wanted to ask you about the paint. Did you paint the entire thing, trim and the shelving? And just with a roller? Could you share what finish of paint you used? Thank you so much!
Hi Amy and thank you. I used whisper white by behr in an enamel finish. I rolled all the additional wood I added as well as the sides of the bookcases. Not the inside.
Such an amazing tutorial! These awesome Ikea hacks make me think maybe I can pull this off too! I have a question about the paint too. In some hacks I’ve read, they recommended priming the Ikea furniture first before painting? Is that not actually necessary? If so that would be awesome! Thanks so much for the tutorial!
Hi karen,
I didnt see it necessary to prime them because the white paint I used was basically a direct match. To be honest I just did one coat of paint on the sides and called it good. You can’t even tell
wow. you are amazing
Bibi thank you so much for stopping in! and thank you for the kind compliment
Brilliant Billy hack! It looks stunning, especially with the lighting at the top. I am planning to write a post about Billy hacks and would love to include yours as one of my favourites, with credit to your post of course. Would this be ok?
I would love thank you for making sure to link back to my site
I was wondering if you did anything to cover up all the extra shelving holes on the inside of the bookcases? I am looking to do this same type of ikea hack, but I am going to do it on either side of my fireplace. Also, how well did the paint adhere to the side of the Billy bookcases? I have read that some people have trouble painting the actual bookcases, so I was just wondering how it went for you and if you did anything special to prep them? Also, in person, how close of a match was the whisper white by Behr (in enamel) to teh white of the Billy bookcases? Can you tell much of a difference? Thank you for the great tutorial you posted and the finished product looks amazing!!!
Hi Brian. you can take a light weight sparkle to the extra shelving holes if they bother you. I did it to some of them, but not all. I cannot see a difference from the whisper white paint to the bookshelf…it matches so well. My paint adhered perfectly fine. If your concerned I would just take a light sanding to the bookcases before painting. Good Luck and don’t forget to mark the pin as “Tried it!” Thanks
I am confused about where you used the extender piece? The measurement in the picture shows the extender wider than the other shelf?
Its not. But i know its confusing. I promise the extender works.
I love love love this!! I’m using it as inspiration for my billy project. Did you use the supplied backs for the bookcases? ( the folded thin board) or did you put a solid piece for the back? I’ve read in other hacks that the crease in the backboard can be unsightly and wanted to see how you tackled it. Thank you!!
Hi Chelsea, Im so glad you found me. I did just use the backing board that came with it. please tag me in a photo if you use build it. Id love to see
Thank you!! I was hoping the supplied back worked just fine :). I’ll tag you when I’m done for sure!
Nicely designed and done! Can you tell me the paint & color on the walls behind the bookcase? I’ve been trying to find a shade like that! Thanks!
Sure all wall colors and room sources are listed on my home resources page on my blog.https://remingtonavenue.com/shop-my-home
You did an amazing job, so well that the wife has decided I need to build one for her haha.
Nicely done on the write up, but I have one question. It looks like in a couple of the pictures you used trim vertically along the edge where the bookcase meets the wall. Did you use angled corner trim, or did you just caulk the seam?
Thanks again for the great step by step!
Thank you. I used angled corner trim and caulk! Cant wait to see how it turned out. Please tag me with a pic on instagram @remingtonavenue.
I’m curious as to why all of your books are facing the back of the shelves instead of “spine out” like usual… It looks great. Clean and uncluttered. I would never have thought of this!
Hi Diana, These are books we’ve collected over the years that we dont read very often. I just thought it would look nice to display them backwards.