Budget Friendly Bathroom Makeover
This budget friendly bathroom makeover really took my creative side to another level!
Using things I had on hand, purchasing simple DIY needs and with the power of paint, this bathroom has been completely transformed!
I started this bathroom transformation at Ace Hardware – I love that I can get everything I need to paint in one trip! I choose my paint colors and then grabbed some Frog Tape (you know it’s my fave!) and other painting essentials.
This bathroom transformation also started with a little bit of a disaster. I went to set my can of paint on the counter and got distracted by Juni’s cute face and totally dropped it on the floor and made a HUGE mess. So my wallpapering overalls officially became my painting overalls. Thankfully it all cleaned up with wet rags – no harm, no foul, all part of the fun!
This project took place in our basement. I did a paint treatment down the hallway and continued it into the bathroom and then down the rest of the hallway to our trampoline room. Which, by the way, was one of the best things we ever did. My kids use it on the daily and in the winter everyone is down here jumping and playing. Post on that coming soon!
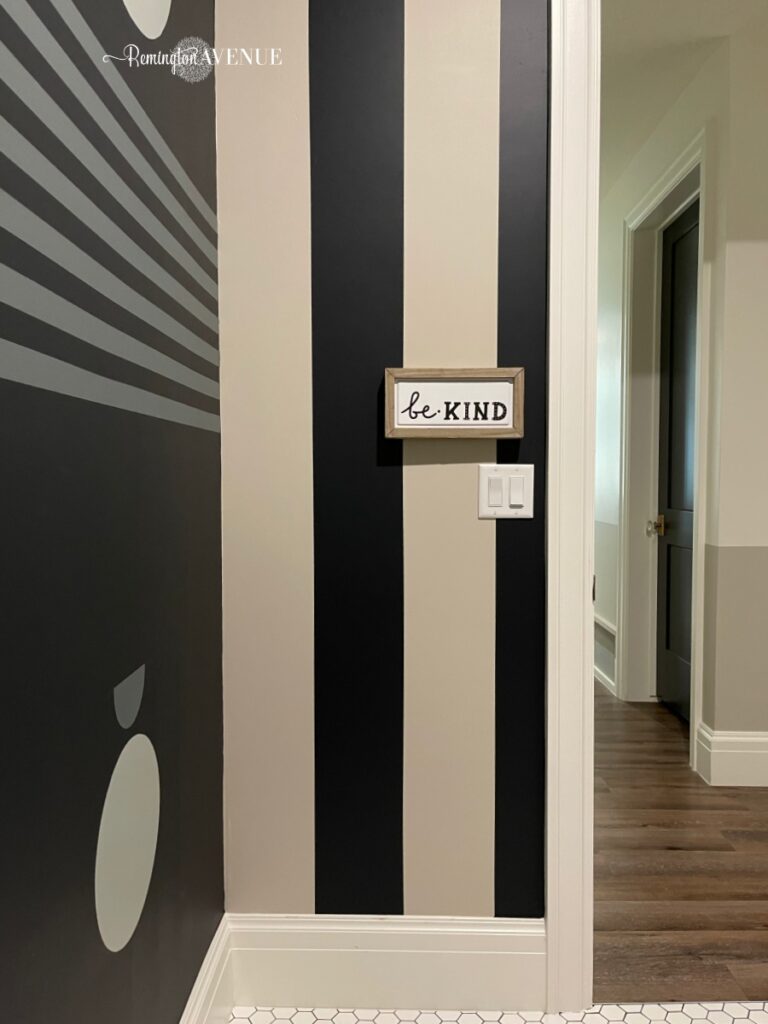
Starting in the hallway, let’s talk about chair rail height. Traditional chair rails go anywhere from 30-36” and are usually determined by actual chair sizes. But, this is a hallway and there will be no chairs here, so since my ceilings are 9ft, I took my chair rail up to 39”, which is just a touch higher than ⅓ of the wall height. Chair rails add depth and contrast to otherwise blank walls. I measured out my chair rail and used my handy laser level to tape it out straight.

Pro tip: I always use an angled brush for cutting in corners and baseboards and feather paint up to avoid abrupt roller marks.
I had a special helper for part of this project, Vinny! We have a family history of professional painters by trade: hubby’s grandfather, hubby’s dad, hubby grew up working for his dad, hubby taught me, and now I’m teaching Vin. The thing about kids is when they’re young they want to help you, but you don’t want them too. But when they’re older you want them to help you, but then they don’t want to. So that’s why I just let them start young!
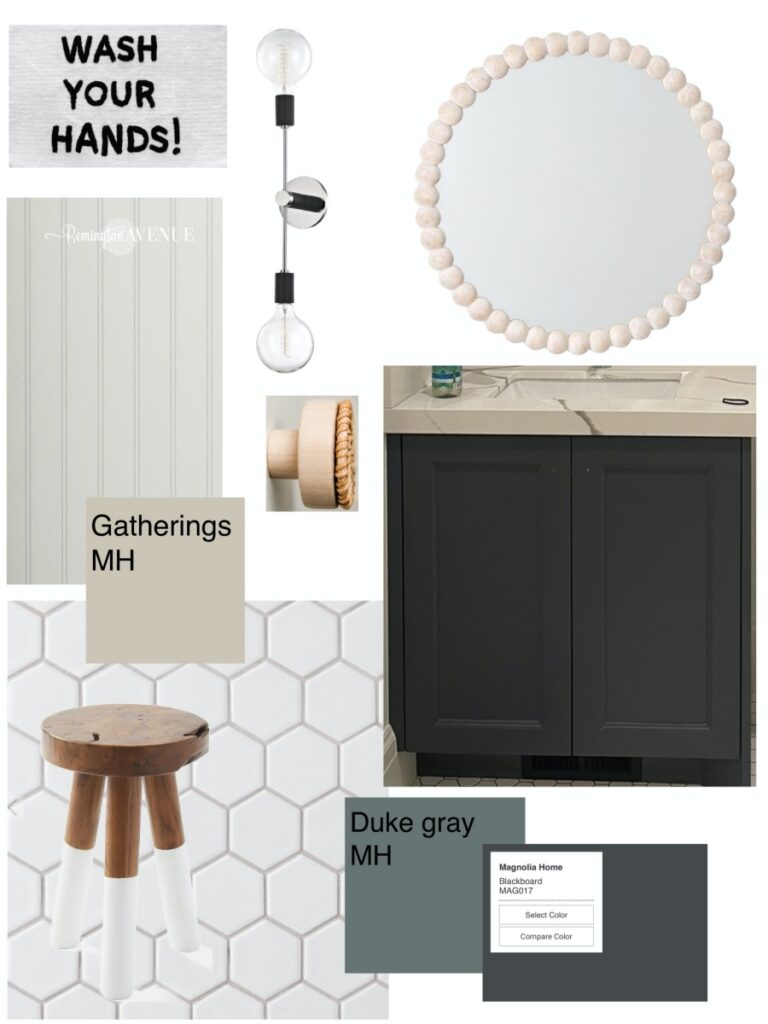
We got everything painted and did a second coat quickly! And then we pulled the tape off and had the most satisfying straight line. My tips for pulling off painter’s tape: pull it when the paint is wet, pull at a 45 degree angle to prevent peeling, and use Frog Tape, it’s just so much better. This simple painted chair rail really jazzed up this boring hallway. The paint color is “Gatherings” in eggshell by Magnolia Home, and it’s the perfect ‘greige’ color.
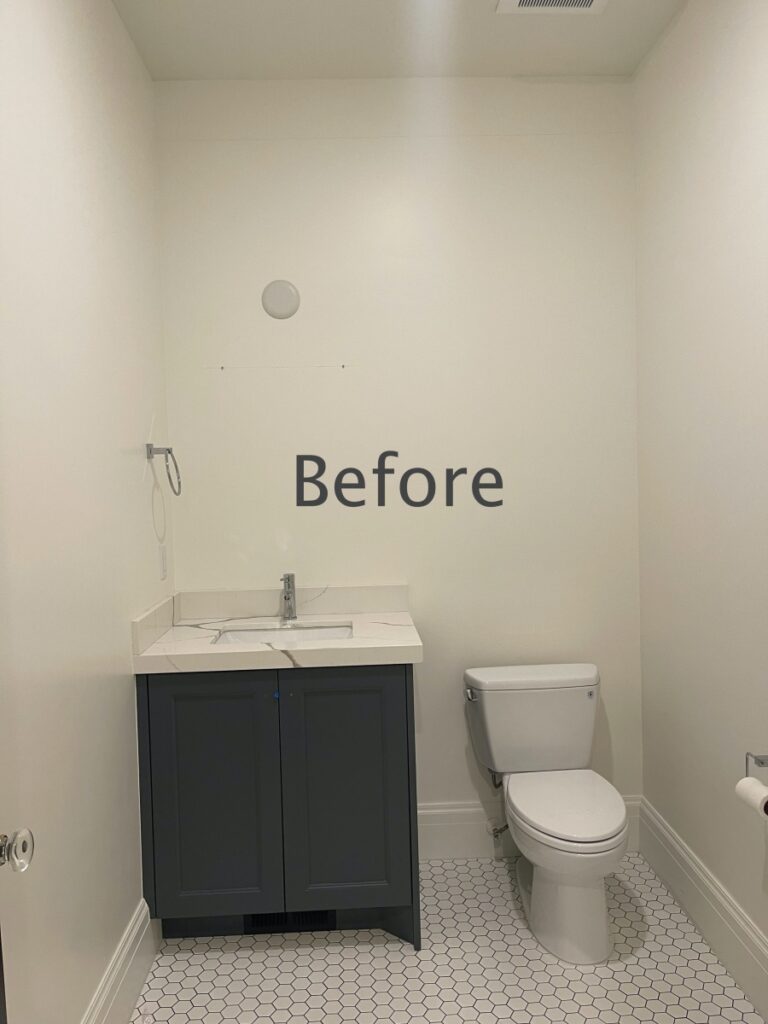
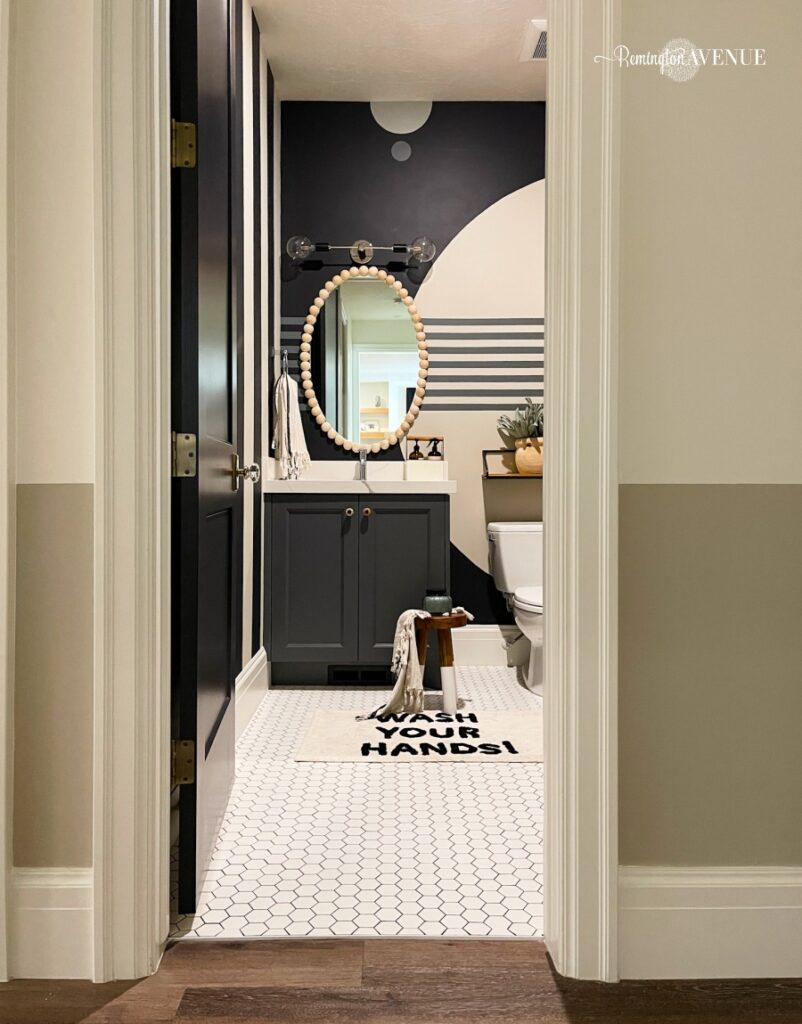
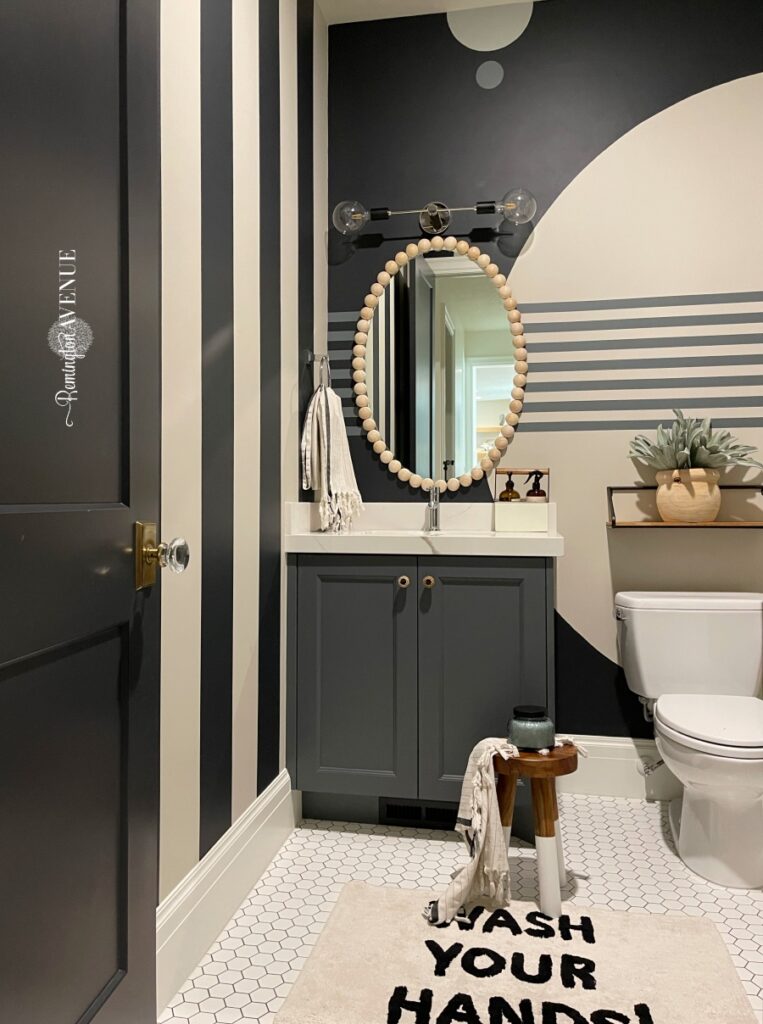
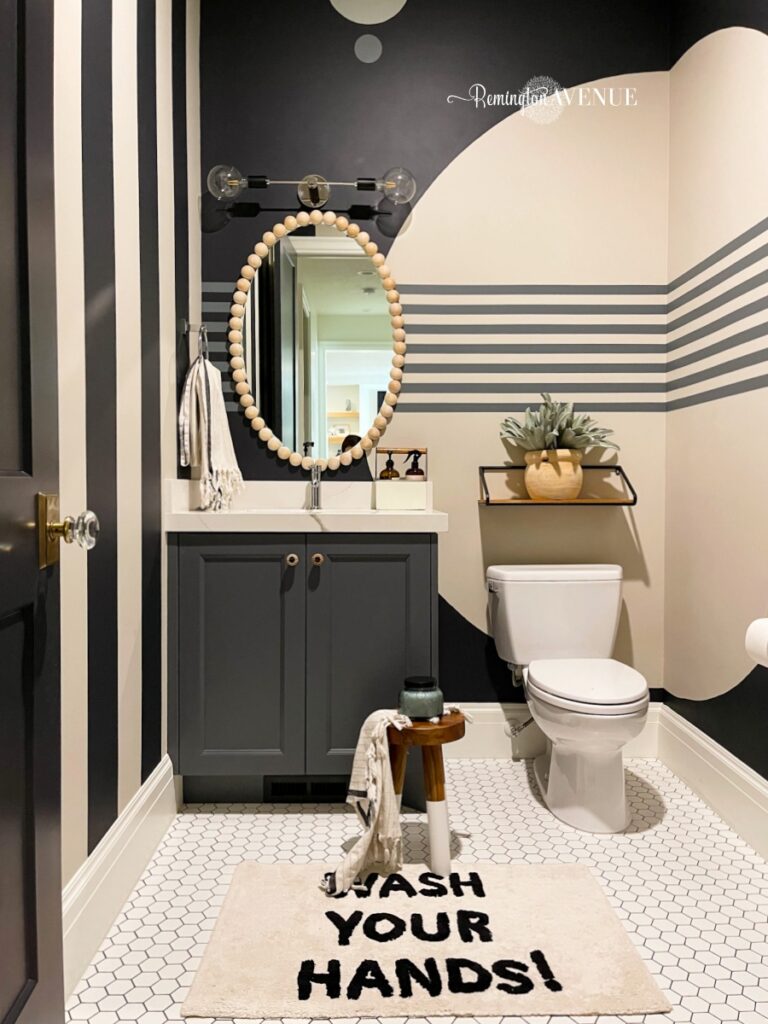
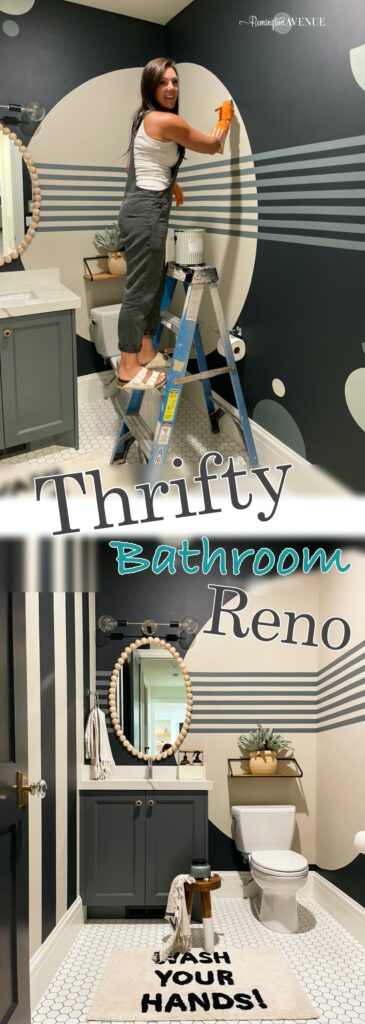
The bathroom is a blank slate and pretty much only the kids use it because it’s right by the trampoline room.
I did a fun little game with Vinny where I gave him a paper plate and a flashlight to see if he could figure out what we were doing. And he figured it out without me telling him!
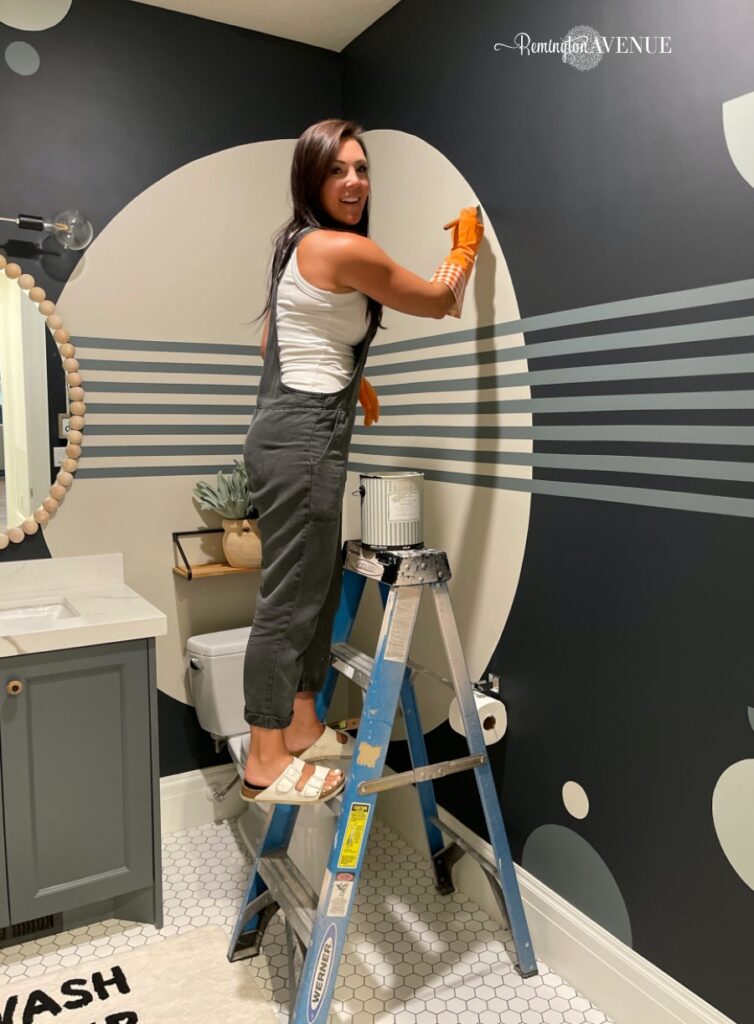
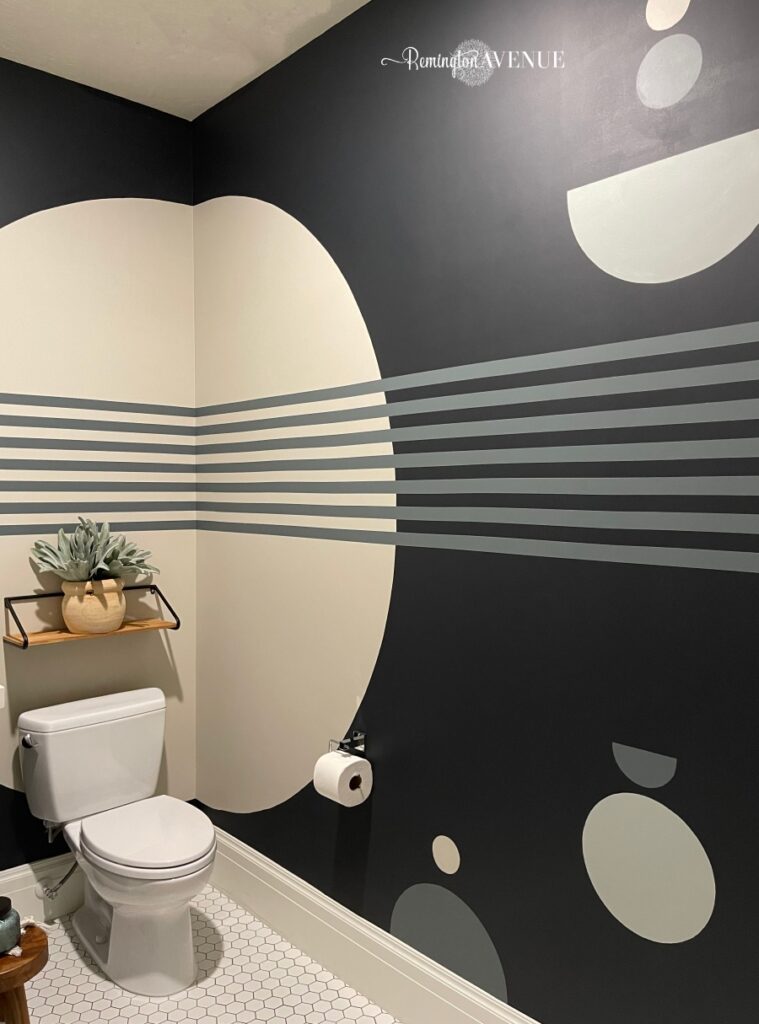
I set up the paper plate and the flashlight on my tripod to begin casting circle shadows on the wall. This is a super easy trick. Once you’re set up, all you have to do is trace the shadow line with a pencil and then follow the pencil line with an angled brush!
I left the center of the circle the original Simply White Benjamin Moore wall color, but filled in the wall space around it on both walls with a roller brush. Then I moved on to paint the other walls while I continued to ponder the circle. Sometimes I just don’t know what I’m gonna like until I do it, and to me the circle felt unfinished. So I decided to paint the inside the same color as the hallway. And truth be told, if I had known I was going to paint the circle, I would’ve done that first so I would’ve only had to paint around the circle once with the angled brush. Plus, this actually took forever this way. But I ended up liking it so much better.
Then I taped out stripes on the other wall, using Frog Tape and my laser level , because it’s just the best. Painted stripe tutorial here.
Could I have done wallpaper instead of taping out and painting stripes? Yes. But that was not my challenge to myself. My challenge was to do a full paint project and make it cool and budget friendly.
The best tip: bag your paint and rollers up and put them in the fridge, They will last for days!
The extent of my plan was the stripes and the circle. Everything after that was just me winging it. So I started out taping stripes horizontally across the circle. For my first pieces I used a laser level, but after they were lined up, I just started using my tape as a spacer. Tape spacers are a thing right?? Then I painted over them.
And if you thought I was done there, you were wrong… I went looking for more tools ie. shapes around the house. You can find tools (shapes) anywhere around the house and then trace them to use as shapes on your wall!I used kitchen bowls, trays, and cups for a variety of circle sizes.
While that dried, I pivoted to another DIY for the bathroom.
The mirror. I had a mirror in mind that I loved but it was pricey and I couldn’t get it in the size I needed. So, my brain went into DIY mode. I ordered a plain 24×36” oval mirror for $79 and 2” wood half rounds for $18. The total cost was $97 and it’s a wayyy bigger mirror. I used my Locktite quick grab to glue the wood rounds around the edge of the mirror. I applied the adhesive on half of the wood round and stuck it half on the mirror to prevent gaps.

A few finishing touches. I hung the sconce above the mirror. What’s cool about the one I found was that you can hang it vertically, or horizontally like I did. I got the silver color with these really cool oversized bulbs to go in it. It also comes in a brass/gold that is pretty too and you can easily change the style a bit depending on the bulbs you buy. And how cute is this “wash your hands” bathmat?! I thought it was perfect for a kids’ bathroom, because we all know they need a reminder sometimes. There are other styles available, plus its and washable! Use code REMINGTON10 for $10 off any purchase from the site.
All paint was Joanna Gaines Magnolia Home line. The neutral color is “Gatherings,” the dark color is “Blackboard,” the light green is “Early Riser,” and the medium blue is “Sir Drake.”
Because this is a kids bathroom right off the trampoline room, I could really do something fun and off the wall that I wouldn’t do maybe in other bathrooms or areas of my home.
The total cost of this budget friendly bathroom makeover was $248!!
$106 was spent on the mirror and supplies, and $142 went towards paint. I got 2 gallons and 2 quarts and I have lots left over too! I am so happy with how it all came together – the look is super custom…but all for less! Win!

 Add to favorites or read later
You made this bathroom fun and anyone would love to just stand and admire. Great job.
Thanks so much diana
Mysha! What happened to your Instagram page? I’m not able to find you. I clicked your Instagram icon link at the bottom of your page; shows up as “user not found”
apparently Ive been blocked for answering too many dms. Im trying to fix it
Love this and missing you on IG